After several months of rigorous beta testing, Apple officially released iOS 17 in September last year (18 September 2023). Loaded with a plethora of notable features, the latest iteration of iOS is touted to be the greatest upgrade ever. From customization to security to stability, iOS 17 seems to have covered all the bases. Moreover, the all-new OS also consists of a number of neat tweaks which may not have set the ball rolling at the keynote but they are going to play a pivotal role in shaping the overall user experience. For this very reason, I’ve dived into the details to discover the 140 best iOS 17 hidden features that are worth digging deeper into!
Best Hidden iOS 17 Features: Time to Take New Add-Ons for Test Drive!
From seamless sharing to offline maps to live stickers to super handy quick responses, iOS 17 has got more tricks up its sleeve than what you have come across in the wild.
1. New Way to Manage iMessage Apps
With iOS 17, Apple has offered a new way to manage iMessage apps. Unlike before, you can keep track of iMessage apps right from the Settings apps.
- On your iPhone, go to the Settings apps -> Messages -> iMessage Apps.
- On this screen, you should see a list of all the iMessage apps you have installed. Tap on the red delete button and hit Delete to get rid of a specific app.
- Keep in mind that deleting an app will delete it not only from iMessage but also from Home Screen.
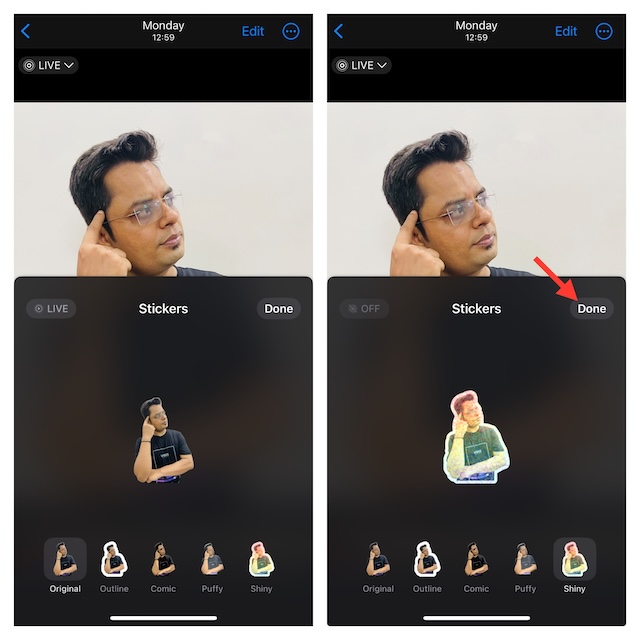
2. Send a Live Sticker in iMessage
Probably, the coolest feature of iMessage is “Live Sticker”. Well, save it for times when you wish to spice up your messaging in a unique way.
- To get started, open the Apple Messages app on your iPhone -> head over to a chat where you would like to send a hilarious sticker.
- Now, tap on the “+” button at the bottom to the left of the text field.
- After that, choose Stickers in the menu -> tap on the big “+” button -> select a Live Photo which you want to convert into a sticker.

- Then, tap on Add Sticker at the bottom.
- Next, tap on Add Effect -> choose an effect and send it.
To find out more about how Live Stickers work, check this hands-on video:
3. Annotate PDFs Using Live Stickers
This one is surely going to please you if you have a penchant for annotating PDFs on your iPhone. If you thought your PDFs needed something out of the box to look different, bring on the Live Stickers.
- Open a PDF on your iPhone -> look for the markup icon ( tiny pencil icon) -> tap on the “+” button at the bottom right corner of the screen -> Add Sticker -> choose a preferred sticker and place it at the desired spot!
4. Make Your Notes Look Eye-Catching With Live Stickers
Not just PDFs, you can deck up your notes with Live Stickers as well. If Apple’s note-taking app is your go-to destination for jotting down thoughts, this one is going to be a key addition to your roster. Whether for adding some fun elements to the mix or making your note invoke smiles, the stickers will never let you down.
5. Use Live Stickers With Third-Party Apps As Well
If you thought that the Live Stickers are restricted to only Apple apps, you can’t be more wrong. You can access all your Live Stickers in any app such as WhatsApp, Telegram, Facebook Messenger, and more which allow access to the emoji keyboard.
6. Read an Audio Message Transcription
Now, iMessage automatically transcribes audio messages. Hence, if certain words or phrases confuse you, you can read the text to have a clear understanding.
7. Automatically Notify Your Loved Ones When You Arrive at a Destination
Another equally important feature that has graced iMessage in iOS 17 is “Check In”. What makes it so handy is the ability to automatically notify your friends and loved ones when you arrive at a destination.
With the arrival of iOS 17, Apple has added a new to share and view locations from the “+” button -> Location in the menu. Moreover, whenever anyone shares a location, you will be able to view it directly within your conversation.
9. Use Search Filters in Messages
By combining multiple search filters, you can quickly narrow your search and find specific messages in the Apple Messages app. Hence, you can take advantage of the search filters to instantly find a particular message in a chat thread. Yeah, you will no longer need to dig through hundreds of messages to find particular ones.
10. Catch up and Swipe to Reply to Messages
Apple Messages app has got a new catch-up arrow that allows you to directly jump to the first message which you have either missed or haven’t seen in a conversation. What’s more, you can also swipe to the right on any message to instantly send a reply.
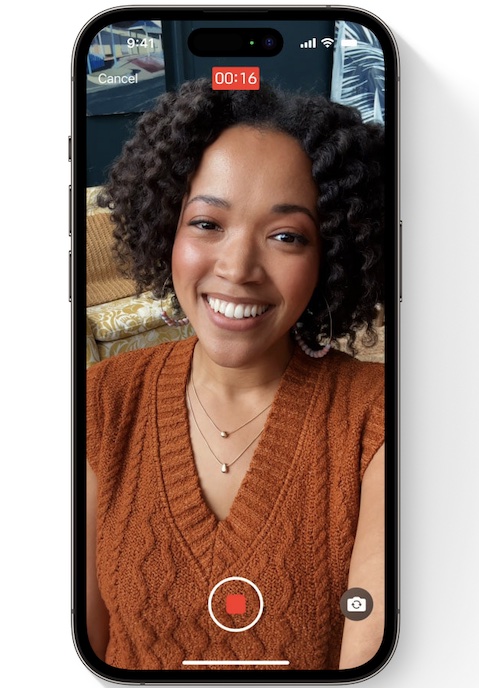
11. Leave a Message on FaceTime
If your friend or family misses your FaceTime call, you can now record a video or audio message and send it across. This is a better way to send your feelings to your dear ones even when they fail to pick up your FaceTime call.
12. React with your Hands in FaceTime
If you wished to react in a nice way while FaceTiming with your loved ones, this feature is for you. Apple’s video-calling app now lets you add a reaction that fills the camera frame with fun 3D augmented reality effects such as fireworks, confetti, hearts, and whatnot. What’s more, you can even share a reaction with just a hand gesture.
13. Use FaceTime on Apple TV
Using your iPhone as a camera, you can start a call directly from the FaceTime app on your Apple TV. Additionally, you can also hand off your FaceTime call from your iPhone to your Apple TV.

14. FaceTime on Apple TV Can Make Use of Center Stage
With iOS 17 and tvOS 17, Apple TV can now let you host a FaceTime call. But what has added more spice to this feature is the ability to use Center Stage which automatically crops and moves the video feed around to help you remain in the center of attention.
For those unaware, Center Stage leverages machine learning to smartly fine-tune the front-facing Ultra Wide camera. It is compatible with modern iPads and Mac computers connected to Studio Display.
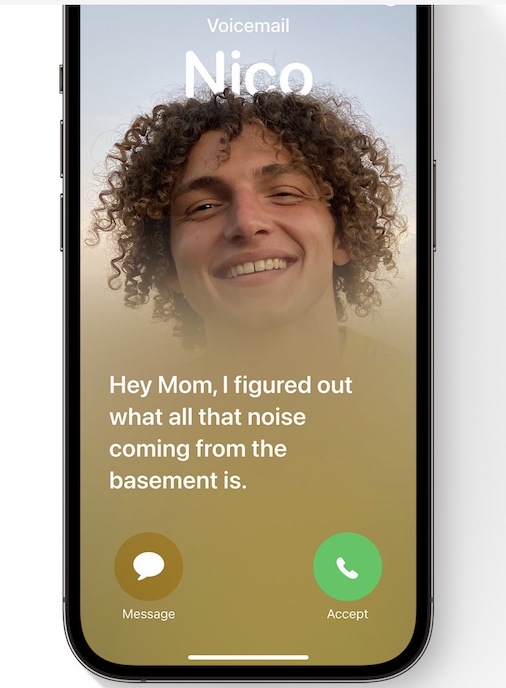
15. Enable Live Voicemail
When enabled, “Live Voicemail” lets you view a transcript of an incoming voicemail message in real-time and also answer the call before it ends.
- Navigate to the Settings app on your iPhone -> Phone -> Live Voicemail and then turn on the toggle next to Live Voicemail.
16. Live Voicemail Filters Out Spam Messages
The ability to automatically transcribe incoming voicemail messages makes Live Voicemail stands out. But if you are concerned about speech-to-text-based spam calls, let me tell you that Live Voicemail is fully equipped to filter out spam calls. Thus, you can get the most out of this noteworthy addition without having to deal with frustrating calls.
17. Enable Sensitive Content Warning
“Sensitive Content Warning” automatically detects obscene photos and videos before they are viewed on your iPhone. Moreover, it also provides expert guidance to help you make a safe choice.
- Launch the Settings app on your iPhone -> Scroll down and choose Privacy & Security.
- Now, tap on Sensitive Content Warning -> Finally, turn on the toggle for Sensitive Content Warning.
18. Create and Customize your Safari Profile
You can create a fully personalized Safari profile to keep your info like history, favorites, and tabs separate.
- On your iOS device, open the Settings app -> Safari -> Under the Profiles section, tap on New Profile.
- Now, give a suitable name to your profile and perfectly customize it.
For a more personalized experience, you should automatically share Safari website settings across iDevices connected with the same Apple ID.
- Launch the Settings app on your iPhone -> Safari -> Scroll down and then turn on the toggle next to Share Across Devices.
20. Enable Privacy Preserving Ad Measurement
With a view to doubling down on privacy, iOS 17 lets you activate “Privacy-preserving ad measurement.”
- On your iPhone, fire up the Settings app -> Safari -> Advanced.
- Under Privacy, turn on the toggle for Privacy-Preserving Ad Measurement.
21. Enable Safari WebKit Feature Flags
As you may have already guessed, this one is specifically designed for nerds. If you are one of them, you would be glad to know that iOS 17 allows you to enable a host of Safari WebKit feature flags.
- Open the Settings app on your iPhone -> Safari -> Advanced -> Scroll down to the bottom and tap on Feature Flags.
- On this screen, you will have access to a ton of Safari feature flags.
- Now, enable/disable feature flags depending on your needs and then get out of the Settings app.
22. Enable Advanced Tracking and Fingerprinting Protection
One of the most important iOS 17 security features is the ability to enable “Advanced tracking and fingerprinting protection” in Safari. If you wish to have enhanced privacy while browsing the web, this feature is for you.
- On your device, go to the Settings app -> Safari -> scroll down to the bottom of the screen and tap on Advanced.
- Under Privacy, choose Advanced Tracking and Fingerprinting Protection.
- Finally, choose Private Browsing or All Browsing.
23. Safari Shows Website Favicon in History
History in Safari now displays website favicons so that you can easily spot the history of specific websites. For those uninitiated, a favicon (short for favorite icon) is a tiny 16×16 pixel icon that is used by browsers to represent a website.
24. Quickly Activate the Safari Private Browsing Mode
Activating private browsing mode in Safari has become a pretty simple affair. To activate this mode, now, you just need to tap on the tabs icon at the bottom right corner of the screen -> swipe toward the right on the tab bar to reveal the Private tab, and tap on it.
Now, the entire interface will turn black, confirming that the private browsing mode has kickstarted. Since the private mode is protected with Face ID/Touch ID, you shouldn’t bother about the intrusion.
25. Extensions are Disabled in Safari Private Browsing Mode
To further double down on privacy, Safari automatically turns off extensions when you enable the private browsing mode. It might seem to be a bit inconvenient for folks who prefer to use extensions, but I don’t think many would complain about it. Particularly, the privacy nerds!
26. Set Private Search Engine for Safari in iOS 17 on iPhone and iPad
If you are willing to take Safari’s private browsing to the next level, you can now choose a separate private search engine – specifically for the private mode. Do not get confused! With iOS 17, you can set up a separate search engine for both general browsing and private browsing.
- Go to the Settings app on your iPhone/iPad -> Safari -> Private Search Engine -> Now, you can keep using the default search engine or select other search engines like Google, Yahoo, Bing, DuckDuckGo, and Ecosia.
27. Enable Night Mode for StandBy
StandBy automatically kicks in when your iPhone is stationary in landscape and while on power and starts showing information like widgets, a photo frame, or a clock. Notably, you can enable Night Mode for StandBy so that it can present in a red tint with low ambient lighting.
- Launch the Settings app on your iPhone -> StandBy -> turn on the toggle for Night Mode.
28. StandBy Mode Does Not Require a MagSafe Charger
While MagSafe chargers are better equipped for StandBy mode, they are not a must-have. Thus, even if you don’t have a MagSafe charger, you can use the smart display.
29. Take Control of System Settings from Spotlight Search
For years, Spotlight has been an integral part of iOS. The built-in search feature has become more versatile in iOS 17 as it can now let you take control of system settings such as Bluetooth, Cellular, and Bluetooth as well. That means you no longer need to dive into the Settings app or invoke the Control Center to toggle some of the most frequently used settings on your iPhone.
30. Customize Your Contact Photo and Poster
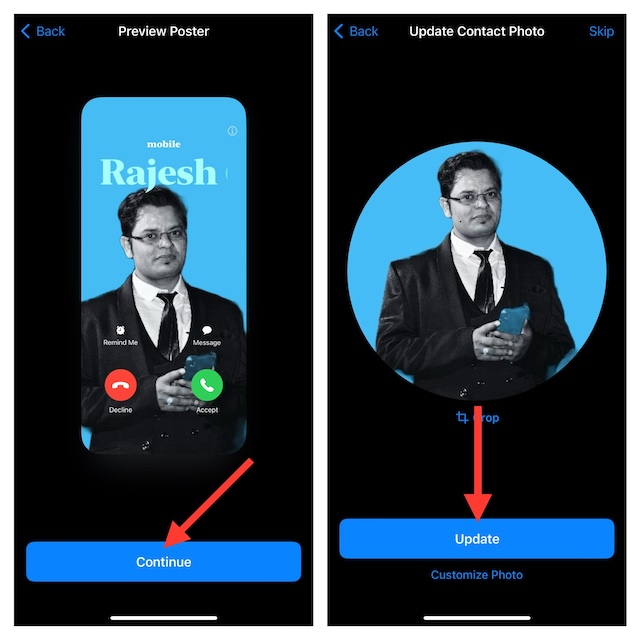
Gone were the days of the tiny thumbnail! With iOS 17, you can perfectly customize your contact photo and poster so that it can be an impressive representation of your contact information. If you are someone who has a liking for an eye-catching contact poster, this one should appeal to your taste.
- Launch the Contacts app on your iPhone -> tap on your Contact card -> tap on Contact Photo & Poster.
- Now, enter your first name and the last name.
- Tap on the Edit button and then customize the poster to your heart’s liking. Once you have customized the poster, tap on Done -> Continue -> and Update to start sharing the contact poster with others.
31. Contact Posters Work With Third-Party Calling Apps
Without an iota of doubt, the contact poster is one of the biggest highlights of iOS 17. If you have loved crafting a variety of contact posters to showcase your contact card, you would be super pleased to know that it will work with not just the stock phone app but also third-party apps like WhatsApp and Telegram.
32. Sign In To Your iPhone Using a Nearby Device
In order to make signing in to an iPhone a hassle-free experience, Apple now lets you sign in to your iPhone using a nearby iDevice or any email address/phone number listed in your account.
33. People Album in Photos App Now Recognizes Cats and Dogs
The People album in the Photos app not only recognizes people but also cats and dogs that are part of your family. So, if your pets were feeling left out, now is the time to bring them to the fold.
34. Find Out Who Locked/Unlocked the Door in the Home App
The Activity History in the Home App can let you find out who locked or unlocked the door and when. Furthermore, you can also view recent activity for garage colors, security systems, and contact sensors.
iOS 17 allows you to share AirTag or Find My network accessories with up to 5 people. Better still, everyone in the group will now be able to use Precision Finding and also play a sound to pinpoint the location of a shared AirTag.
36. Siri Can Now Handle Back-to-Back Requests
In what could enormously enhance Siri’s capability and also improve your interaction with the virtual assistant, Siri is now capable to handle back-to-back responses. For example, “Siri, text Rohan I’m out of the station. Remind me to call Katty when I get back home.”
37. Make the Most of App Shortcuts in Top Hit
Spotlight has gotten way smarter than you think. Now, it provides app shortcuts to your next action within the Top Hit. For instance, if you search for Photos, it will offer shortcuts like Recents and Favorites so that you can jump right into them without wasting any time whatsoever. Pretty nifty, isn’t it?
38. Download Maps to Use Offline
Finally, Apple Maps can let you download maps to use offline. Hence, you can view information like ratings, and hours, and also get turn-by-turn navigation for walking, cycling, riding transit, or driving.
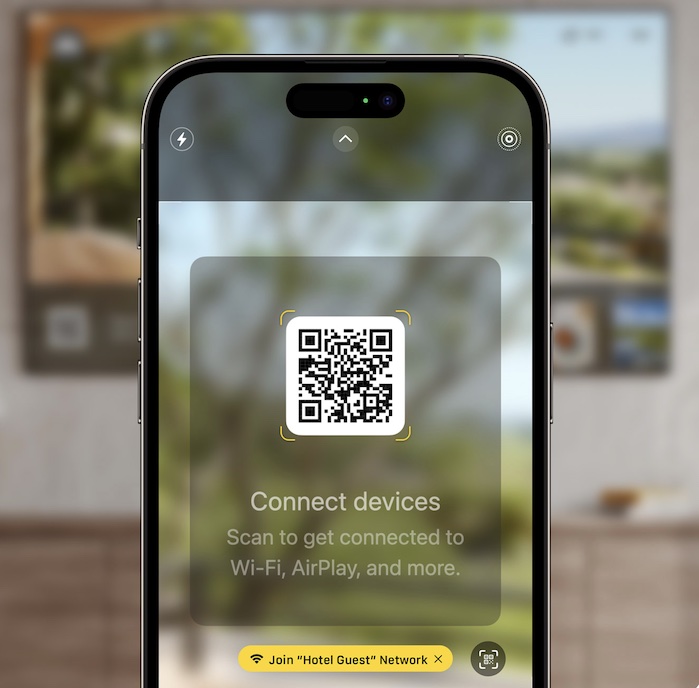
39. AirPlay in Your Hotel Room
AirPlay will now be available to use in supporting hotel rooms. Thus, you can scan the QR code on your room TV to securely share music, videos, and photos from your iPhone to the TV.
40. Collaborate on Apple Music Playlists
If you love to listen to songs with your friends, there is a good chance that this feature will win you over – right from the word go. Using the collaboration feature, you can invite your friends to join your playlist. Upon accepting the invitation everyone can add, reorder, and remove songs. Not to mention, they can also use emoji to react to the song choices in Now Playing.
41. Control Apple Music in the Car
With SharePlay, everyone can now control music in the car including the passengers who are in the back seat. Therefore, everyone will stream their favorite songs and control them.

iOS 17 has made the password-sharing process a seamless affair. That means you can share a set of passwords and passkeys with your trusted contacts with ease – without compromising on the security aspects.
43. Autofill Verification Codes Received in Mail
Apple Mail has also received a notable feature which I’m sure going to impress a large number of users. With the autofill verification codes feature, Apple Mail can let you automatically fill in one-time verification codes. Thus, you can log in without having to leave Safari.
44. iOS 17 Temporarily Underlines Autocorrect Words
To let you type faster by keeping typos at bay, iOS 17 temporarily underlines the autocorrected words so that you can easily spot what has been changed. As a result, you can revert back to the original word with just a quick tap.
Kickstarting a SharePlay session had never felt so simple! You can now just hold two iPhone devices close together to quickly start a SharePlay session.

46. Initiate the Transfer over AirDrop
Sharing content over AirDrop has become dead simple. Just bring your phones close together to kickstart the transfer over AirDrop.
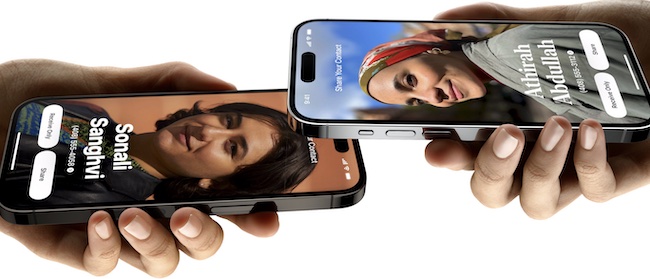
47. Instantly Swap Numbers with NameDrop
Swapping numbers has become remarkably smooth sailing!
- To get it done, all you have to do is simply hold your iPhone near someone else’s iPhone or Apple Watch to initiate NameDrop.
- After that, you can choose to share specific phone numbers, email addresses, and even your contact poster.
48. Get Fully Personalised Journaling Suggestions
Making use of on-device machine learning, iPhone smartly creates personalized suggestions of moments. With the help of these suggestions, it becomes a bit easy for you to remember the great memories and write about them based on your workouts, music, photos, and more.

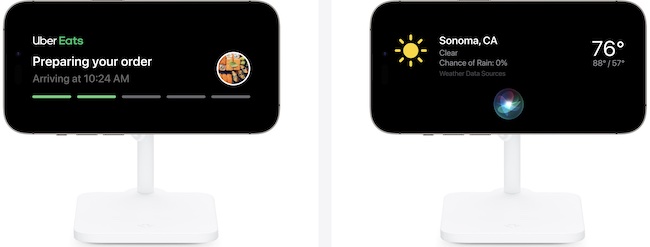
49. Show Live Activities in Full Screen
Unlike before, iOS now shows Live Activities in full screen, thereby allowing you to track things that are happening in real-time. Whether you would like to keep an eye on your upcoming ride, the progress of your food delivery, or the score of a game, the landscape viewing will make the task a more convenient affair.
50. Use Markup to Add Stickers to Your Photos, Screenshots, Documents, and More
For folks who don’t get enough of stickers, iOS 17 has opened a gateway in order to let them make the best use of bone-tickling stickers. For a change, you can now use Markup to add stickers to photos, screenshots, documents, and more.
- To get started, look for the Markup icon and tap on it. Next, choose Stickers in the menu -> choose a preferred sticker and place it at the desired spot.
51. Keep All Your Amazing Stickers in One Spot
Courtesy of the stickers drawer, iOS 17 keeps your entire collection of stickers in one spot. Therefore, you can instantly access all your Live Stickers, Memoji, and sticker packs right from one place. Yes, you don’t have to run from one end to the other to find your beloved stickers.
In what could be the cherry on the cake, iOS 17 automatically syncs all your stickers using iCloud to ensure they are always at your beck and call across iDevices linked with the same Apple ID.
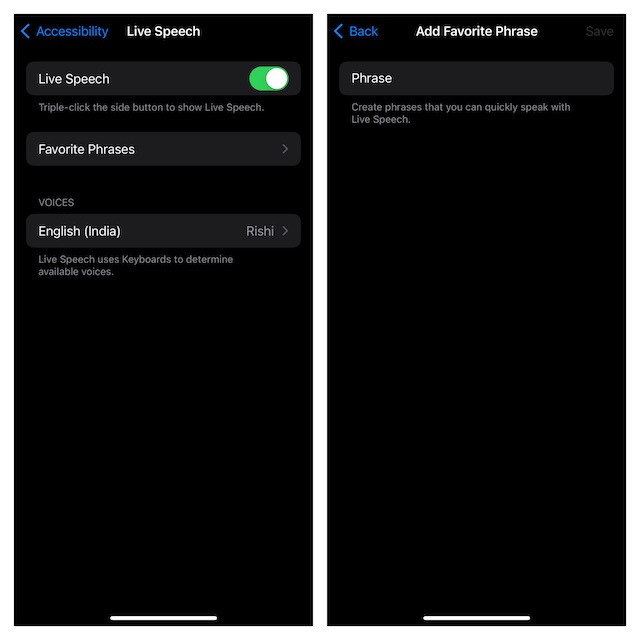
52. Enable and Customize Live Speech
Live Speech has debuted as a significant Accessibility feature with iOS 17. It uses keyboards to determine available voices.
- On your iPhone, open the Settings app -> Accessibility -> Under the Speech section, choose Live Speech.
- After that, turn on the toggle for Live Speech.
- To create phrases for Live Speech, tap on Favourite Phrases -> tap on the “+” button at the top right corner of the screen -> then enter phrases -> and hit Done at the top right corner of the screen to finish.
- Under the Voice section, tap on Language and then choose a preferred language.
- From now onwards, you can triple-click the side button of your iPhone to show Live Speech.
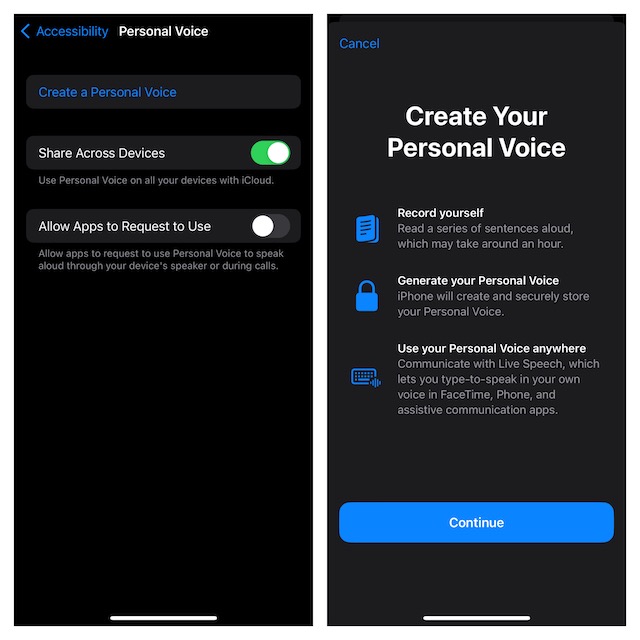
53. Create a Personal Voice
Giving the already robust Accessibility yet another major boost, iOS 17 allows users to create a personal voice.
- To bring this new Accessibility feature into action, launch the Settings app -> Accessibility -> under the Speech section, choose Personal Voice.
- Next, tap on Create a Personal Voice and then follow the instructions to generate your personal voice.
- As interesting as it sounds, you can also allow apps to request to use your personal voice.
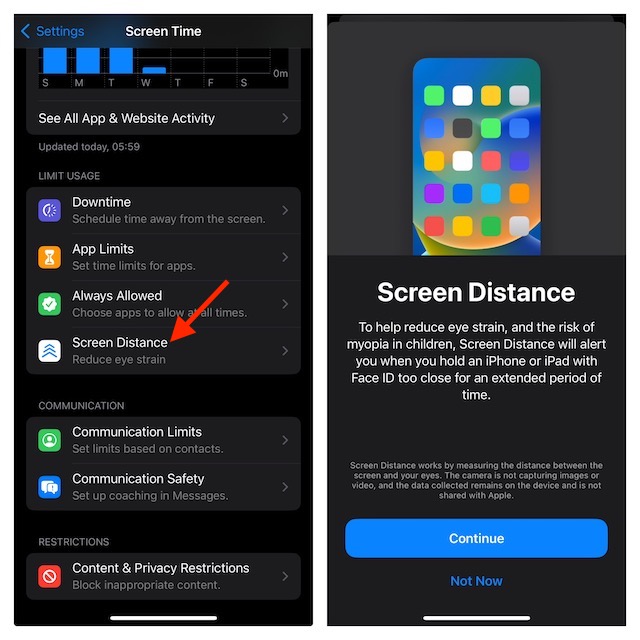
54. Set Up Screen Distance
With a view to reducing eye strain and the risk of myopia in children, Screen Time can now alert you when you hold your iPhone or iPad too close for an extended period of time. Wondering how Screen Distance works on iPhone and iPad? Well, this eye-protection feature makes use of your device camera to measure the distance between the screen and your eyes.
In case you are bothered about the security of your data, let me assure you that while Screen Distance is in action, the camera is restricted to not take photos and videos. In addition, the data collected does not leave your device and is not shared with Apple.
- Launch the Settings app on your iPhone -> Screen Time -> Screen Distance.
- Next, go ahead with the instructions to set it up.
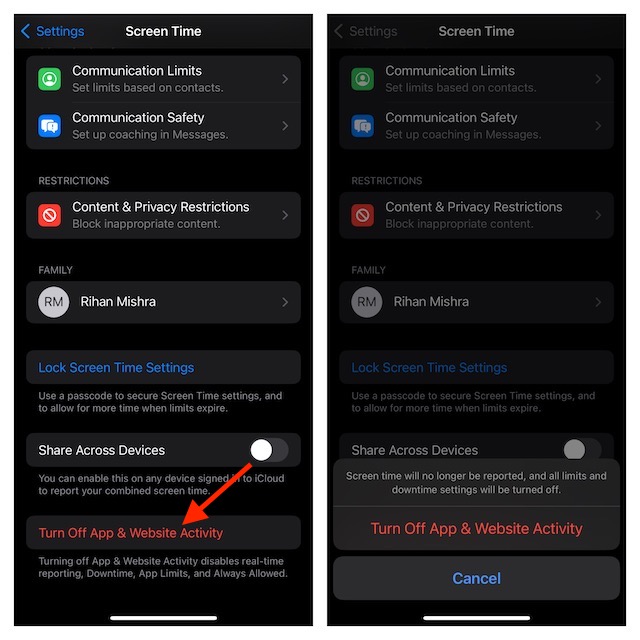
55. Turn OFF App & Website Activity
Disabling app and website activity turns off App Limits, Downtime, Always Allowed, and real-time reporting.
- Head into the Settings app on your iPhone -> Screen Time.
- Scroll all the way to the bottom of the screen -> Turn Off App & Website Activity and confirm the action.
56. Recover Accidentally Deleted Passwords
Apple has introduced a built-in password recovery tool to let you recover accidentally deleted passwords on your iPhone and iPad. Not to mention, macOS 14 has also got a native password recovery tool to restore deleted passwords on Mac. So, if you ever happen to wipe out any important secret codes, you can get them back with ease.
57. Automatically Delete Verification Codes in Messages and Mail
Now, you no longer need to manually clean up the expired verification codes in Apple Messages and the Mail app once you have inserted them using the AutoFill functionality. The Cupertino giant has added an auto-delete functionality to let you get rid of unnecessary verification codes without breaking any sweat.
58. Customize Photo Options When Sharing With Others
For enhanced privacy, you can fine-tune the photo options to hide metadata like location and captions when sharing images with anyone. If you are a privacy-conscious person who prefers to have an additional layer of shield, this feature will please you no end.
59. Lock White Balance in Your iPhone Camera
Well, this one is primed for shutterbugs. Unlike before, you can lock the white balance on your iPhone camera to record video with better control. To bring this new add-on into play, navigate to the Settings app on your iPhone -> Camera -> Record Video, and then turn on the toggle next to Lock White Balance.
60. Add Pronouns to a Contact Card
Apple Contacts app has got some notable features in iOS 17. However, the one that has gone a bit under the radar is the ability to assign pronouns to a contact card. Just open a contact -> tap on Edit -> Add pronouns -> choose language and then select the preferred pronoun.
61. Set and Track Multiple Timers at Once
Whether you are a pro-multi-tasker or have the habit of doing multiple tasks simultaneously, there is a good chance you would like to have the flexibility to set multiple timers at once. As iOS has made it possible to keep a tab on timers right from the iPhone Lock Screen, you can stay in sync and get your work done faster.
62. Use One-Tap Crop Functionality to Instantly Crop a Photo
Cropping a photo has become dead simple in iOS 17 thanks to the introduction of a one-tap crop button. If you ever want to get the most out of this handy feature, just zoom in on any image and hit the Crop button to get rid of the unwanted portion or fix the aspect ratio.
63. Link Apple Notes
Unlike before, you can now link notes inside a note. Whether you want to connect ideas, add references, or enhance the credibility of any statement, hyperlinking comes into play Better still, it also enables you to keep deviations at bay without leaving any pivotal points.
64. Save Voice Messages to Voice Memos
Interestingly, iOS 17 has made it possible to save voice messages to Voice Memos. If you ever want to save any sent or received voice messages for reference or keepsake, you can make use of this handy feature. All the saved voice messages are neatly labeled so that you can find the specific ones without any confusion whatsoever.
65. Insert Contacts and Passwords Directly into Messages
Contact and password sharing has become incredibly simple in iOS 17, thanks to the implementation of a new “Insert” functionality. You can now drag any contact or saved password and drop it directly into a conversation thread in iMessage.
66. Enable and Customize Crossfade in Apple Music
While listening to Apple Music, did you ever get annoyed with the unwanted silence between songs? If you are nodding in the affirmative, you would be glad to know that Apple has finally offered a way to enable crossfade in Apple Music. Moreover, you can also choose to fine-tune the length of the crossfade transition to ensure it’s always in line with your taste.
67. A Better Way to Rearrange iMessage Apps
The redesigned Messages app has offered a better way to rearrange iMessage apps. Head into the Messages app -> open a chat -> tap on the “+” button -> More. After that, drag an iMessage app and drop it at the desired spot. Repeat it to perfectly organize your iMessage app drawer.
68. Log Your State of Mind
Mental Wellbeing is undoubtedly the biggest highlight of the Health app in iOS 17. Notwithstanding, this feature hasn’t received as much spotlight as it should have. Using this health-centric feature, you can log your state of mind and keep a tab on your emotions and moods. Thanks to the in-depth insight, you can address the factors that cause distress and also be able to share the data with your doctor.
69. Delete Specific or Entire Mental Health Data
To ensure your logged data remains in your control, the Health app has offered a neat way to let you delete specific or entire logged Mental Wellbeing data at once. Whether you want to shield your privacy or just wish to get rid of the clutter to retrieve precious storage, this feature can come in handy.
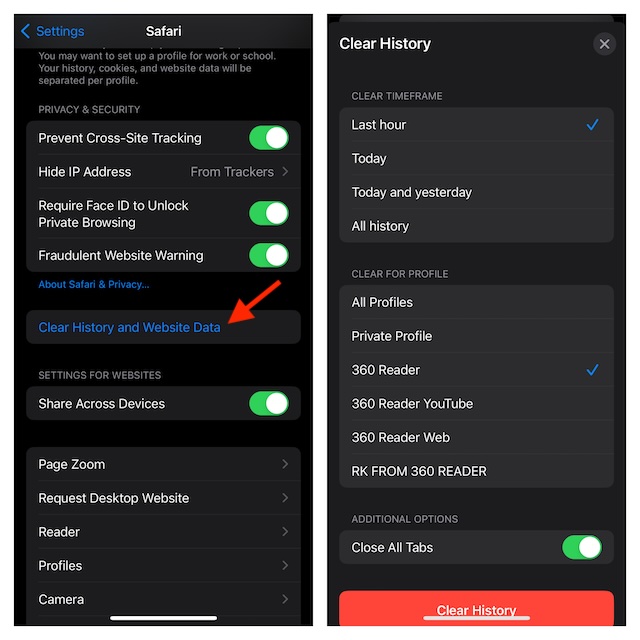
70. Better Way to Clear Safari History
Though iOS has provided a simple way to delete Safari history for a long time, it lacked the functionality to get rid of the browsing history of a specific duration. With iOS 17, you can choose to wipe out the Safari history of the last hour, today, today, and yesterday or the entire history at once. That’s not all, you also have the option to close all tabs and clear the history of a specific Safari profile.
- Head into the Settings app on your iPhone or iPad -> Safari -> Clear History and Website Data.
- After that, select the specific duration as well as the Safari profile, which history you want to clean up.
- Finally, hit Clear History and you are done!
71. Reset Hidden Siri Suggestions
In iPadOS 17 and iOS 17, if you don’t find a specific Siri suggestion helpful, you can hide the suggestion in order to keep it at bay. Later, if you ever want to bring all the concealed suggestions back into action, you can reset the Siri suggestions at will on your iPhone or iPad.
72. Check Moon Info, Moonset and Moonrise Times, and Moon Phase Calendar
In iOS 17, you can view all kinds of moon data in the stock weather app on your iPhone. Interestingly, the moon data consists of the current phase, moonrise and moonset times, moon phase calendar, full moon and new moon dates, illumination, and more. Not just that, the moon data is also designed to dynamically change when you slide through different hours of the day or tweak the time.
73. Automatically Pause GIFs on the Web and in Apps
If you are not a fan of animated images and find them nothing but distractions, you can choose to automatically pause them not only in Safari but also in other apps. You can leverage this hidden Accessibility feature to speed up your browsing experience, cut down unnecessary battery consumption, and also save some precious data.
- Go to the Settings app on your iPhone -> Accessibility-> Motion -> Turn off the toggle next to Animated Images.
74. Clear All Recently Closed Tabs
By default, Safari displays the recently closed tabs right on the start page in order that you can easily access any tabs. If you don’t want those useless tabs to remain on the start page, you can now clear them all with just a click. After you have closed tabs, make sure to tap on the Clear All button to get rid of them.
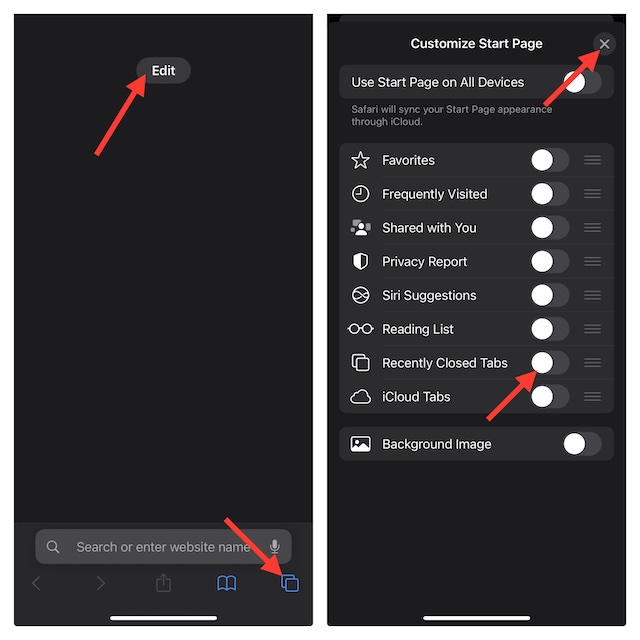
75. Block the Recently Closed Safari Tabs from Showing Up at the Start Page
If you would rather want to entirely block the recently closed tabs from showing up at the start page, there is a hidden way to get it done as well.
- Open Safari on your device -> tap on the tabs icon -> tap on the Edit button.
- After that, turn off the toggle next to Recently Closed Tabs -> hit the ‘X” button.
- Going forward, the recently closed tabs won’t appear on the Safari start page.
76. Send Recurring Payments With Apple Cash
iOS 17 has come up with a much better way to let you send recurring payments via Apple Cash. And that too by using iMessage!
Using this all-new recurring payment feature, you can set up a payment schedule for a friend who will automatically receive payments depending on your custom schedule.
- Navigate to the Messages app -> conversation thread -> tap on the “+” button at the bottom -> choose Cash in the menu and then set up the recurring payments as per your needs.
77. Close All Tabs While Clear Safari History
In what could be a handy privacy feature for many, iOS 17 provides a straightforward way to close all tabs while cleaning up Safari history.
- On your iPhone, open the Settings app -> Safari -> Safari History and Website Data -> choose the time frame -> select the profile -> turn on the toggle next to Close All Tabs and hit Clear History.
78. More Accurate Search Recommendations
Safari has vastly improved in terms of offering more relevant and accurate search recommendations. So, the next time you activate the browser to search for something, make sure to take a look at the search suggestions to speed up your browsing experience.
79. Remove Trackers from Webpage URLs in Private Browsing Mode
In the private browsing mode, Safari can now automatically remove trackers from URLs. Earlier, data trackers could exploit a loophole to integrate tracking tags at the end of a URL to keep a tab on the traffic source. The Apple browser has found a way to block this exploit. That means the private browsing mode in Safari has become even better to shield your privacy.
80. When Uploading Photos and Videos, Remove Metadata
Do you know that your photos and videos contain your personal information like the location where they were captured, device camera settings, captions, and more? When you upload your images to a website, your personal information also gets shared. Thankfully, you can now remove the metadata like location and captions from the images/videos before uploading them to a website.
81. Auto-Fill Mail-Received Verification Codes
If you have auto-filled verification codes via the Apple Messages app on your iPhone, you would know how seamless it feels to authenticate. Apple has brought this very feature to the stock mail app as well. That means you can now AutoFill verification codes sent to the Apple Mail app on your iDevice. Since the latest iteration of iOS also wipes out expired verification codes, you don’t have to worry about useless codes cluttering your inbox as well.
82. Turn Live Photo into Video from Recently Deleted Folder
The Recently Deleted folder has become better equipped to let you manage the already dumped photos and videos. One of the notable addition to this folder is the ability to convert any Live Photo into a video.
- Head into the Photos app -> Albums -> Recently Deleted -> Tap on the Select button at the top right -> select the Live Photo in question -> tap on the menu button at the bottom right corner of the screen -> choose Save as Video in the menu.
83. Look Up Food
Visual Look has become even better in iOS 17. The stock photos app can now identify recipes for similar dishes as soon as meals have been recognized in an image.
Interestingly, the moment the Photos app detects an image of food, it shows a knife and a fork icon at the bottom of the screen. To help you instantly dive into the details and also learn how to cook the recipes, the app also includes direct links to recipe websites.
84. Visual Look Up for Auto Symbols
Another vivid example of the much improved Visual Look Up in iOS 17 is the ability to identify automobile emblems on vehicle dashboards. Once the Photos app recognizes one or more symbols in an image, it shows the icon’s name and a brief description of what it means. Furthermore, it also includes links to let you find out more information related to the symbols.
85. Straighten Up Your Shooting Angle
Thanks to the inclusion of a new camera-level feature, you can now straighten up your shooting angle with utmost ease. And that too before you even hit the shutter button when capturing straight-on images.
For enhanced control, Apple has separated the camera level feature from the grid mode and also added a horizontal level so that you can snap straight-on shots with precision.
- To bring this hidden camera feature into action, go to the Settings app on your iPhone -> Camera -> turn on the toggle next to Level.
86. Lift a Subject from the Background
Introduced in iOS 16, the background remover tool has been highly appreciated for its neat functionality. In iOS 17, Apple has integrated a “Look Up” feature to its profile so that you can search for more details about the subject you have lifted. If curiosity drives you to find out more details about a person or thing, just hit the Look Up button.
87. Pause a Video and Search for Details
While watching a flick or a TV show or a short clip you have come across in the wild, you can pause it on literally any frame and search for more details on a subject. Whether to sort out any confusion or discover intriguing details about a subject, this nifty feature will come into the picture.
88. Time to Keep Track of Your Beloved Pet
iOS 17 has brought along a pet tracking feature that you can use to keep a tab on your beloved pet and its behavior. When you are away from home and want to check what your cat is up to or how is your pup spending its time, you can get the most out of the native pet tracking functionality.
89. Redesigned Calling Interface
iOS 17 has revamped the calling screen, making it look modern and a bit more accessible. Apple has put the buttons slightly lower, possibly to let you receive calls or respond with text with one hand.
90. Tweak the Clock Font Size on Lock Screen
Lock Screen customization was the big-ticket feature of iOS 16. Courtesy of plenty of customization features, it made crafting iPhone Lock Screen a fun-filled affair. iOS 17 aims to take this experience to the next level. Having the flexibility to tweak the clock font size right from the Lock Screen is noteworthy as it lets you get into the business without having to dig into the customization setting.
91. Live Album Art in Apple Music
Clearly inspired by Spotify’s canvas, Apple Music on iOS 17 features live album art. The live album art looks stunning and can go a long way in amping up your music time.
92. Magnified Text is Much Larger
For a more improved text readability experience, iOS 17 shows a much larger magnified text. Thanks to the enhanced magnification, when you move the cursor at a character, you will larger text.
While this accessibility feature is primarily designed for people who have vision issues, anyone can take advantage of this neat improvement for better legibility.
93. Brand New Wallpapers
iOS 17 has come up with several new wallpapers to ramp up the customization game. The ones that have won my attention are Astronomy and Kaleidoscope wallpapers. What’s more, Astronomy wallpaper lets you choose from all eight planets.
94. Set 4:3 or 1:1 Aspect Ratio Images as Wallpapers
iOS 17 has made it possible to set 4:3 or 1:1 aspect ratio images. If an image doesn’t fit the Lock Screen, you can use the zoom in/out gesture to fix the image. On top of all, it also elegantly fades the color of the wallpaper so that it can look more pleasing to the eyes.
95. Reuse Old Passcode
Apple has offered a secure way to let you reuse old passcode for up to three days. When you change a passcode on your iPhone, you get up to 72 hours to use the old one. From what I can tell fathom, it can be a lifesaver for folks who are a bit forgetful.
- To find out how this feature works, go to the Settings app on your iPhone -> Face ID/Touch ID & Passcode -> Expire Previous Passcode Now.
- If you input an incorrect passcode on your iOS device, tapping on “Forgot Passcode?” reveals the “Try Passcode Reset” option. When you tap on the “Try Passcode Reset” you get the option to enter the previous passcode and create a new passcode.
96. Interactive widgets
Though the Home Screen widgets arrived in iOS 14, they were not interactive and could just show the related information. Fast forward to iOS 17 and Home Screen widgets have become interactive, thereby allowing you to tweak the functions of widgets right from the Home Screen. For example, you can play/pause Apple Music by just tapping on its widget on the Home Screen.
97. Undo Move App on iPhone Home Screen
For the rare occasions when you happen to accidentally move an app to another Home Screen page or drop it into a folder, you can make use of this hidden iOS 17 feature to undo the action. Simply, shake your iPhone and then hit Undo Move App to undo the action.
98. Modified Photo Editing Interface
The Photos app for iOS sports a modified photo editing interface. Comparatively, it looks more intuitive now. Due to the tweaking, the “Cancel and the “Done” buttons now appear at the top. The text descriptions have made the functionality of all the key editing icons including filters, adjust, and crop clearer.
99. Modified Interface of Recently Deleted Folder in Photos App
The “Recently Deleted” folder in the Photos app has also got some tweaking.
- Now, when you tap on the Select button inside the “Recently Deleted” folder, a triple-dot menu appears at the bottom right corner of the screen. Tapping on this menu shows the Recover All and Delete All options.
- But when you select a specific image and tap on the menu button, it shows the Recover and Delete buttons.
100. Stop Sharing Your Contact Poster With Anyone – Automatically
Creating stunning contact posters and sharing them with others is great. However, if you don’t want to share your customized contact card with certain people, you can force the phone app to ask for your permission before sharing the contact card.
- Go to the Contacts app on your iPhone -> contact card -> Contact Photo & Poster -> Under the Share Automatically section, choose Always Ask.
101. Lock Safari Private Browsing Mode
When you want to browse the web with trusted privacy, Safari’s private browsing mode comes into play. But what’s the point of private browsing if you can’t keep unauthorized access at bay? For this very reason, iOS 17 lets you lock the private browsing mode in Safari with Face ID or Touch ID.
- Head into the Settings app on your device -> Face ID/Touch ID & Passcode -> navigate to the Privacy & Security section.
- Then, turn on the toggle next to Require Face ID/Touch ID to Unlock Private Browsing.
102. Manage Your Mac’s Desktop Widgets Right from iPhone
With macOS Sonoma, Apple has launched desktop widgets so that you can deck up your Mac’s desktop with eye-catching widgets. Aside from amping up the customization game, it can also let you keep a tab on the essential information related to an app right from the desktop.
But did you know that all of your iPhone widgets are automatically synced with your Mac for a seamless experience? And you can manage your desktop widgets right from your iOS device.
103. Convert a Live Photo into a Static Sticker
Converting a Live Photo into Live Stickers is great. But if you prefer to go classic and want to use a static sticker, there is a hidden way to get it done as well.
- Simply, long press on a Live Photo -> tap on Add Sticker -> Add Effect -> choose the desired effect, and tap on Done to confirm.
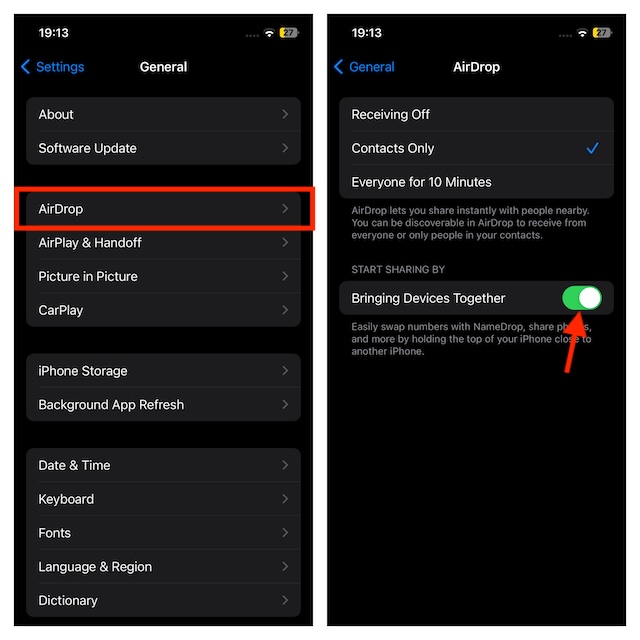
104. Enable/Disable NameDrop
Thanks to a recent update, Apple has included “a Start Sharing By” section in the AirDrop menu in Settings. This section features a toggle called “Bringing Devices Together,” that allows you to manually enable/disable NameDrop on your iPhone. With NameDrop enabled, you can hold your iPhone near someone else’s iPhone or Apple Watch to quickly share contact information.
- Navigate to the Settings app on your iPhone -> General -> AirDrop -> ensure that the toggle next to “Bringing Devices Together”.
105. Tweaked Way to Automatically Verify CAPTCHAs
With iOS 17, Apple has renamed the “Password & Security” setting as “Sign-In & Security. Hence, the option to automatically bypass the CAPTCHAs has gone inside this new setting.
- Dive into the Settings app on your iPhone -> your profile -> Sign-In & Security -> scroll down to the bottom of the screen and then make sure that the toggle next to the” Automatic Verification” is turned on.
106. Standby Notification Preview Toggle
In the latest update, Apple has introduced a feature called “Show Preview on Tap Only,” which enables Standby to conceal the preview of a notification until you tap on it. Perfect for folks who want to take all the possible measures to safeguard their privacy.
- On your iPhone, head over to the Settings app -> StandBy and then turn on/off the toggle next to Show Preview on Tap Only.
107. Enable/Disable Depth Effect for Your Contact Poster
With the AI-powered “Depth Effect” enabled, the subject of an image takes center stage while the time reading takes the back seat. Hence, the subject looks more appealing. If you have loved using this dramatic effect for your iPhone Lock Screen wallpaper, chances are you would appreciate using the Depth Effect contact poster as well.
- On your iPhone, open the Contacts app -> contact card -> Contact Photo & Poster -> tap on the Edit button at the bottom of your current contact poster.
- After that, tap on the “+” button at the bottom right corner of the screen -> Photos -> choose a Portrait image from your photo library -> tap on the triple-dot icon at the bottom right corner of the screen and select Depth Effect.
- Tap on Done at the top right to confirm.
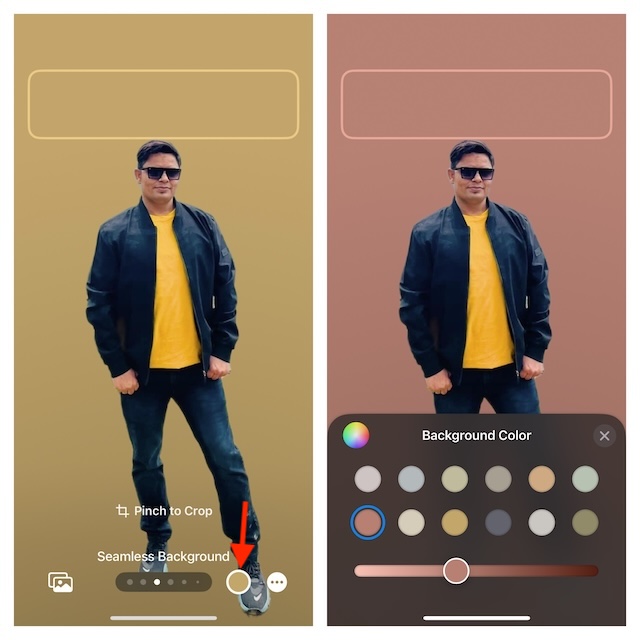
108. Change the Background Color of the Contact Poster
Creating a stunning contact poster becomes a pretty straightforward affair when you get to choose from a variety of background colors.
- Visit the Contacts app -> contact card -> Contact Photo & Poster -> Edit button at the bottom of the current contact poster.
- Now, find the contact poster in which background you wish to change -> tap on the Customize button at the bottom -> choose Poster in the menu. If you wish to tweak the background of a new contact poster, hit the “+” button at the bottom right corner of the screen -> Photos -> select an image from your camera roll.
- Then, tap on the background color icon at the bottom.
- Then, use the color slider to perfectly adjust the color and hit Done at the top right to finish.
109. Use Solid Colors As Contact Poster Wallpaper
You can also use solid colors to give your contact posters a more fascinating look.
- Open the Contacts app -> contact card -> Contact Photo & Poster -> Edit button at the bottom of the contact poster. -> “+” button at the bottom right corner of the screen -> Photos.
- Now, choose an image from your camera roll -> tap on the background color icon at the bottom -> choose a solid color (subject to availability) -> adjust it using a slider, and hit Done at the top-right to confirm.
110. Change Contact Photo
Changing the contact photo is a bit different in iOS 17.
- Fire up the Contacts app -> contact card -> Contact Photo & Poster -> Edit button at the bottom of the contact poster.
- After that, tap on the Customize button -> Contact Photo -> tap Choose a Different Photo -> tap on Photos/Memoji/Monogram/Emoji.
111. Style Your Contact Poster With Eye-Catching Filters
When you have a ton of awesome filters at your disposal, giving a more attractive look to your photo becomes quite an easy task. Guess what, iOS 17 offers a bunch of cool filters to let you spruce up your contact poster so that you can flaunt it in style.
- Launch Contacts app -> contact card -> Contact Photo & Poster -> Edit button -> “+” button at the bottom right corner of the screen -> Photos.
- Next, pick an image from your camera roll.
- After that, swipe left/right to cycle through the available filters and hit Done at the top-right to confirm.
112. Customize the iPhone Clock Style in the StandBy Mode
Should the StandBy mode ever seem to be losing charm, tweaking the iPhone clock style to your liking can liven up the smart display for a more personalized appearance.
- In the StandBy mode, swipe toward the left (twice) from the right edge of the screen to bring up the clock face.
- Then, long-press on the screen and hit the tiny white circular icon -> choose the desired clock style -> tap on the X button, and then hit the Done button at the top right to finish.
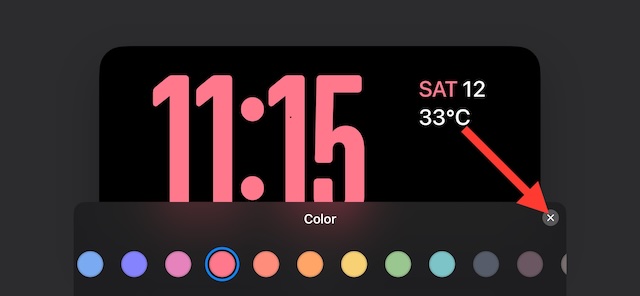
113. Change the Color of the iPhone Clock in StandBy Mode
When you have a ton of different color combinations to choose from, you don’t have to settle with a pale or dull hue; especially when you want your StandBy to make an adorable match with your mood.
- Once you have activated the StandBy mode, swipe toward the left from the right edge of the screen to access the clock face.
- After that, long-press on the screen and tap on the small white circular button -> swipe left/right on the color swatches and select the preferred color -> tap on the X button.
- Be sure to tap on Done to confirm the cooler for the iPhone cooler.
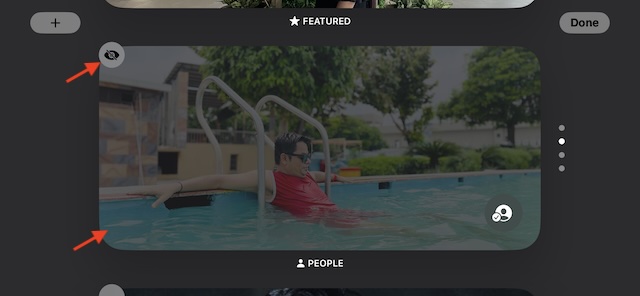
114. Show or Hide Photo Album in the iPhone StandBy Mode
To ensure StandBy mode always shows only your favorite images, you would like to perfectly customize the photo screen.
- After you have invoked the StandBy mode, swipe toward the left from the right edge of the display to reveal the photo screen.
- Long-press on the image -> swipe up or down to find the photo album you want to hide -> tap on the “Eye” icon at the top left corner of the screen to hide it.
- Next, hit the Done button to conceal this photo album from the photo screen of the StandBy mode.
115. Add or Remove a Photo Album from Photo Screen in the StandBy Mode
Even though adding the desired photo album to the StandBy mode is a piece of cake, not everyone may find it plain sailing.
- Once the StandBy mode has got activated, swipe toward the left from the right edge of the iPhone’s screen to go to the photo screen.
- Then, press and hold onto the image to enter the editing mode -> tap on the “+” button at the top left corner of the screen -> choose the preferred album from your photo library.
- To remove any album, tap on the “-“ button at the top left corner of a specific album.
- After that, do not forget to hit the Done button to confirm.

116. View Song Credits in Apple Music
Viewing song credits in Apple Music has become a reality. As a music lover, you would appreciate this new add-on as it will let you check the names of everyone who has contributed to a song.
- In Apple Music, head over to the song in question -> tap on the triple-dot icon next to it -> View Credits.
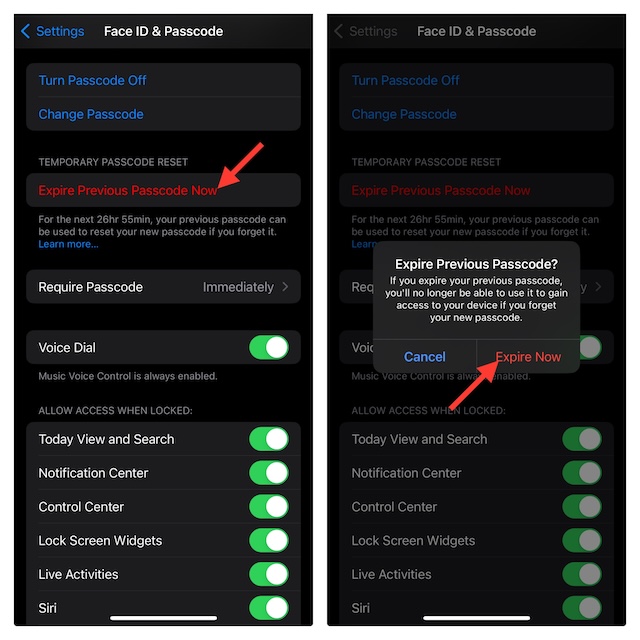
17. Expire Previous Passcode
As you know iOS 17 allows users to reuse the previous passcode for up to 72 hours after you have set up a new passcode. That means if you ever forget the new passcode, you can rely on your precious passcode to save you. However, if you think that someone might exploit your old iPhone passcode, you can choose to expire the previous passcode.
- To do so, head over to the Settings app -> Face ID/Touch ID & Passcode -> Expire Previous Passcode Now and confirm the action.
18. Turn On “Motion to Wake”
On the top-tier iPhone models (including iPhone 14 Pro and iPhone 14 Pro Max), StandBy automatically disables the display when it notifies that you are not looking at the display. Smartly integrated with the StandBy’s Night Mode exists a new feature called “Motion to Wake” that automatically brings the display into action at night as soon as motion is detected. Hence, your glanceable information never seems to lose your sight without draining your battery.
- To activate it, launch the Settings app -> StandBy -> Night Mode -> turn on the switch next to Motion to Wake.
119. Customize Action Button
On the iPhone 15 Pro and 15 Pro Max, Apple has ditched the age-old mute switch in favor of the Action button. You can use this super handy button to not only instantly access many features but also launch your favorite apps and trigger shortcuts.
- To customize the Action button, open the Settings app -> Action and then do the needful.
120. Enable/Disable the Silent Mode Using the Action Button
I don’t think many folks are aware of the fact that the “Action” button on iPhone 15 Pro/15 Pro Max still enables/disables the ringer by default. So, if you miss the iconic “Mute” switch on your iPhone 15 Pro, you can set the Action button to turn on/off the ringer with a long press.
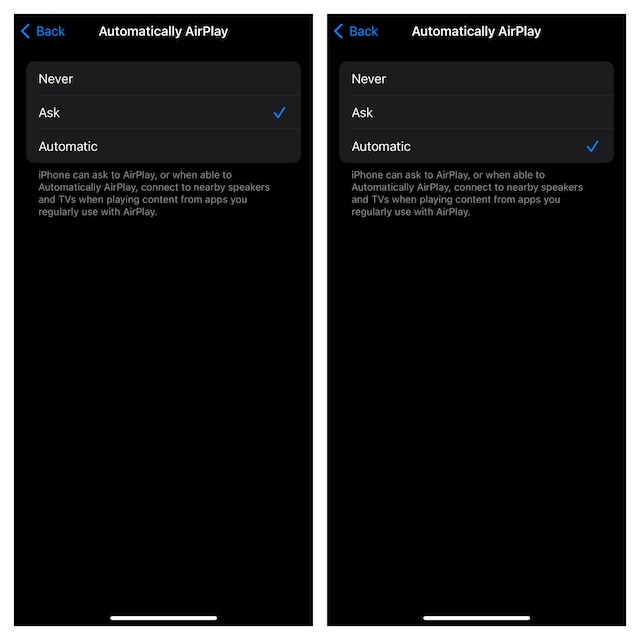
121. Automatically AirPlay to Nearby Speakers
In iOS 16, you could set your iPhone to automatically connect to nearby AirPlay-supported smart TVs for a seamless streaming experience. In iOS 17, you can take your AirPlay experience to the next level by allowing your iPhone to automatically connect to the AirPlay-compatible speakers.
- To use auto-AirPlay for speakers, go to the Settings app -> General -> AirPlay & Handoff -> Automatically AirPlay and choose Automatic.
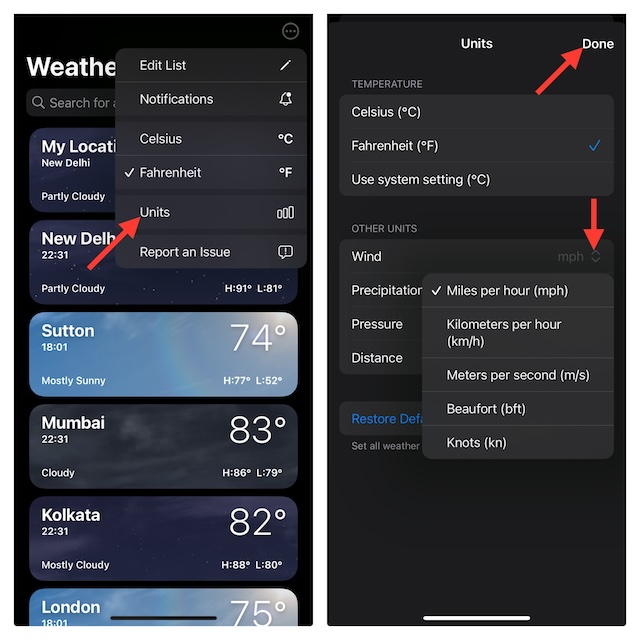
122. Change Measurement Units
Among several handy features that have graced the Apple Weather app is the ability to change the measurement units for wind, pressure, distance, and precipitation.
- In the Apple Weather app, tap on the three-lined icon at the bottom -> triple dot icon at the top right -> choose Units in the drop-down menu -> and then customize the measurement units to your heart’s liking.
123. Seamlessly Send Files and Photos with AirDrop Proximity Sharing
AirDrop proximity sharing feature has made the process of sharing files and photos incredibly simple.
- Just choose the photo or file that you wish to share -> hold your iPhone next to your friend’s unlocked iPhone -> hit the Share button.
- To make sure this feature is enabled, go to the Settings app -> General -> AirDrop -> turn on the toggle next to Bringing Devices Together.
124. Control Which Apps Have Access to Your Calendars
In iOS 17, Apple lets you control which apps have access to your calendar for enhanced privacy.
- To manage the app’s access to your calendar, dive into the Settings app -> Privacy & Security -> Calendars.
- After that, choose the app in question and then select the desired option like None, Add Events Only, and Full Access.
125. Use Offline Maps on Your Apple Watch
In iOS 17 and watchOS 10, when you download offline maps in the Apple Maps app, your downloaded maps are available on the paired Apple Watch as well. To make the most of this new add-on, ensure that your iPhone is turned on and within the range of your watchOS device.
126. Automatically Update Your Offline Maps
Apple Maps can let you automatically update the downloaded maps so that you will have access to the latest information while using the offline maps. When downloading maps on your device, tap on the progress cycle and then choose to enable the automatic updates for your offline maps.
127. Automatically Remove the Useless Offline Maps
To ensure the useless offline maps do not clutter your device, make sure to automatically get rid of the useless maps. Head over to the offline maps setting and turn on the toggle for Optimise Storage.
128. Only Use Offline Maps
To save your precious data pack, you can use the offline maps even when your device has an internet connection. Navigate to the offline maps setting and choose the Only Use Offline Maps option.
129. Limit Third-Party Apps’ Access to Your Photos App
If you are concerned about the privacy of your personal information and no longer want greedy apps to have full access to your images/videos, you would be super glad to know that Apple has offered a better way to limit third-party apps’ access to the Photos app.
- To bring this privacy feature into action, open the Settings app -> Privacy & Security -> Photos -> select the app in question -> After that, select None, Limited Access or Full Access.

130. Perfectly Manage Communication Safety for Your Child’s iPhone/iPad
In iOS 17 and iPadOS 17, Apple lets you manage “Communication Safety” for your child’s iPhone or iPad with better control.
- On your iPhone or iPad, go to the Settings app -> Screen Time -> Name of your child -> Communication Safety -> turn on/off the toggle next to Communication Safety.
- On this very screen, you can view the child safety resources which provide the much-needed advice on helping kids stay safe offline.
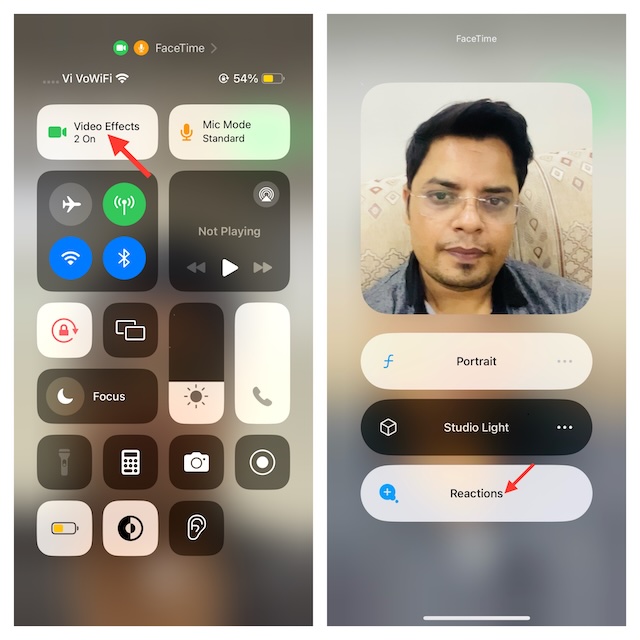
131. Enable/Disable FaceTime Reaction Effects
FaceTime gesture effects have spiced up the whole video-calling experience. You can choose to enable/disable the gesture effects at will.
- During a video call, swipe down from the top-right corner of the screen (or swipe up from the bottom of the screen on a Touch ID-equipped device) to access the Control Center.
- Next, tap on the Video Effects -> tap on the Reactions button to turn it off/on.
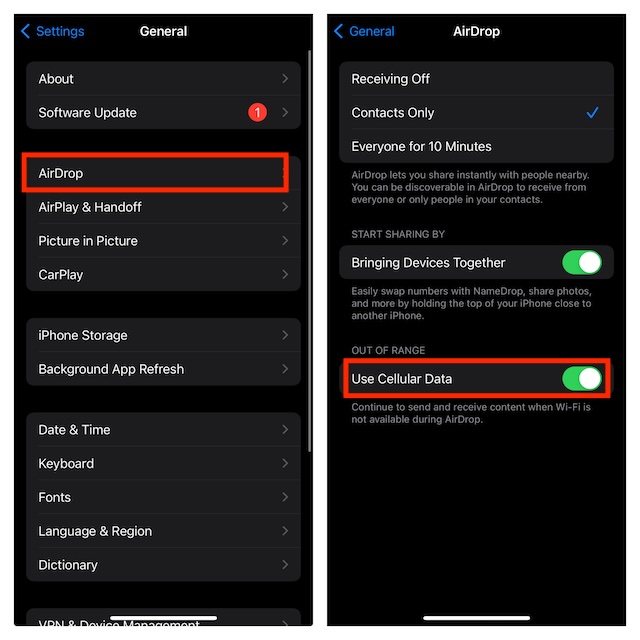
132. Use AirDrop Without Wi-Fi
In iOS 17, you no longer need Wi-Fi to send/receive files via AirDrop. You can now rely on a cellular connection to let you transfer files across iDevices.
- On your iPhone or iPad, go to the Settings app -> General -> AirDrop -> turn on the toggle next to Use Cellular Data.
133. Shuffle Specific Photo Album on iPhone Lock Screen
With iOS 17.1 or later, you can shuffle a specific photo album on the iPhone Lock Screen.
- To begin with, unlock your iPhone with Face ID/Touch ID -> long-press on the screen -> tap on the “+” button at the bottom right corner of the screen.
- Next, tap on the Photo Shuffle button –> Album -> select the desired photo album and set it up.

134. Journal App with Face ID/Touch ID
In order to ward off unauthorized access, iOS allows you to lock the Journal app with Face ID/Touch ID.
- On your iPhone/iPad, launch the Settings app -> Journal -> Lock Journal -> Turn on the toggle next to Lock.
- Next, tap on Require Passcode and choose Immediately.
135. Customize Journaling Schedule
If you often forget to jot down your thoughts, customize the journaling schedule to get timely notifications.
- To fine-tune the schedule, fire up the Settings app -> Journal -> Journaling Schedule -> turn on the toggle next to Schedule and then adjust the date and time to your liking.
136. Enable and Use Stolen Device Protection
With the introduction of iOS 17.3, Apple has bolstered iPhone’s theft protection. Termed “Stolen Device Protection” (Settings app -> Face ID/Touch ID Passcode), it provides an extra layer of shield to sensitive features and services. When your iPhone is away from familiar locations such as home or office, this all-new security shield puts a series of features including your iCloud Keychain passwords and passkeys behind Face ID/Touch ID.
- Since Stolen Device Protection does not support password backup, Face ID/Touch ID authentication becomes the only way to access the protected information or make changes to the key settings.
- On top of all, it also forces several critical actions such as changing the Apple ID password, adding/removing Face ID/Touch ID, and turning off Find My to require a one-hour delay.

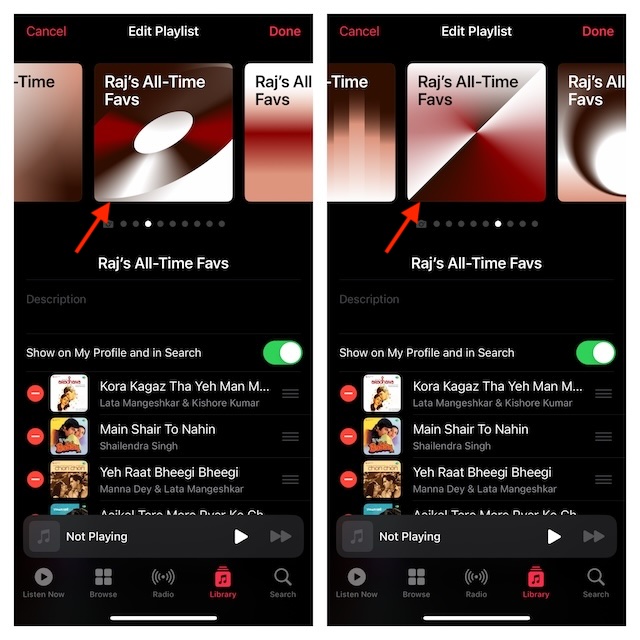
137. Customize Your Apple Music Playlists with Custom Artwork Styles
When you have a bunch of readymade custom artwork styles at your disposal, customizing the look of a playlist becomes a straightforward affair. If you missed artwork styles in the Apple Music app, you would be pleased to know that the stock music app has listened to your wish.
- On your iPhone, head into the Apple Music app -> choose a playlist -> hit the triple-dot icon at the top right -> Edit.
- Nów, swipe left/right to find a nice artwork style and select it.
- As always, make sure to tap on the Done button at the top to finish.
138. Access and Write Health Data with Siri
Courtesy of a recent update, you can use Siri to track, access, and write your health data. For instance, you can ask Siri to find out your average walking speed in the last week, check the total number of calories you have burned today, your current heart rate, and more.
- To enable Siri access to your Health data, go to the Settings app -> Health -> Data Access & Devices -> Siri -> turn on the switch next to Access Health Data.
139. Record Spatial Video with iPhone 15 Pro/15 Pro Max
Apple Vision Pro has several intriguing tricks up its sleeve including the ability to let you record spatial videos for Apple Vision Pro with your iPhone camera (supports iPhone 15 Pro and 15 Pro Max running iOS 17.2 or later).
Once you have recorded the spatial videos, you will be able to view them in two dimensions and share them with your friends. The supported iPhone models can record spatial videos at 1080p at 30 fps in SDR. While one minute of spatial video is about 130 MB, one minute of regular 1080p 30 fps video is about 65 MB.
- Before moving ahead, go to the Settings app -> Camera -> Formats -> Spatial Video for Apple Vision Pro.
- To shoot a spatial video using your iPhone, open the Camera app -> select Video -> now, hold your iPhone in the landscape orientation > hit the Apple Vision Pro icon in the viewfinder -> hit the shutter button to start recording the video. You can find your recorded spatial video in the Spatial album.
140. Use New Podcast Transcript Feature
With the release of iOS 17.4, Apple has introduced the “Transcript” feature. That means you can now not just listen to your favorite podcasts but also read what is spoken.
- To get started, play a podcast -> tap on the speech bubble icon at the bottom-left corner of the screen.
- For an enhanced user interface, the transcript automatically scrolls and highlights the text that is being spoken so that you can track it with ease. Besides, it also helps you scroll through the transcript manually.
Stay Tuned In For More…
There you go! So, that wraps up this most exhaustive roundup of the best hidden iOS 17 features. As someone who loves to take on the latest features and tweaks, I’m pleased with what iOS 17 has to offer. Of course, it’s not perfect and is going to take several updates to get refined. However, no one can deny the fact that it’s moving in the right direction.
Read more: iOS 17 Software Update Got Stuck? 20 Ways to Fix It!
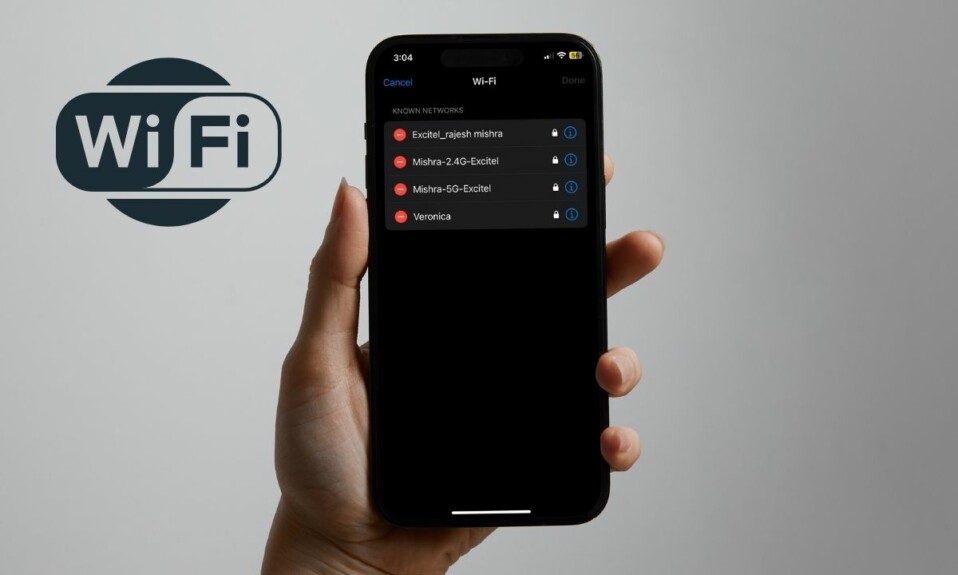


Spotlight WiFi toggle is so useful because it actually turns off the WiFi unlike the control center, thank you so much for that one!