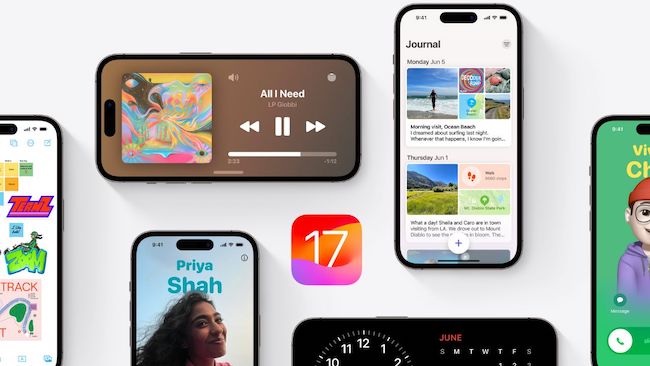
Ever since Apple showcased the iOS 17 at the WWDC 2023, the latest iteration of iOS has become the talk of the town. Whether it’s the eye-catching customization or enhanced security or much-improved stability, iOS 17 seems to have ticked off most boxes. No prizes for guessing! A large number of iPhone owners have already taken the OS for a long spin in order to test-drive the new add-ons. Unfortunately, for some, iOS 17 beta software update got stuck and failed to install. If this issue has brought your excitement to a standstill as well, try out these 20 best tips and tricks to fix iOS 17 software update stuck on iPhone.
Can’t Download and Install iOS 17 Beta on your iPhone? 20 Real Fixes!
First off, let’s briefly delve into the possible reasons why the issue has occurred!
What has Caused iOS 17 Beta Software Update to Get Stuck?
In most cases, it’s the jam-packed traffic that tends to block the download of new software betas. Yeah, you read that right! Millions of iPhone users would have lined up to download the iOS 17 software beta, thereby making the servers either crash or become incredibly sluggish. Besides, poor internet connection is also equally responsible for the failed software update.
Not to mention, the cogged-up storage could be spoiling your party as well. So, we will need to look at the failed iOS 17 beta software update on iPhone from multiple perspectives.
1. Be Sure You Have a Supported iPhone Model
In what is going to disappoint millions of iPhone owners, iOS 17 has left out iPhone 8, iPhone 8 Plus, and iPhone X. So, if you were hoping that your old yet still fully capable iPhone to get the latest iOS 17, you would feel terribly let down.
Here is the list of iPhone models that are compatible with iOS 17:
- iPhone XR
- iPhone XS
- iPhone XS Max
- iPhone 11
- iPhone 11 Pro
- iPhone 11 Pro Max
- iPhone SE 2
- iPhone SE 3
- iPhone 12
- iPhone 12 mini
- iPhone 12 Pro
- iPhone 12 Pro Max
- iPhone 13
- iPhone 13 mini
- iPhone 13 Pro
- iPhone 13 Pro Max
- iPhone 14
- iPhone 14 Plus
- iPhone 14 Pro
- iPhone 14 Pro Max
2. Ensure That Your iPhone Has At Least 50% Charge
To get going, make sure your iPhone has at least a 50% charge to initiate software update. When connected to a power source, ensure that your device has a minimum of 20% battery.
3. Connect Your iPhone to a Power Source During Software Update
Even though the file size of iOS 17 is less than 3GB and hardly takes around 15/20 minutes to download and install, I would recommend you connect the device to a power source during the software update. It will play a vital role in keeping unexpected interference at bay.
4. Force Quit All Other Apps to Free Up Memory
During the software update, make sure to force quit all apps to ensure they do not run in the background. It will free up plenty of memory and also speed up the software update process.
5. Force Quit the Settings App and Relaunch It
At times, all you need to do to troubleshoot the stuck software update on iPhone is to just force quit the Settings app and relaunch it.
- On your iPhone with the Face ID: Swipe up from the Home Bar to bring up the app switcher -> then swipe up the Settings app to force kill the app.
- On your iPhone with Touch ID: Double-press the Home Button to access the app switcher -> swipe up on the Settings app to force kill it.
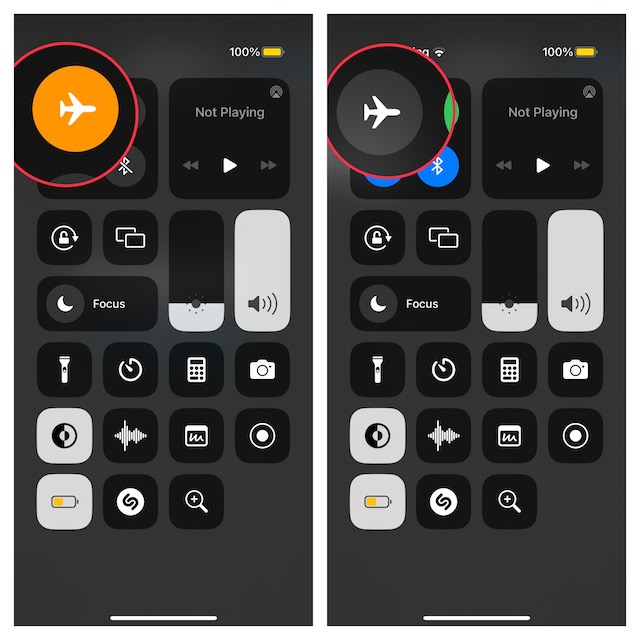
6. Turn OFF/ON Airplane Mode
If the software update has got stuck due to a poor internet connection, you can temporarily fix it by using the airplane mode trick.
- On your iPhone, swipe down from the top right corner of the screen (Face ID-equipped model) or swipe up from the bottom edge of the screen (Touch ID-equipped model) to bring up the Control Center.
- After that, hit the airplane mode icon to turn it on/off.
7. Make Sure the Settings App Can Access Your Cellular Data
If you are trying to install the iOS 17 beta using cellular data, be sure the Settings app can access cellular data.
- On your iPhone, open the Settings app -> Cellular -> scroll down and then turn on the toggle for Settings.
8. Disable Low Power Mode
When active, the Low Power Mode temporarily reduces or disables background activities such as downloads and mail fetch in order to prevent battery drain.
- Open the Settings app on your iPhone -> Battery -> turn off the toggle next to Low Power Mode.
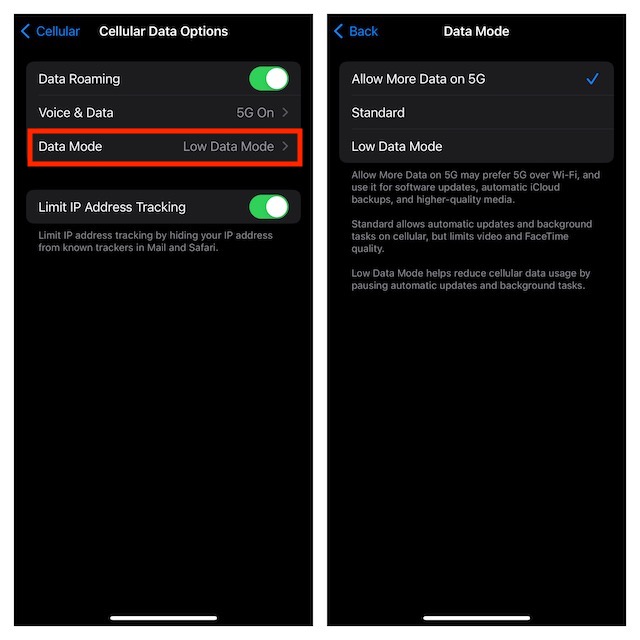
9. Turn OFF Low Data Mode
When Low Data Mode is enabled, cellular data usage is reduced by pausing background tasks and automatic updates.
- Fire up the Settings app on your iPhone -> Cellular -> Cellular Data Options -> Data Mode.
- After that, ensure that the Low Data Mode is deselected.
10. Allow More Data on 5G
Times when you are dealing with tasks like updating software, backing up high-quality media, or syncing your data to iCloud, make sure to allow your iPhone to use more data on 5G (subject to availability).
- On your iOS device, open the Settings app -> Cellular -> Cellular Data Options -> Data Mode -> Allow More Data on 5G.
11. Enable “5G ON” to Speed Up the Software Update
5G Auto (default option) is designed to use 5G only when your iPhone needs a high-speed internet connection in order to prevent battery drain. With the “5G ON” selected, your iPhone uses 5G whenever it’s available – even when it may drain battery life.
- On your iPhone, navigate to the Settings app -> Cellular Data -> Cellular Data Options -> Voice Data -> choose 5G ON.
12. Disable Personal Hotspot
Double-check if you have enabled the Personal Hotspot on your iPhone. If it’s enabled, be sure to turn it off.
- Launch the Settings app on your iPhone -> Personal Hotspot -> turn off the toggle next to Allow Others to Join.
- Also, make sure to turn off Family Sharing of the personal hotspot. On this very screen, tap on Family Sharing and then disable the toggle next to Family Sharing.
13. Enable Wi-Fi Assist
With the Wi-Fi assist enabled; your iPhone automatically switches to cellular data when Wi-Fi connectivity is below par. What makes this feature so handy is the ability to keep the unwanted interruption at bay.
- Head over to the Settings app on your iPhone -> Cellular -> Scroll all the way to the bottom of the screen and then make sure that the toggle for Wi-Fi Assist is enabled.
14. Restart/Force Restart Your iPhone
Can’t download and install iOS 17 as yet? Worry not! We will now go for the soft reset to get rid of the issue. Knowing how effective a soft reset (aka reboot) is, you shouldn’t fail to give it a chance. But what if it doesn’t get the job done? If rebooting doesn’t work for you, try out hard reset which is extremely effective in clearing temporary files which often results in not only freeing up memory but also fixing random issues.
- To force reset your device; press and release the volume up button. Then, immediately, press and release the volume down button which is also placed on the left side.
- Next, you need to hold down the power button until the iconic Apple logo pops up on the screen.
15. Force Wi-Fi to Forget Your iPhone and Reconnect
Many a time, you can troubleshoot a poor Wi-Fi network by forcing the iPhone to forget the Wi-Fi network and reconnect to it.
- Navigate to the Settings app on your iPhone -> Wi-Fi -> tap on the info icon next to the Wi-Fi network.
- Now, tap on Forget This Device and confirm.
- After that, reconnect to the Wi-Fi network.
16. Reboot Your Wi-FI Router
Should your Wi-Fi network continue to be below par in terms of speed and stability, reboot the router.
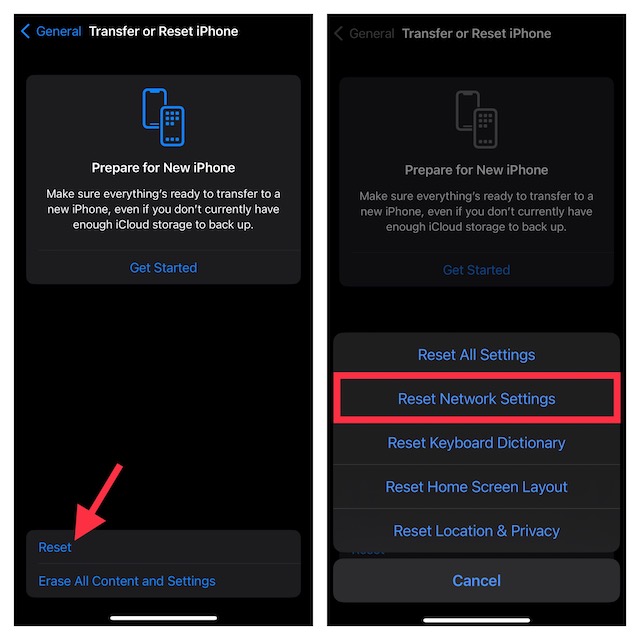
17. Reset Network Settings
If the airplane mode trick has not yielded the desired result, try resetting the network settings. Since it has the knack for fixing sluggish internet connections, hopefully, you will be able to troubleshoot iOS 17 stuck on the update requested.
- On your iOS or iPadOS device; go to the Settings app -> General -> Transfer or Reset iPhone/iPad.
- Now, hit Reset.
- When prompted, do not forget to input your device passcode and Screen Time passcode (if it’s set up).
- In the end, hit Reset Network Settings in the popup to confirm the action.
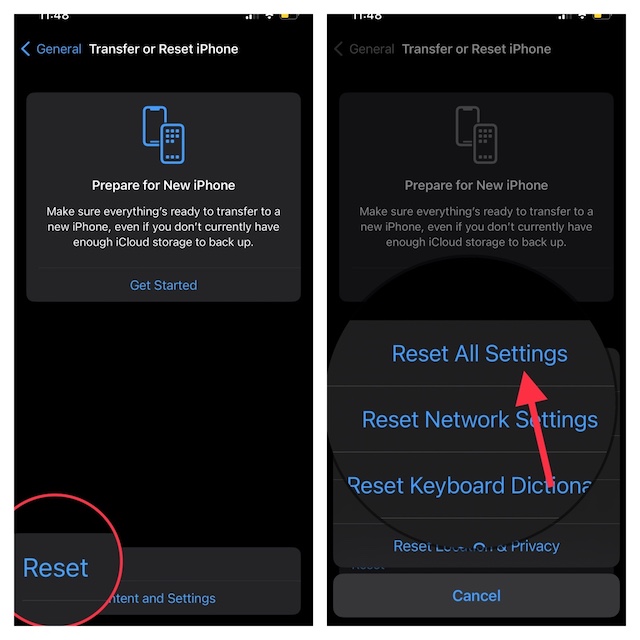
18. Reset All Settings
Factory reset boasts an impressive track record of fixing persistent issues like this one. Therefore, we will go for this radical solution as well. For those unaware, factory reset erases all the custom settings such as custom Home Screen layout, Wi-Fi passwords, VPN settings, cleans up Safari history, and more. Thus, you will have to customize the entire settings of your iPhone right from scratch.
- On your iPhone, open the Settings app -> General -> scroll down and choose Transfer or Reset iPhone/iPad -> Reset.
- Now, tap on Reset All Settings -> enter your device passcode and Screen Time passcode, if prompted.
- Finally, tap on Reset All Settings in the popup to confirm the action.
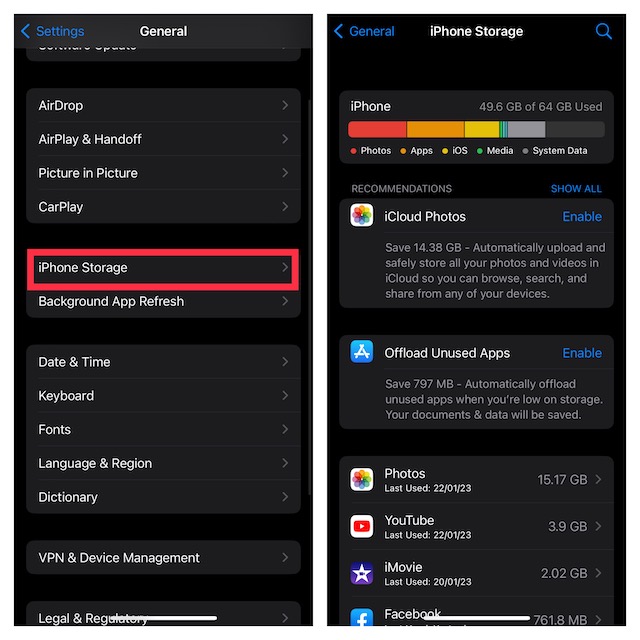
19. Declutter Your iPhone
If your iPhone is cluttered for space, you don’t need to look anywhere else but the clogged-up space. If there is a lack of space for the software update, you need to first clear out the redundant files and delete the useless apps to recover precious storage.
Not sure which apps need to be cleaned up? Bother not, iOS provides a neatly designed storage bar to make it easier for you to find out what has hogged the most amount of space. Even better, you can also have a quick look at the amount of space in each app and take the necessary action to get rid of the clutter.
- On your iPhone, head into the Settings app -> General -> iPhone/iPad Storage.
- Have a quick glance at the storage bar at the top to find out the total available and used storage. Besides, also check out the file types that have consumed the most storage.
- You can scroll down to check a long list of apps and the amount of space each one has gobbled up.
20. Update Your iPhone Using Mac or Windows PC
If none of the above-mentioned tips has worked in fixing the iOS 17 stuck on the software update issue, I would suggest you update your iPhone using your Mac or Windows PC. As this solution has long been a highly effective troubleshooter of stuck software updates, it’s apt to give it a go as well.
- First off, connect your device to your computer -> launch Finder (on Mac running macOS Catalina or later) or iTunes (on Windows PC.
- After that, select your device.
- Then, click on Check Software Updates and then download and install the update.
Frequently Asked Questions
1. When will Apple launch iOS 17 public beta?
Apple is set to launch the iOS 17 public beta in early July.
2. Should I install iOS 17 developer beta or wait for the iOS 17 public beta?
Compared to a developer beta, a public beta is more stable, which means you will likely face fewer issues while dealing with a public beta. Therefore, I would suggest you wait for the iOS 17 public beta.
What’s the best way to enjoy beta testing without falling prey to unexpected issues?
Probably the smartest way to deal with a software beta that has the habit of throwing tantrums every now and then is to fully back up your entire data beforehand and download the software beta on a secondary device.
Fixed iPhone/iPad Stuck at Software Update
That’s it! Hopefully, your iPhone has successfully updated to iOS 17. Considering the fact that the total size of the latest iteration of iOS 17 is just 2.79GB, updating the software feels like a pretty smooth sailing affair. Especially if you have ticked off all the bases. With that said, make sure to share your thoughts about iOS 17 and the tips that have come to your rescue.
Read more: How to Download and Install macOS 14 Sonoma Beta on Your Mac