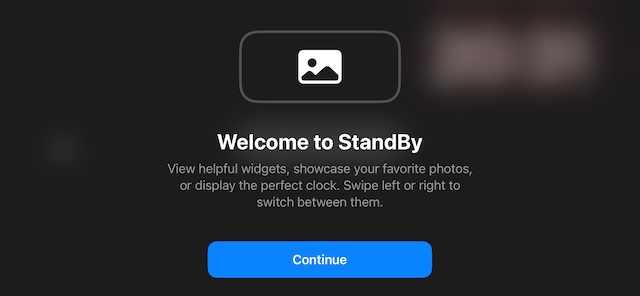
When you have a top-notch smartphone like iPhone at your disposal, you always tend to look for ways to get the most out of the device. Be it while snapping photos, browsing the web, or navigating. But did you ever find your iPhone sitting idle on a charger and wondered if there was a way you could make even this idle situation more lively? Whether that thought has ever crossed your mind or you adore the idea of a smart display primed to entertain you with glanceable information, the “iPhone StandBy” mode is for you! Give a try to these 21 best tips and tricks to use iPhone StandBy mode in iOS 17 like a pro.
Best Tips & Tricks to Use StandBy Mode on iPhone in iOS 17
To get going, let’s briefly discuss what makes this smart display so adorable!
What exactly is the iPhone StandBy Mode and how does it work?
Designed to deliver a full-screen experience when your iPhone is docked, charging, and placed in the landscape orientation, the StandBy mode is a smart display that not just acts smartly but also charms you with inimitable elegance.
Aside from showing widgets to let you keep an eye on essential information, the smart display also lets you track Live Activities and get the most out of Siri. To enhance the viewing experience and also safeguard your eyes, it also comes with a night mode that never lets the low ambient lighting dampen your gazing.
Oh yes, the StandBy mode also makes sure you don’t miss out on important notifications but in an altogether different fashion. Long story, it’s exactly what you need to turn your smartphone into a handy utility even when it needs to be docked.
“Showcasing glanceable information in a visually fascinating form so that you can comfortably view it at a distance makes the StandBy mode a beloved new add-on.”
1. Enable StandBy Mode on Your iPhone
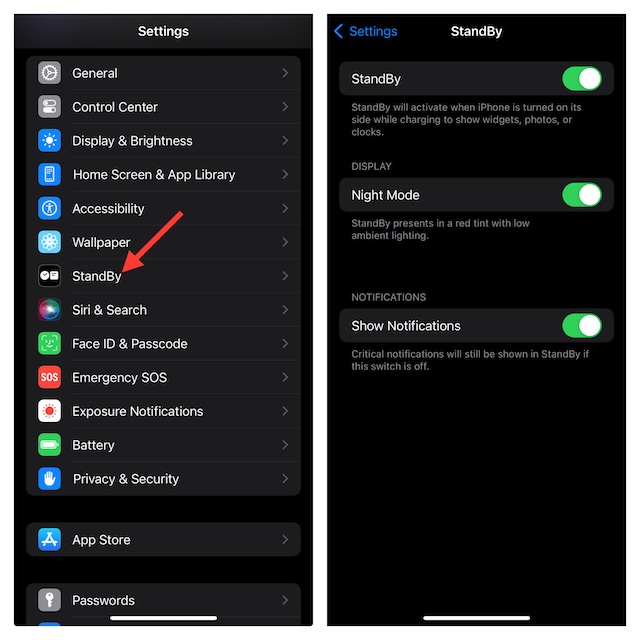
To get started, make sure the StandBy mode is active. It’s more like a precautionary measure to ensure the smart display is always ready to get activated.
- Head into the Settings app of your iPhone -> StandBy.
- Next, you should see three toggles:
- StandBy: It lets you enable or disable StandBy mode on your iPhone.
- Night Mode: When enabled, it presents the information in a red tint with low ambient lighting.
- Show Notifications: Use this toggle to allow/disallow notifications when the StandBy mode is active.
2. Customize Additional StandBy Settings on iPhone 14 Pro and 14 Pro Max
On iPhone 14 Pro/14 Pro Max, you get additional settings for the StandBy mode. As you may have already guessed, the top-tier iPhone models are better equipped to get the most out of the smart display.
- Navigate to the Settings app on your iPhone -> StandBy.
- Turning on the Standby toggle reveals two options:
- Always On With this toggle enabled, the display will go to sleep when not using it.
- Night Mode: Tap on this option to access night mode settings.
- When you tap on the Night Mode option, you will again see two options-
- Night Mode– Turn on this toggle to enable night mode, and the StandBy mode will show a red tint with low ambient lighting.
- Motion To Wake- If you enable this feature, the display will turn on when motion is detected at night.
Next reading: Poetic iOS 17 Preview: Beloved Update for Your Beloved iPhone!
3. Bring iPhone StandBy Mode into Action
Activating the StandBy mode is dead simple – so long as you’ve got the basics right. Simply, dock your iPhone on your upright charger, placing the device in the landscape orientation. Also, ensure that the iPhone is securely plugged in, charging, and locked.
While the StandBy mode gets into action automatically on the iPhone 14 Pro and 14 Pro Max thanks to the support for Always On Display, it requires you to tap on the screen to get going on other iPhone models.
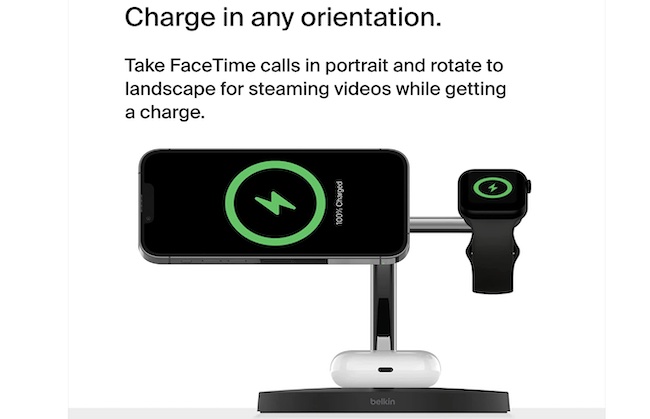
4. Make Use of MagSafe/Certified Wireless Chargers for Best Experience
As against the popular misconceptions, you don’t need a MagSafe charger to use the StandBy mode. Even if you have a reliable Qi-based charger or a Lightning charger, you can use the smart display. However, note that MagSafe chargers are better equipped to get the most out of the smart display.
In a nutshell, what you need to remember is that your iPhone must be positioned (upright placement) in a stationary horizontal/landscape orientation. Bear in mind that if your device is placed on a flat surface, the smart display won’t kick in.
If you are hunting for a top-notch MagSafe upright charger, we’ve got you covered with a meticulously compiled roundup. Head over to the article to explore the lineup to buy a suitable charger for your beloved iPhone.
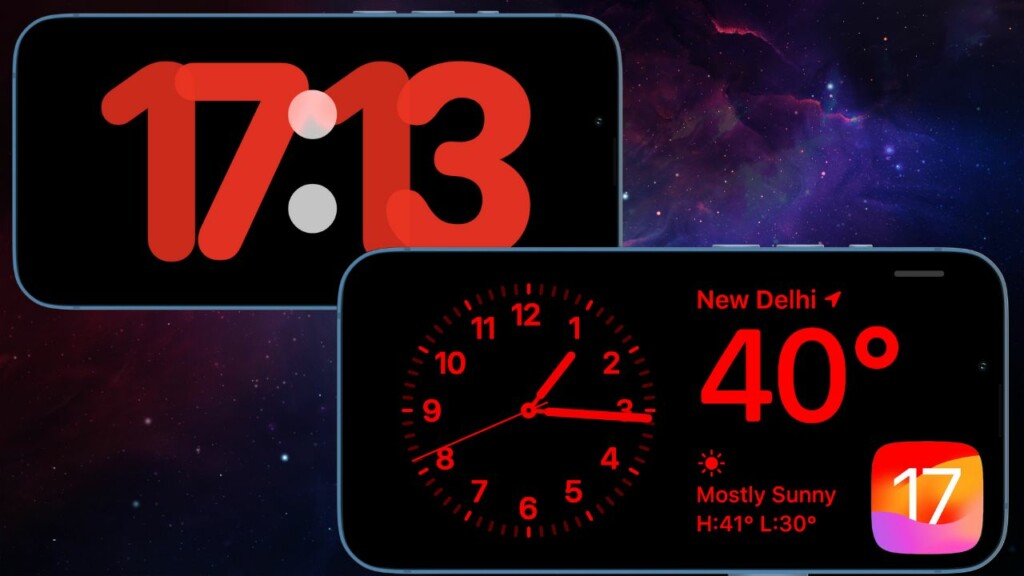
5. Get a Hang of Three Different Screens of iPhone Standby Mode
The StandBy mode features three different screens; each one is designed with a specific purpose. While the first screen showcases the interactive widgets, the second one displays images picked from your photos library. Talking about the third screen, it flaunts a large clock.

6. Make the Most of Interactive Widget Stacks
StandBy mode’s widgets screen consists of two interactive widget stacks showing side by side. Interestingly, you can swipe through each widget up and down – independently – to access other variants.
If you have tried the Home Screen widget stacks on your iPhone, you would find the StandBy’s interactive widget stacks pretty much the same – both in terms of interaction and functionality.
If a widget has an interactive element, you can tweak it right from the StandBy mode. For instance, you can check off items in a Reminders list widget. But if a widget is not interactive, tapping on it displays an arrow indicator that directs you to the associated app.

Unfortunately, as of now, only a handful of widgets feature interactive widgets.
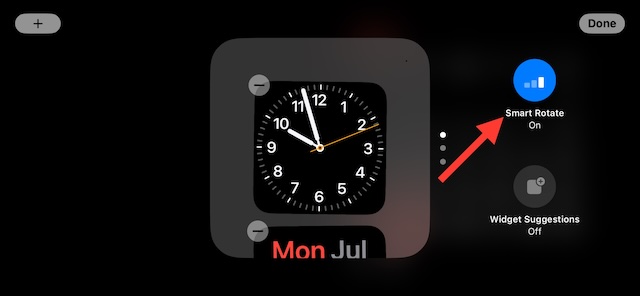
7. Enable/Disable Smart Rotate
“Smart Rotate” livens up the widget stacks. Keeping a tab on your usage and preference, it automatically scrolls widgets that are already in a stack. Therefore, make sure to bring it into action. Just touch and hold onto the interactive widget stack and tap on the Smart Rotate icon to enable it.
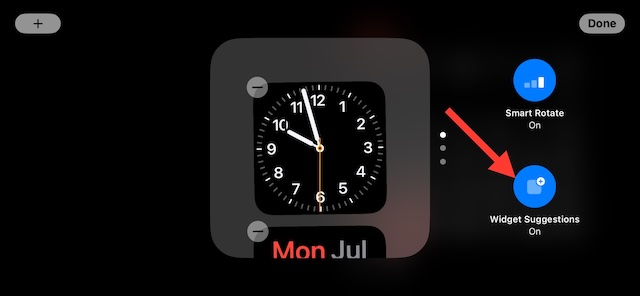
8. Enable/Disable Widget Suggestions
Widget suggestions further enhance the interactive widget stacks. So, be sure you have turned it on as well. Long-press on the interactive widget stack and hit the Widget Suggestions icon to turn it on.
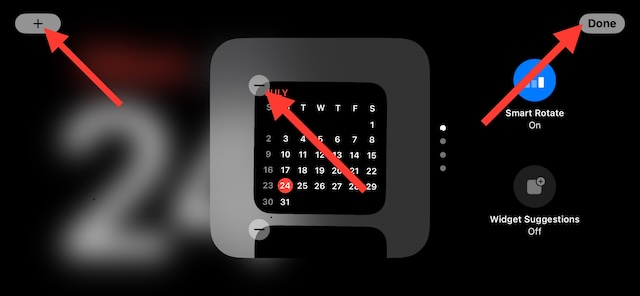
9. Customize Analog Clock and Calendar Widget in iPhone Standby Mode
- When your iPhone is in Standby Mode, you will see the analog clock and the calendar widget by default. It is the first screen of the StandBy Mode.
- You can swipe up and down on either of the two widgets to change the style.
- To edit the widget stack, tap and hold either of the widgets you want to edit. Tap the (–) icon to remove the widget and the (+) icon to add the widget.
- If you tap on the (+) icon, you will see all the widgets you can add to the widget stack. You can also search for the widgets from the search bar at the top.
- Once you are done, tap the Done option to save the changes.
10. Customize the Photos Widget in the iPhone Standby Mode
- Swipe left on the first screen of StandBy Mode, and you will see the photos from the library.
- Long press the photo screen, and you will be able to swipe up and down to select between different screens, including nature, pets, cities, and people.
- Tap the (+) icon at the top right corner to add a particular album to the photo stack.
- If you don’t want a particular album/theme to be displayed, tap on the eye icon on the top left of the theme/album to hide them.
- Tap on Done to save the changes you have made.
11. Customize the Clock Widget in the iPhone Standby Mode
- Swiping left from the photos screen will take you to the large clock.
- You can swipe up and down the large clock to change between different clock themes.
12. Use Live Activities in the iPhone Standby Mode
In StandBy mode, tracking Live Activities becomes a pleasing experience. Whether it’s monitoring the live score of a match, finding the whereabouts of your food delivery, or keeping a close watch on your timer, the smart display is going to add more vigor to the real-time tracking of things that matter to you.
13. Make Use of Siri in the StandBy Mode on Your iPhone
Looks like Siri and the StandBy mode are primed to complement each other. When you invoke, Siri, it shows up on the full screen. As for the queried information, it beautifully takes center stage on the screen, making it more convenient for you to glance at the info from a distance. For instance, if you ask for weather updates, you will see the weather updates in full screen.

14. More Convenient Notification Tracking
Incoming notifications appear in full screen when your iPhone is in StandBy mode. Thus, you won’t have to put too much stress on your eyes to figure out who pinged you. For example, if you receive an iMessage from your friend, the message will pop up on the screen showing the name of the person along with the Messages icon.
Bear in mind that the content that can’t be shown in a notification won’t appear in the StandBy mode. Therefore, keep this inconvenience in mind while using the smart display.
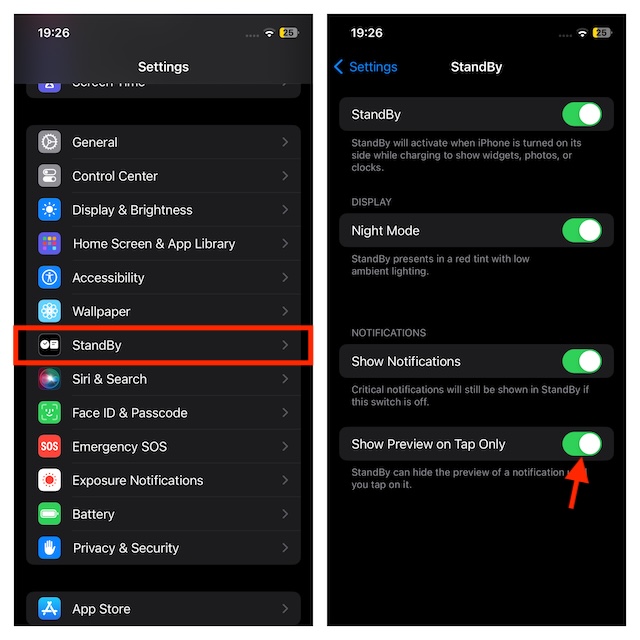
15. Hide Notification Previews for Enhanced Privacy
Should you wish to shield your personal messages from prying eyes, especially when the iPhone StandBy mode is in action, this slightly hidden StandBy feature is for you!
Courtesy of the latest update, iOS 17 lets you hide the notification previews in the StandBy mode and reveal them only when you tap on them. If you prefer to have an extra layer of safeguard for your notifications, this is precisely what you need to prevent them from falling into the wrong hands.
- Go to the Settings app on your iPhone -> StandBy and then turn on the toggle next to Show Preview on Tap Only.
16. Hide or Show Photo Album from the Photo View
To make sure the photo screen only shows the images you love, you can choose to hide or show the desired photo album in the StandBy mode.
- Invoke the StandBy mode -> swipe toward the left from the right edge to head over to the photo screen -> long-press on the image.
- Then, you can swipe up or down to find the specific photo album.
- After that, tap on the “Eye” button to hide or show a particular album.
- Once you have customized the photo view, hit the Done button.
17. Add or Remove a Photo Album from the Photo Screen
StandBy also offers an easy way to let you add or remove a photo album from the photo screen.
- Activate the StandBy mode on your supported iOS device -> swipe left from the right to access the photo screen -> press and hold onto the screen to invoke the editing mode.
- Then, tap on the “+” button at the top right corner of the screen -> select the desired photo album.
- To remove the one you don’t want to keep, hit the “-“ minus button.
- Make sure to hit the Done button at the end to confirm the changes.

18. Fully Leverage MagSafe Location Awareness
If you thought StandBy has run out of all the tricks, you can’t be more wrong. The smart display comes with a MagSafe-related feature that enables your iPhone to remember what sort of widget customization you prefer. Wondering how this neat feature works? Well, the smart display uses the location of your MagSafe charger to show the preferred widgets.
For example, if you like to use the photo widgets at home, the StandBy mode will display your memorable photos. And if you use the reminders widget at the office, it will show the relevant reminders widget on the screen.
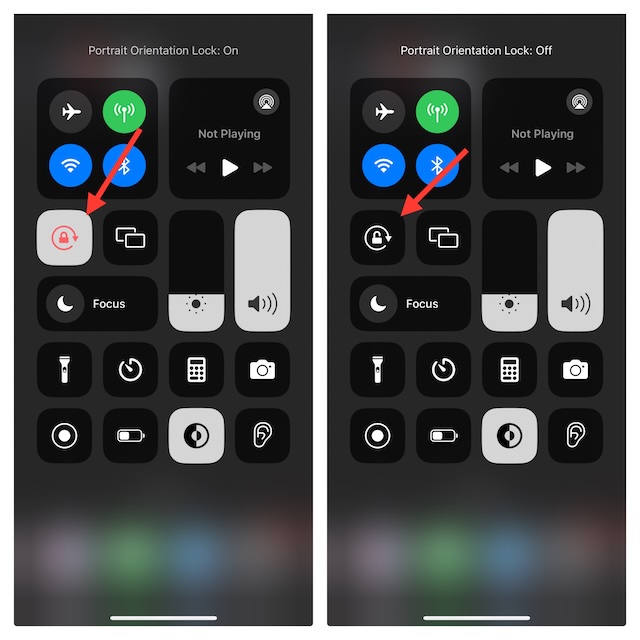
19. Ensure That the Orientation Lock is Disabled
To bring the StandBy mode into action without any interference, make sure that the orientation lock is disabled.
- On your iPhone with the Face ID: Swipe down from the top-right corner of the screen -> tap on the orientation lock icon to turn it off.
- On your iPhone with Touch ID: Swipe up from the bottom edge of the screen -> hit the orientation lock icon to disable it.
20. Be Sure the Low Power Mode is Turned OFF
With the “Low Power Mode” enabled, your iPhone automatically pauses the background activities like auto-app updates or auto-downloads to extend the battery life. Be sure to turn off this power-saving mode, or else the StandBy mode might not activate.
- Navigate to the Settings app on your iPhone -> Battery -> turn off the toggle next to Low Power Mode.

21. Enable Location Services for More Personalized Experience
It’s important to note that some widgets like photos, weather, and calendar make use of your location data to offer a more personalized experience. Therefore, ensure that it’s enabled on your iPhone. Not to mention, the MagSafe location awareness also uses your location data to offer personalized suggestions.
- Head over to the Settings app -> Privacy & Security -> Location Services -> make sure that the toggle is turned on.
- After that, scroll down to find the apps (i.e. Photos, Weather, and Calendar) in question, and then ensure that their toggles are enabled.

Get the Most Out of StandBy Mode on your iPhone…
There you go! Having used StandBy mode for quite some time, I must say that it has managed to become one of my favorite features of iOS – not just iOS 17. What I love the most about this new add-on is the ability to let everyone take some pie out of the popular “Always On Display” which is locked to the Pro iPhone models.
What’s your take on this feature and whether or not it has lived up to the hype for you? Do share your thoughts and if you would like to dig even deeper, navigate to our 115+ best iOS 17 hidden features article.
Read more: 17 Best New Messages Features in iOS 17 on iPhone