What’s the point of having an iPhone with a gorgeous display, if you can’t get the most out of it in every possible way? Just introduced in iOS 17, StandBy is designed to turn your iPhone into a beautiful-looking display. For times when your eyes are set on tracking real-time information, glancing at a memorable photo, or keeping a tab on time, it comes into play. Unfortunately, iPhone StandBy mode is not working in iOS 17 for some users. If you are also looking at the wrong end of this feature, check out these 28 handy tips to fix StandBy mode issues on your iPhone.
Best Tips & Tricks to Fix iOS 17 iPhone StandBy Mode Not Working
Before moving ahead, let’s check off each requirement so that you don’t get caught off guard later!
What Exactly is StandBy in iOS 17 and How Does It Work?
StandBy is basically a “Smart Display” that kicks in automatically when your iPhone is set in landscape mode and connected to a power source. Yeah, you read that right! It’s an automatic play that needs power for activation. There is no way you can put your iPhone in the horizontal orientation and invoke the smart display even when your device is not connected to a power source. At least, for now.
As to what makes iPhone StandBy so handy, it’s the ability to let you view the desired information in a neat way that makes this smart display a great addition to iOS 17. If you have come across Amazon Echo, chances are you can easily discern what iPhone StandBy is trying to achieve.

In What Way Can You Use iPhone StandBy?
There are all sorts of ways you can make use of the iOS 17 iPhone StandBy mode: Here are some notable ones:
- Time-tracking
- Checking real-time updates
- Glancing memorable photos
- Keeping an eye on useful information through widgets
Which iPhone Models are Compatible with StandBy?
If your iPhone can run iOS 17, you are in with this smart display. To be more precise, iPhone XR/XS or later can invoke this much-talked-about feature.
Which iPhone Models Are Best Suited for StandBy Display?
Even though all iOS 17-supported devices can activate the StandBy, only the latest top-tier iPhone models are best suited for the smart display. Based on how this feature works, I have put iPhone models in the respective categories for a better understanding.
Best-Suited iPhone Models for StandBy
- iPhone iPhone 15 Pro Max
- iPhone 15 Pro
- iPhone 15 14 Pro Max
- iPhone 14 Pro
iPhone 14 Pro, 14 Pro Max, iPhone 15 Pro, and 15 Pro Max come with a top-notch OLED display that already supports Always On Display aka AOD. In terms of functionality, AOD is multiple steps ahead of StandBy. That aside, the large screen 6.1″-6-7″ is also well-equipped to get the most out of StandBy.
iPhone Models That Can Make Good Use of StandBy
- iPhone 15 Plus
- iPhone 15
- iPhone 14 Plus
- iPhone 14
- iPhone 13 Pro Max
- iPhone 13 Pro
- iPhone 13
- iPhone 13 mini
- iPhone 12 Pro Max
- iPhone 12 Pro
- iPhone 12
- iPhone 12 mini
- iPhone 11 Pro Max
- iPhone 11 Pro
- iPhone XS Max
- iPhone XS
Whether it’s the large screen or the attractive OLED display, these iPhone models are more than capable of letting you use StandBy to your heart’s liking.
iPhone Models That Can Make Decent Use of StandBy
- iPhone 11
- iPhone XR
Featuring a 6.1″ display, iPhone 11 and XR are just good enough to make decent use of StandBy.
iPhone Models that are Less Capable of Making the Best Use of StandBy
- iPhone SE 2
- iPhone SE 3
The tiny 4.7-inch display doesn’t seem to be good enough to take full advantage of StandBy. Though you can invoke this feature on iPhone SE 2/3, I don’t think the smart display will appear as elegant on the tiny display as it does on the devices with larger displays.
Aside from the small screen size, the inferior LCD display is another downside that these iPhone models have to deal with.
Tips to Customize iPhone StandBy to Your Heart’s Liking
- Note that the classic analog clock along with the calendar widget on the right has been set as the default StandBy view. You can swipe up on either the clock face or the calendar to access more options. Interestingly, Apple has set the calendar as the smart stack suggestion by default.
- If you wish to fine-tune this StandBy view, simply long-press on the left or right widget. Then, remove the unwanted options or hit the “+” button in the top left corner of the screen to add widgets.
- While viewing the first StandBy clock/widget view, swipe from right to left to access the Photos StandBy view.

- You can swipe from right to left again to reveal the last view that features a variety of customizable clock faces. To customize these clock faces, just press and hold on to them. Though you can customize the color schemes of the clock faces, there is no option to add widgets to these clock faces.

- However, there is one thing that makes clock faces so impressive. When you tap on the “….” ellipsis icon in the top center, you will have access to music.
- What makes StandBy more user-friendly is the ability to support Siri, Live Activities, larger notifications, and incoming calls.
- On top of all, StandBy is able to remember your “preferred view” and smartly dims to red at night so that your sleep doesn’t get disturbed.
Reliable Tips to Fix iPhone StandBy Issues
If the iPhone StandBy is ill-functioning even after you have ticked off all the required boxes, it’s time to look for ways to fix the problem and bring the smart display back on track.
1. Make Sure Your iPhone is Locked
It’s worth reiterating that StandBy activates only when your iPhone is locked and placed in the landscape orientation. Hence, be sure to tick off this must-have requirement.
2. Make Sure You Have Set Up the Passcode on Your iPhone
If you have not set up passcode on your iPhone, the StandBy mode might not activate. Thus, try setting it up.
- Dive into the Settings app on your iPhone -> Face ID/Touch ID & Passcode -> Turn On Passcode and set it up.
3. Be Sure to Place Your iPhone on an Upright Charger
Make sure to position your iPhone in the landscape orientation on an upright charger. Bear in mind that StandBy doesn’t work on flat or low-angle chargers. Check off this must-have requirement and the smart display could be back in action in all its glory.
4. Make Sure Your iPhone Charger is Up to the Mark
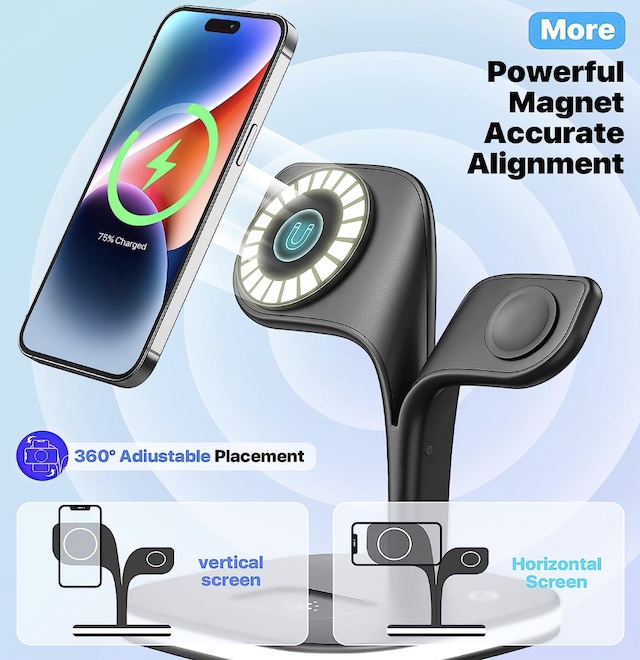
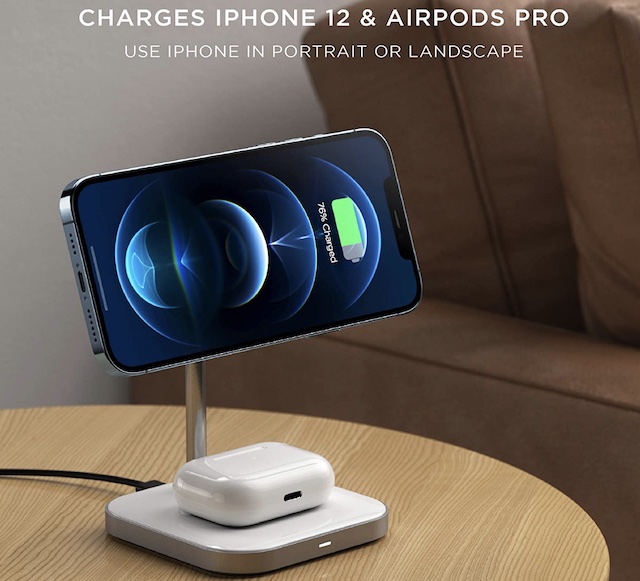
If your iPhone still can’t bring the StandBy into action, be sure your charger is up to the mark. For the best experience, you should use a MagSafe-compatible upright charger. Having explored various options, I have found three well-built and fully equipped chargers that can let you get the most out of iPhone StandBy.
Cococka MagSafe Compatible Charger
Sporting a modern-looking design, the Cococka charger is designed to hold your iPhone both vertically and horizontally. Better still, it can also let you power up your Apple Watch and AirPods.
Petino 22W MagSafe Compatible Charger
Petino’s 22W charger is a powerhouse. You can use it to juice up multiple devices including Apple Watch and AirPods. Moreover, this MagSafe-compatible charger comes in multiple colors including silver, purple, and golden.

Satechi Aluminum 2-in-1 Magnetic Wireless Charging Stand
Satechi is well-known for producing highly efficient chargers. As for this 2-in-1 charger, it is exceptionally durable, can hold your iPhone in multiple orientations, and also charge your AirPods.
5. Ensure That Your iPhone is Securely Connected to the Charger and the Charging is ON
Remove your iPhone from the charger. Then, securely connect your iPhone to the compatible charger, place it perfectly in the horizontal orientation, and ensure that the charging is on. Knowing that StandBy requires power, be sure that your device is being charged.
6. Make Sure Your iPhone is Not Overheating
If your iPhone is faced with overheating issues or tends to become too hot within a few minutes of being placed on a charger, this could very well be the spoiler. This problem could be due to a number of factors including the uncertified charger, clogged-up storage, or software bug. Fixing these aforementioned issues could let you bring the iPhone StandBy mode back on track.
7. Be Sure to Tap on the Screen to View the Clock and Widgets
Keep in mind that while StandBy works on any iPhone that can run iOS 17, you must tap on the screen to view the photos, clock, and widgets. Thanks to Always On Display, iPhone 14 Pro and 14 Pro Max can always show the StandBy display. Told you that 14 Pro/14 Pro Max is the best suited to make the most of StandBy, didn’t I?
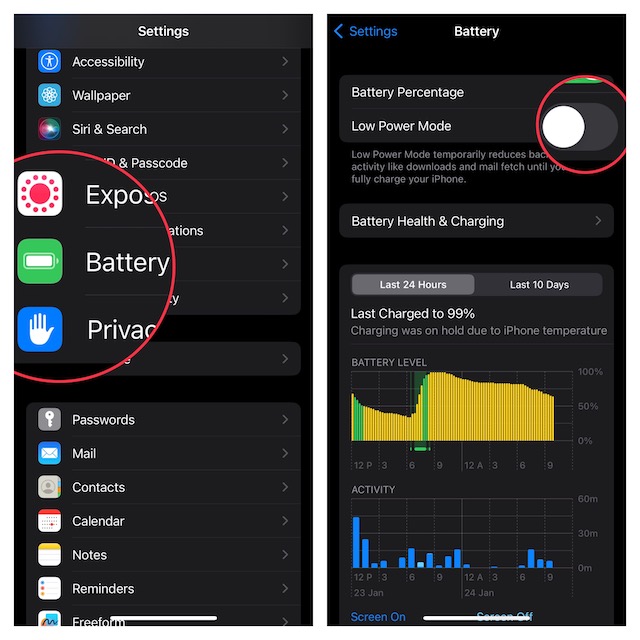
8. Disable the Low Power Mode
When Low Power Mode is enabled, iPhone StandBy mode does not work consistently. Therefore, make sure to turn it off.
- Navigate to the Settings app on your iPhone -> Battery -> turn off the toggle for Low Power Mode.
9. Make Sure Your iPhone is Not Running Low on Power
If your iPhone’s battery is on the lower side of the spectrum, the StandBy mode may not activate. Hence, you need to first fully allow your iPhone to have sufficient battery.
10. Force Quit All Apps that are Running in the Background
Force kill all apps that are running in the background.
- On your iPhone with Face ID: Swipe up from the home bar -> then swipe up the cards of all apps to force kill each one of them.
- On your iPhone with Touch ID: Double-press the Home Button -> swipe up all the app cards to kill the apps.
11. Ensure That Orientation Lock is Disabled on Your iPhone
If your iPhone is not automatically switching to the landscape orientation, ensure that the orientation lock is disabled.
- On your iPhone with Face ID: Swipe down from the top right corner of the screen to access Control Center -> tap on the orientation lock icon to turn it off.
- On iPhone with Touch ID: Swipe from the bottom to reveal the Control Center -> then hit the orientation lock icon to disable it.
12. Disable/Enable StandBy
If StandBy doesn’t work even after you have checked off all the basics, disable/enable StandBy.
- Go to the Settings app on your iPhone -> StandBy -> turn off the toggle for StandBy.
- Now, reboot your iPhone. Once the device has rebooted, head over to the StandBy setting and turn it on.
- Next, place your iPhone horizontally on the upright charger to check if the StandBy mode has been activated.
13. Hard Reset Your iPhone
Hard reset (also known as the force restart or force reset) comes into action when dealing with miscellaneous issues. Wondering what makes it so effective? Well, it’s the ability to clear temporary cache and free up memory that enables it often get rid of common iPhone issues.
- To force restart your iPhone, press and release the volume up button -> press and release the volume down button.
- Next, make sure to hold down the side button until you see the Apple logo on the screen.
14. Can’t Interact With Specific Widgets in the StandBy Mode? Keep It In Mind!
It’s worth reiterating that as of now only a handful of widgets (such as Apple Music and Reminders) have interactive elements. While many widgets lack interactive elements, several of them (Sleep and Game Center) haven’t been optimized for the StandBy mode either. When you tap on an uninteractive widget, it shows a tiny arrow at the top to let you open the associated app.
15. Some Widgets Don’t Show Real-Time Information? Make Sure Cellular/Wi-Fi is Enabled
Some StandBy widgets like Weather and Maps require a strong and stable internet connection to show real-time information. So, ensure that you have enabled cellular/Wi-Fi (Settings app -> Cellular/Wi-Fi) on your device.
- If the widgets do not display the latest information, turn on/off the Airplane mode (Swipe down from the top-right corner of the screen to access Control Center -> hit the Airplane mode icon to turn it on/off.)
16. Delete/Reinstall the Widget Apps
Should certain StandBy widgets continue to ill-function, delete the widget apps and reinstall them.
- On your iPhone Home Screen, touch and hold onto the app in question -> Remove App -> Delete App and confirm.
- Then, open the App Store -> find the app and install it as usual.
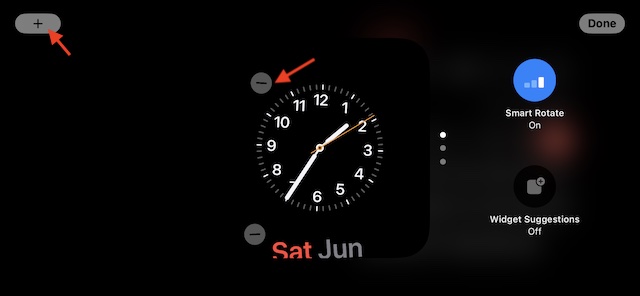
17. Photo Screen Not Rotating Images? Make Sure to Choose A Specific Photo Album
In some cases, the photo screen in the StandBy mode won’t rotate images or show a single image all the time. To fix this issue, make sure to select a preferred photo album with multiple images.
- Invoke the StandBy mode -> swipe toward the left from the right edge of the display to access the photo screen -> long-press on the screen to get into the editing mode.
- Now, tap on the “-“ minus to remove the existing photo album.
- After that, tap on the “+” button at the top left corner of the screen -> choose the desired photo album, and then hit the Done button at the top right corner of the screen to confirm.

18. Siri Not Working in the StandBy Mode? Allow the Virtual Assistant to Work on the Lock Screen
If you can’t invoke Siri in the StandBy mode, make sure you have allowed the virtual assistant to work on the iPhone Lock Screen.
- Go to the Settings app on your iPhone -> Siri -> Now, make sure to turn on the toggle next to Allow Siri When Locked.
19. Tips to Fix Live Activities Not Working in the StandBy Mode
If Live Activities are misbehaving in the StandBy mode, ensure that you have perfectly set up the associated app. Should the issue still persist, turn off/on Live Activities and also allow the apps to update more frequently.
- Open the Settings app on your iPhone -> Scroll down to find the app, which Live Activities are not working -> Live Activities -> Turn off/on the toggle next to Allow Live Activities.
- Additionally, ensure that the toggle for More Frequent Updates is enabled.
20. Turn ON “Motion to Wake”
On iPhone 14 Pro and 14 Pro Max, StandBy mode turns off the display if it figures out that you are not looking at the screen. Integrated with the Night Mode, StandBy comes with a feature called “Motion to Wake” which automatically turns on the display at night when it detects motion.
- To bring this additional feature into play, go to the Settings app -> StandBy -> Night Mode -> turn on the toggle for Motion to Wake. From now onwards, StandBy mode will turn on the display when motion is detected at night.
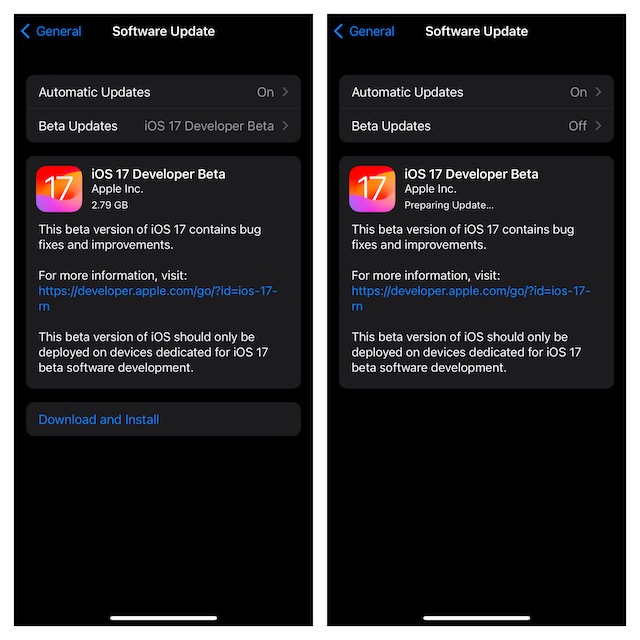
21. Disable the Automatic Software Update
The automatic software update kickstarts when your iPhone is locked, connected to a power source, and has a strong as well as stable Wi-Fi connection at its disposal. If you have enabled the auto-software update on your iOS device, try turning it off as it might be coming in the way of the smart display.
- Open the Settings app on your iPhone -> General -> Software -> Automatic Updates -> Under the Automatically Install and Download sections, turn off the toggle next to iOS Updates.
22. Disable Auto-Installation of Security Responses & System Files
In the modern versions of iOS, you can install the Rapid Security and Response software updates even without restarting the iPhone. Even though these are generally minor updates and don’t require you to restart your iPhone, they might obstruct the smart display from functioning.
- Launch the Settings app on your iPhone -> General -> Software Update -> Automatic Updates -> turn off the toggle next to Security Responses & System Files.
23. Check Your iPhone’s Battery Health
If the battery health of your iPhone has degraded below the recommended level, the entire performance (including the StandBy mode) of the device will ill-function. The reason why I have brought battery health into focus is that it is a key component.
- On your iPhone, go to the Settings app -> Battery -> Battery Health & Charging -> check the maximum capacity of the battery.
- If the battery health has dropped below 80%, it could be probably the biggest reason why the iPhone StandBy is malfunctioning.
24. Enable Always ON Display on Your Support iPhone
If you are using iPhone 14 Pro/14 Pro Max or iPhone 15 Pro/15 Pro Max, try enabling the Always On Display. Notably, the iPhone with the AOD has got a few more settings to get the most out of the smart display.
- Head into the Settings app on your iPhone -> Display & Brightness -> Always On Display and then turn on the toggle.
25. Enable Location Services
iPhone StandBy makes use of your location to change views based on your preference. Thus, make sure to enable Location Services.
- On your iPhone, go to the Settings app -> Privacy & Security -> Location Services, and then turn on the toggle.
26. Update Your iPhone
Considering that iOS 17 is still a work in progress, StandBy could be faced with bugs that might be preventing the smart display from functioning properly. Hopefully, updating the software could help you resolve the iPhone StandBy mode not working issue.
- On your iOS device, open the Settings app -> General -> Software Update -> Download and Install the latest iteration of iOS.
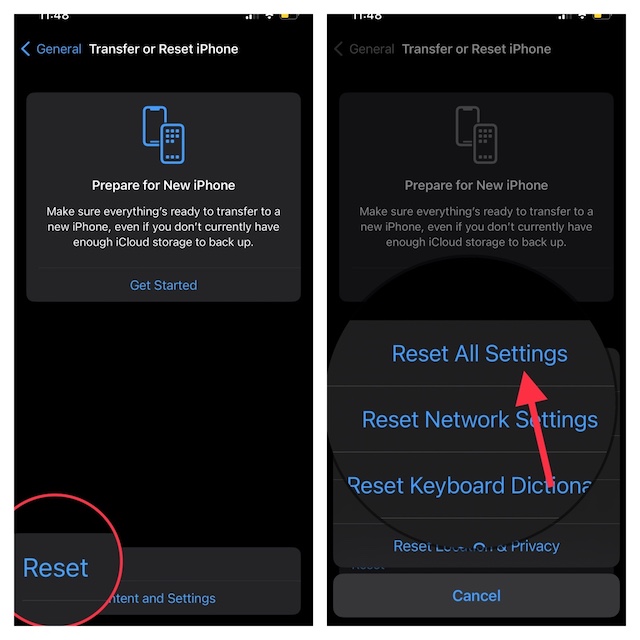
27. Factory Reset Your iPhone
No luck as yet? Fret not, factory reset is renowned for fixing persistent issues like this one. Hence, we will bank on it to put the smart display back on track.
Note that a factory reset will erase the entire custom settings including the Home Screen layout on your device and bring all the settings back to the default state. Nevertheless, it won’t harm any of your media and data.
- Launch the Settings app on your iPhone -> General -> Transfer or Reset iPhone -> Reset -> Reset All Settings.
28. If Nothing Has Worked, Restore Your iPhone As New
Whether the StandBy mode does not activate or does not work as expected, go for the nuclear solution aka restoring the device as new. Since it will completely erase your iPhone, be sure to fully back it up before taking the radical step.
- Use a Lightning cable to connect your iPhone to your computer -> open Finder/iTunes -> select your iPhone -> then, make sure to back it up.
- After that, hit Restore iPhone. Once your iOS device has been restored, set it up from scratch.
- There you have it! Hopefully, you have gotten the better of the problem and the StandBy has begun to work as usual on your iPhone. Now that you have overcome the hurdle, make the best use of the smart display.
Suggestions to Make iPhone StandBy Mode More Effective
Before offering my critical views about the StandBy mode, I would like to thank Apple’s effort to let everyone including those who own an older iPhone model have some pie out of the widely popular but highly expensive Always On Display. As you may have already guessed, I look at StandBy as the mini version of the AOD. Based on my personal experience, I want to offer three suggestions to make the new smart display more user-friendly.
1. Remove the Need to Connect the iPhone to a Power Source in order to Activate StandBy
Without an iota of doubt, the StandBy mode is power-hungry. Hence, keeping it enabled for hours will trigger the rapid battery drain. But what if you have a smartphone with a huge battery and you wish to have better control over this feature? It would be better to invoke this feature at will without having to connect the device to a power source.
2. Ability to Customize the Schedule of iPhone StandBy
Instead of keeping the StandBy mode enabled for hours, I would love to have the flexibility to customize the schedule for the smart display. It would be nice if I could set the StandBy to activate during the specific time period.
3. Why Not Link iPhone StandBy with a Focus Mode?
As someone who heavily uses Focus Mode to ward off distractions, I would like to pair my Focus profile with StandBy mode. With a bit more granular control and customization options, pairing Focus Mode with StandBy Mode may entice everyone.
Disclaimer: Having thoroughly taken a close look at products, we review and recommend them without any bias or strings attached. When you buy any item through our affiliate or sponsored links, we earn a small amount of commission, which helps manage the ever-growing team and the site. Read more…
Read more: iOS 17 Software Update Got Stuck? 20 Ways to Fix It!
If my phone is charging there is no reason for the screen to go dark. What’s the point of having a StandBy feature if you have to continually tap your phone. This was the only feature of ios17 I was looking forward to and not even my 13 pro can utilize it. Ridiculous.
Sir.. Very good tips on standby.. My problem isn’t that it doesn’t work. It works perfectly when i initiate it. The problem is that almost every night it turns itself completely off for no apparent reason. Tonight I WILL try force closing all the apps, but i seem to recall doing that before. I’ve yet to get a FULL night where it stays on. Sometimes it’s just a matter of tapping it, and it comes back. But other times it will not come back unless i take it off the charger, and place it back on. I attributed it to early beta bugs, but so far (beta 7), it’s still a problem.