In more ways than one, “Spotify’s Autoplay” is designed to enhance your music streaming experience. Based on your preference or the sort of songs that appeal to your taste, Spotify automatically plays songs so that you can enjoy music to the fullest. While this is a well-thought-out feature, not everyone might find it in line with their preference. That’s the reason why the music-streaming app offers a way to turn off auto-play. Recently, many users have reported that they can’t turn off autoplay on Spotify in iPhone or Android. If this issue has troubled you as well, follow along to resolve it.
Fix “Can’t Disable Autoplay” on Spotify in Android & iOS
Why doesn’t the “Autoplay” feature stop in the Spotify app? From what I can tell based on several complaints, this issue seems to be a byproduct of a classic software glitch. Therefore, you can fix it through some tried and tested software tricks.
1. Force Kill the Spotify App and Relaunch It
When faced with a miscellaneous issue, force-quitting comes in super handy. Thus, we are going to bank on it to resolve the issue.
- On iPhone, swipe up from the home bar to access the app switcher and then swipe the app card of the Spotify app to force quit the app.
- On an Android device, swipe up from the bottom of the screen and hold. Next, swipe up on Spotify’s app card to kill the app.
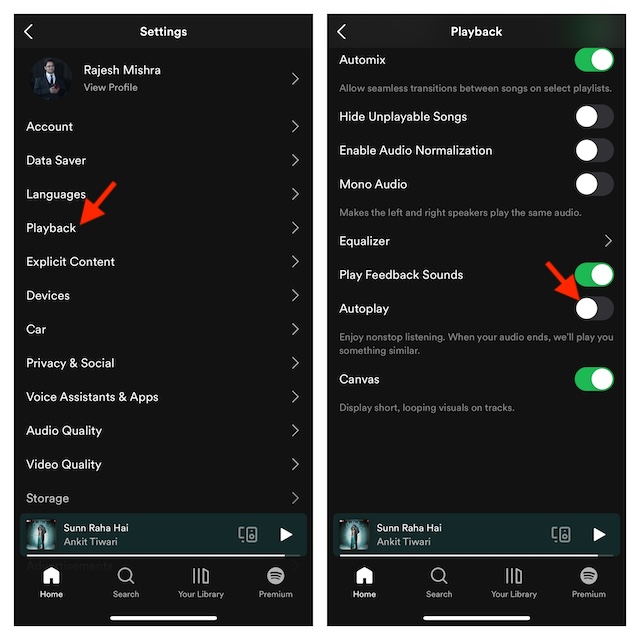
2. Turn ON/OFF Autoplay
Another reliable solution that I would recommend you try is to enable/disable the autoplay feature in the Spotify app. In some cases, just refreshing the autoplay toggle can let you get rid of the problem.
- To do so, open the Spotify app -> tap on the settings icon at the upper right corner of the screen -> Playback -> turn on the toggle next to Autoplay.
- Now, restart your device. After your device has rebooted, turn off Autoplay.
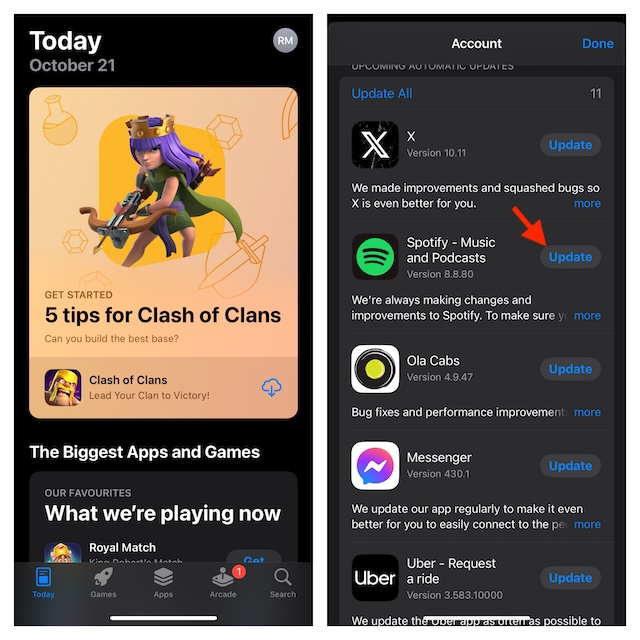
3. Update the Spotify App on your Device
If the autoplay feature still refuses to work as expected, try updating the Spotify app. If the problem is due to a software glitch, updating the app can get the job done.
- To get it done, launch the App Store/Play Store on your device -> find Spotify, and update it as usual.
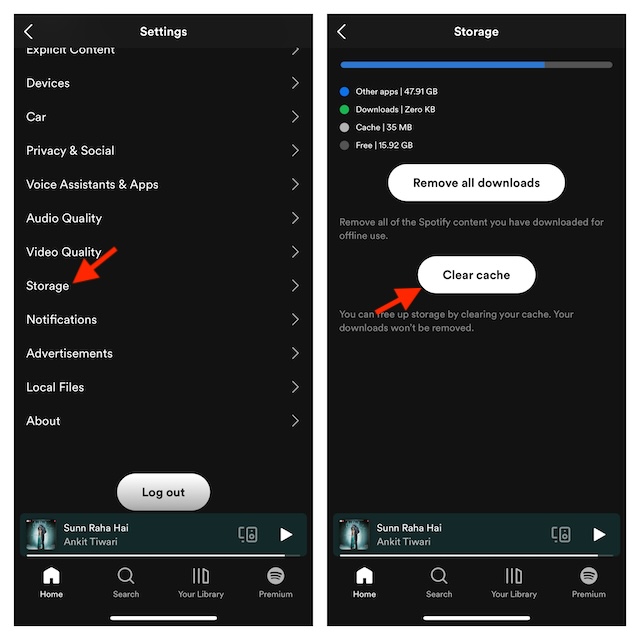
4. Clear Spotify Cache
If it’s been a while since you wiped out Spotify’s cache, it might be causing the problem. At times, just clearing the cache brings the ill-functioning music app back on track.
- Simply, fire up the Spotify app -> tap on the Settings icon at the top right corner of the screen -> Storage -> Clear Cache.
- Now, launch the music app and play one of your favorite tracks. Hopefully, the autoplay feature will no longer kick in.
5. Delete and Reinstall Spotify
A good many users have managed to fix the autoplay issue in the Spotify app by deleting and reinstalling it. Hence, we will give this effective but radical tip a chance.
- Touch and hold the Spotify app icon -> hit the delete button and confirm.
- Next, open the Play Store/App Store -> search for Spotify, and then install the music app.
Wrapping up…
That’s pretty much it! Hopefully, you have successfully disabled the autoplay feature in the Spotify app. Feel free to share your feedback and the solutions that have come to your rescue.
Read more: Pro Tips to Fix Live Stickers Not Working in iOS 17 on iPhone/iPad