Stage Manager is exactly what you should use to keep app windows organized and switch between them with utmost ease. Introduced in macOS 13 Ventura, it’s designed to not only boost productivity but also keep chaotic tabs at bay. So, if you have upgraded to the latest iteration of macOS, you should master this productivity-centric tool sooner than later. To help you get started on the right note, I have come up with 16 best tips and tricks to use Stage Manager in macOS Sonoma/Ventura on Mac like a pro.
16 Best Tips & Tricks to Use Stage Manager on Mac
Initially, it requires some learning curve and also some time to get used to Stage Manager. However, once you have gone past that phase, chances are you may fall in love with the app windows organizer.
1. Quickly Enable/Disable Stage Manager from Control Center
Thanks to the presence of an icon in the Control Center, it’s pretty easy to enable/disable Stage Manager on Mac.
- Click on the Control Center icon at the upper-right corner of the screen -> click on the Stage Manager icon to turn it on/off.
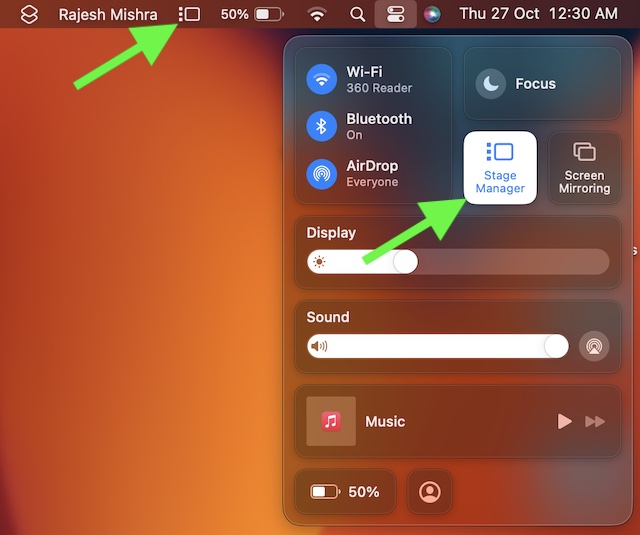
- Besides, you can also turn on/off the Stage Manager from System Settings. Go to the System Settings app -> Desktop & Dock and then turn on the toggle for Stage Manager.
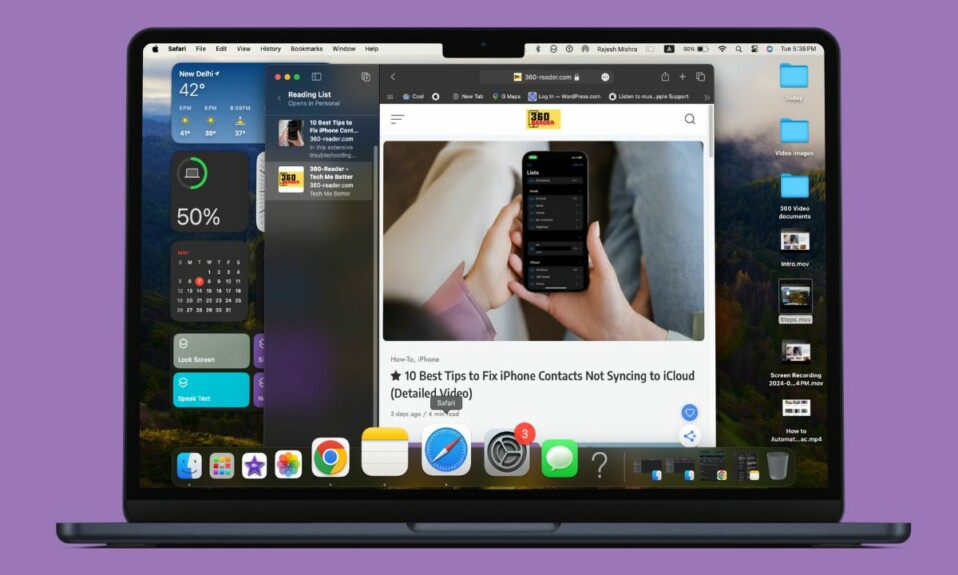
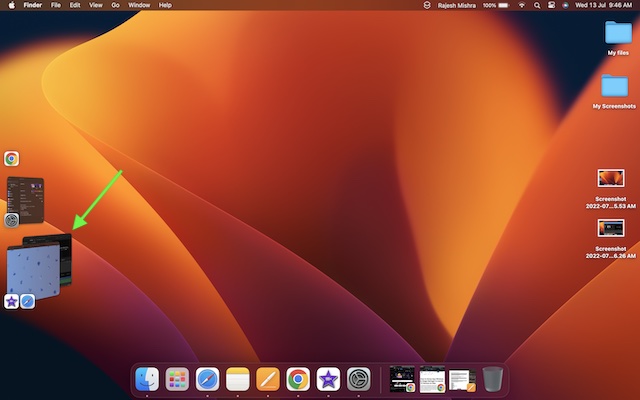
- Based on your recent use, thumbnails are arranged automatically. Up to six thumbnails appear in Stage Manager depending on the size of your desktop.
- Since each thumbnail displays a live view of its window, it becomes much easier to check updates like incoming messages without switching to that window.
2. Move or Resize the Center Window
If you want to move or resize the center window, simply drag its title bar, or drag an edge of the window. Do note that if a window covers thumbnails, they hide until you uncover them or move the pointer to the left edge of the screen. And if you put a window into the full screen, it will move to its own space outside of Stage Manager.
3. Quickly Switch Between Windows in Stage Manager on Mac
The app that you are using currently goes into the center ensuring you can use it with complete peace of mind. The other apps are shown in the Stage Manager as thumbnails. You can quickly switch between windows by clicking a thumbnail.
4. Use Keyboard Shortcut to Switch Between the Widnows of the App You’re Using
It’s worth pointing out that you can also use a handy keyboard shortcut to switch between the windows of the app you are using.
- Press the character key to the left of the number 1 and the Command (⌘) key at once. Then, click on the thumbnail of the app which windows you would like to switch.
5. Use Keyboard Shortcut to Switch Between the Apps in Stage Manager
What’s more, the CMD+Tab keyboard shortcut makes it incredibly simple to switch between the apps in Stage Manager. To do so, press and hold the command button and then use the Tab button to choose the app that you would like to use.
6. Create a Window Group in Stage Manager
To create a window group, simply drag a thumbnail to the center window. Alternatively, you can press the Shift key while clicking the thumbnail to make a window group.
7. Remove a Window from a Group in Stage Manager
To remove a window from a group in Stage Manager, just drag it back to the thumbnail area.
8. Drag Items to Another Window in Stage Manager
If you want to drag items to another window, hold the item over a thumbnail until its window goes to the center. After that, drop the item into the window. Just in case multiple windows are in the center, simply hold the item over a rear window until it moves to the front and then drop the item.
9. Send a Window to the Side as a Thumbnail Without Switching Windows in Stage Manager
You can easily send a window to the side as a thumbnail without switching windows in Stage Manager. To do so, click the minimize button in the corner of the window, or just press Command-M.
10. Hide an App’s Thumbnail and Windows in Stage Manager
It’s also pretty easy to hide an app’s thumbnail and windows in Stage Manager. To do so, press Command-H.
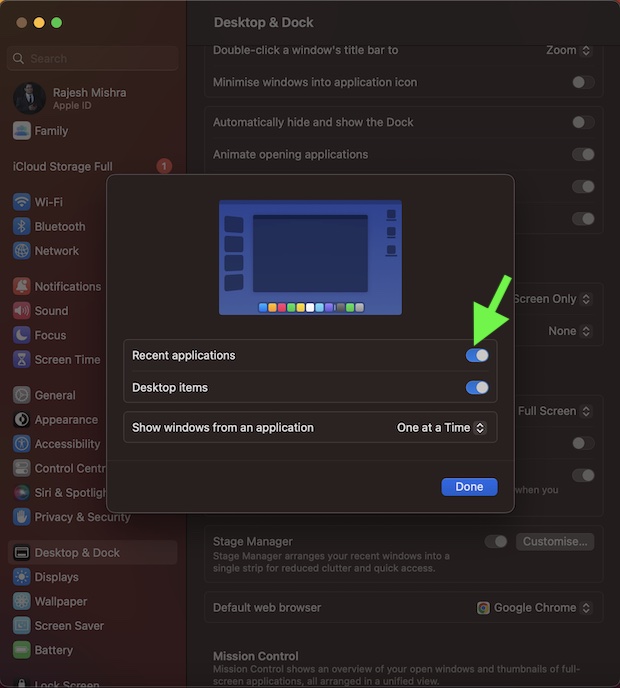
11. Show Recent Applications in Stage Manager
Though thumbnails are hidden in the Stage Manager until you move your pointer to the left edge of the screen, you can choose to show them.
- Go to the System Settings app -> Desktop & Dock -> turn on Stage Manager -> Customize -> turn on the switch for Recent Applications.
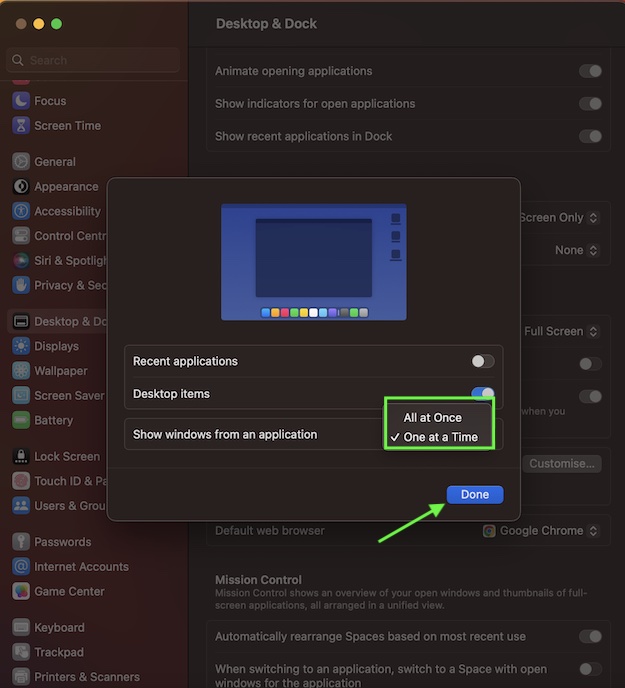
12. Stop Stage Manager from Showing All Windows from an App at Once
Stage Manager displays all windows from an app at once. However, you can limit the Stage Manager to show only one window at a time.
- Open System Settings app -> Desktop & Dock -> turn on Stage Manager -> Customize -> click on the drop-down menu next to All at Once and choose One at a Time.
13. Temporarily Hide/Show Desktop Items When Stage Manager is ON
By default, Stage Manager keeps all the desktop items hidden. However, you can temporarily hide/show desktop items by just clicking on the screen.
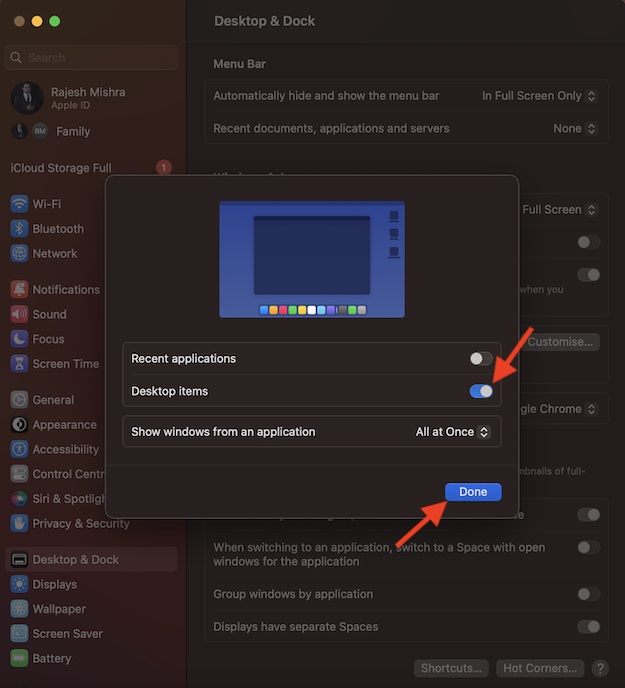
14. Permanently Show Desktop Items When Using Stage Manager
There is also a way to permanently show desktop items when using Stage Manager.
- System Settings app -> Desktop & Dock -> turn on Stage Manager -> Customize -> turn on the toggle next to Desktop items.
15. Show Stage Manager in Mac’s Menu Bar
Using the drag and drop gesture, you can easily show the Stage Manager icon in the Mac’s menu bar.
- To get it done, click on the Control Center icon at the top right corner of the screen -> drag the Stage Manager icon and drop it in the menu bar.
- Alternately, open the System Settings app -> Control Center -> Stage Manager -> Show in Menu Bar.
16. Create a Keyboard Shortcut for the Stage Manager
Notably, you can also create a keyboard shortcut for Stage Manager for a more personalized experience.
- Navigate to the System Settings -> choose Keyboard in the sidebar -> Keyboard Shortcuts button -> Mission Control.
- After that, double-click “none” next to the Stage Manager setting.
- Then, press the keys that you would like to use as a shortcut.
Best Tips and Tricks to Get the Most Out of Stage Manager on Mac
There you have it! So, these are the cool tips and tricks to use Stage Manager like a pro on Mac. Now that you have unraveled all the tricks, bring them all into good effect to not only make the most of Stage Manager but also customize it to your liking.
For more help, check out this video: