Going by several reports and based on my experience, it would be fair to say that iOS 17 is incredibly buggy. Issues like the Depth Effect not working, personal hotspot missing, and the ill-functioning of the always-on display are rather frustrating. Another problem that is haunting a number of users is the Wi-Fi glitch. But there is no need to panic as we have lined up the best 13 best tips and tricks to fix Wi-Fi not working in iOS 17 on iPhone and iPad. That said, let’s sort out the problem!
Tips to Fix Wi-Fi Not Working in iOS 17/iPadOS 17 on iPhone and iPad
Getting into the route of the problem can help you understand the possible villains and the solutions that may work in troubleshooting the issue. So, get through it upfront.
Why Does Wi-Fi Issue Crop Up on iPhone and iPad?
“Wi-Fi not working” is the sort of issue that crops up due to several things. Thus, when you are up against this problem, you will need to take care of multiple things. Here are some of the usual suspects that you need to keep in mind:
- Poor/unstable connection
- Occasional software glitch
- Miscellaneous glitch related to the Wi-Fi network
- Wi-Fi Outage
- Software bug
The good thing is there are some very effective tips to resolve the Wi-Fi not working problem on iPhone. Let’s try each one of these tips to put the issue behind us!
1. Turn OFF/ON Wi-Fi
The easiest way to fix Wi-Fi ill-functioning is to just turn off/ on the Wi-Fi toggle. Since it has done the trick for me on quite a few occasions, I can vouch for its effectiveness.
- Open the Settings app on your iPhone > Wi-Fi and then turn off the toggle.
- Now, restart your iPhone and then turn on Wi-Fi.
- Then, check if the Wi-Fi has started to work properly.
2. Turn ON/OFF Airplane Mode
Airplane mode is also very effective when it comes to fixing Wi-Fi issues. The ability to reset radios in a jiffy always puts it in good stead.
- On iPhone with Face ID: Swipe down from the upper right corner of the screen to show the Control Centre and then tap on the Airplane Mode icon.
- On iPhone Touch ID: Swipe up from the bottom edge of the display to reveal the Control Center and then tap on the Airplane Mode icon to activate it.
- After waiting for a few seconds, tap on the Airplane Mode icon to turn it off.
3. Soft Reset Your iPhone
A soft reset is one of the first solutions that you should try when faced with a common issue like this one.
- On iPhone with Face ID: Press and hold the volume up/down button and the side button. Then, drag the power off slider to shut down your iPhone. After that, press the side button to restart your iPhone.
- On iPhone with Touch ID: Press the side button to bring up the power off slider and then drag it to shut down the iPhone. Then, press the side button to reboot your iPhone.
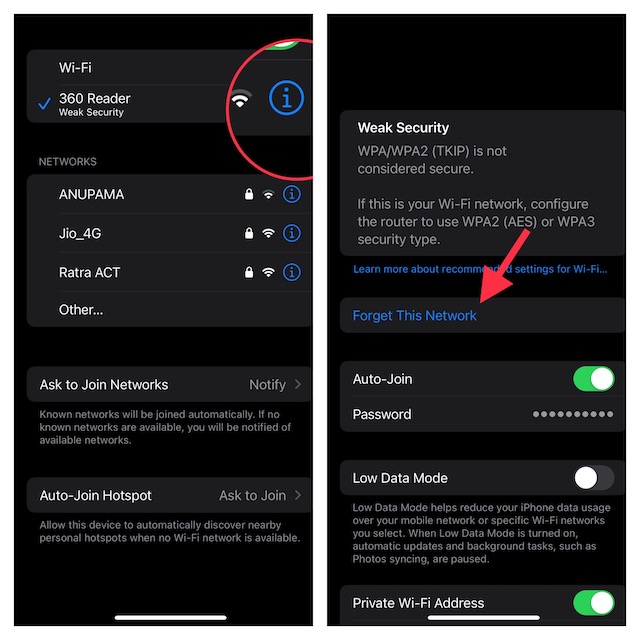
4. Forget the Wi-Fi Network and Reconnect
If the Wi-Fi issue continues on your iPhone, forget the network and reconnect to it.
- Go to the Settings app on your iPhone > Wi-Fi > tap on the info button next to the WiFi network.
- Tap on the Forget This Network and confirm the action.
5. Enable Wi-Fi Assist
Modern versions of iOS come with a feature called “Wi-Fi Assist” which automatically switches to the cellular network whenever Wi-Fi is not working or is poor. It’s smartly done to ensure your usage doesn’t get affected. Though it’s not a solution, turning it on can play a vital role in boosting your overall experience.

6. Allow Your iPhone to Connect to Known Networks
iOS allows you to automatically connect to known networks. If you want your iPhone to automatically join the previously connected networks, go to the Settings app -> Wi-Fi -> Ask To Join Networks -> Notify.
7. Restart Your Wi-Fi Router
At times, you can fix an ill-functioning Wi-Fi connection by just restarting the router. So, give it a try to get rid of the issue. You can use the power button to reboot your router. Besides, you can unplug the router from the power source. Wait for about 10 minutes and then plug the router back in.
8. Hard Reset Your iPhone
There are very few solutions that are as effective as force reset. Therefore, it would be wise to try it out as well.
- Press and quickly release the volume up button.
- After that, press and quickly release the volume down button.
- Then, hold down the side button until the Apple logo pops up on the screen.
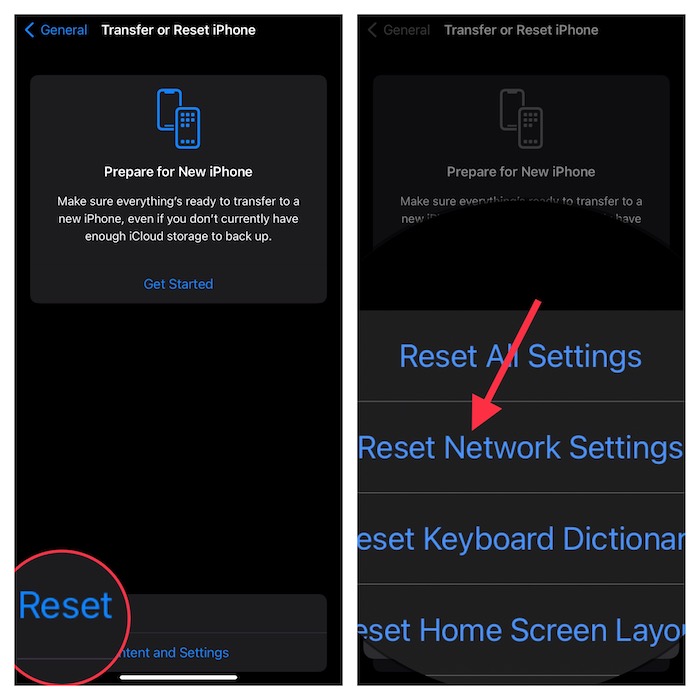
9. Reset Network Settings
This one has long been my go-to troubleshooter for fixing network-related issues. Hence, I would suggest you give it a go as well.
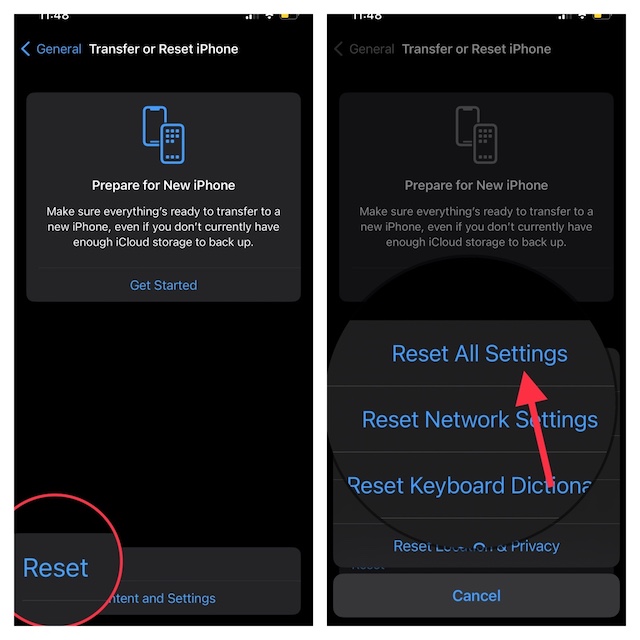
- Open the Settings app on your iPhone > General > Transfer or Reset iPhone /iPad > Reset > Reset Network Settings.
10. Contact Wi-Fi Provider
If none of the tricks mentioned above has resolved the Wi-Fi problem on your iOS device, contact your Wi-Fi provider to check if the Wi-Fi network is going through any outages.
11. Factory Reset Your iPhone
Factory reset has also got a great track record for resolving common iOS issues. But before going for this radical solution, let me tell you that it will remove all the existing settings and put your device in the default state. As for the security of your data, reset assured that factory reset will neither touch your media nor harm your data.
- Head into the Settings app on your iPhone > General > Transfer or Reset iPhone/iPad > Reset > Reset All Settings.
12. Update Your iPhone
If the Wi-Fi issues still persist on your iOS device, go for the software update. Knowing that iOS 17 is too buggy, it wouldn’t be wrong to put the blame on a software bug. Fortunately, updating the software could troubleshoot the issue.
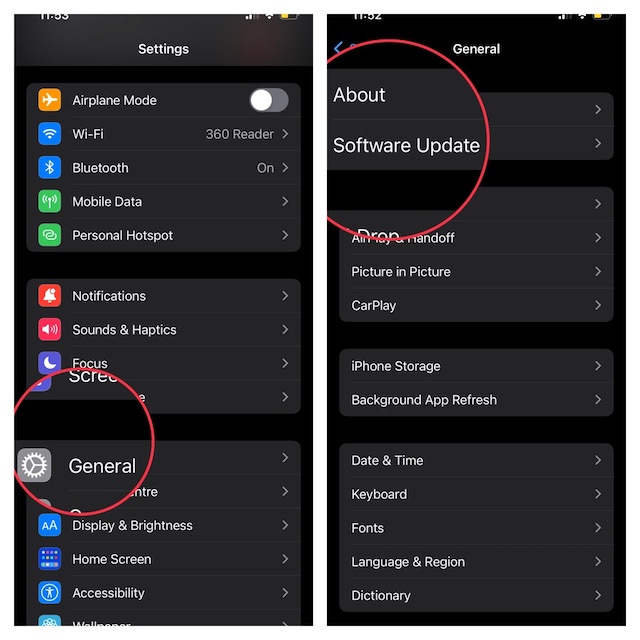
- Launch the Settings app on your iPhone > General > Software Update > download and install the latest version of iOS.
13. Restore Your Device As New
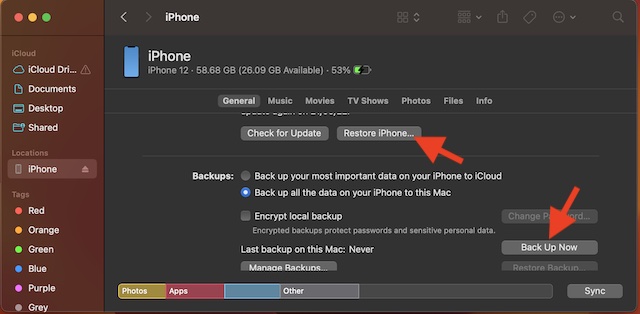
Should Wi-Fi continue to ill-function on your iPhone, restore the device as new. But before giving this nuclear solution a try, you should be fully aware of the fact that it will entirely erase your device, wiping out everything that exists on your device including media and data. Hence, you must not proceed before backing up your device.
- To get going, connect your iPhone/iPad to your Mac or Windows PC using a USB cable -> launch iTunes/Finder -> select your device.
- Now, make sure to click on “Back UP Now” to fully back up your device.
- Once the backup is done, hit the Restore iPhone/iPad and allow the device to restore without any hindrance.
- After that, set up your device and also restore the latest backup.
Wrapping up…
There you go! Hopefully, you have put an end to the Wi-Fi issue on your iPhone. Would you like to share your feedback and the tips that have done the job for you?