In more ways than one, Google Chrome is a feature-packed web browser. Deeply integrated with the G-Suite, it provides a seamless browsing experience. No wonder it’s by far the most popular browser across platforms despite the presence of several capable browsers including Safari, Firefox, Edge, and more. One of the downsides of Chrome is being too resource hungry. If you fail to take control of the browser, it will gobble up a ton of RAM and CPU usage, thereby making your system feel sluggish and may even trigger the battery drain. Fortunately, you can enable Memory Saver in Google Chrome on Mac and Windows PC to reduce RAM/CPU usage. Let me show you how it’s done the right way:
Activate Memory Saver in Google Chrome on Mac and Windows PC
First and foremost, ensure that you have updated Chrome on your computer. If your browser is not updated, you won’t find the memory saver feature.
How Does Google Chrome’s Memory Saver Work?
Wondering how does Chrome’s Memory Saver work? Well, it frees up memory from inactive tabs so that the active tabs and other apps can have more computer resources. As a result, Chrome does not slow down. Notably, it automatically makes the inactive tabs active again when you return to them.
Ever since I stumbled upon this notable Chrome feature, I have been using it. From what I have experienced, it not only decreases the RAM usage but also makes the browser feel faster even when it’s under heavy usage. Give it a try and you may also be pretty much one the same page!
Turn ON Google Chrome’s Memory Saver on macOS and Windows
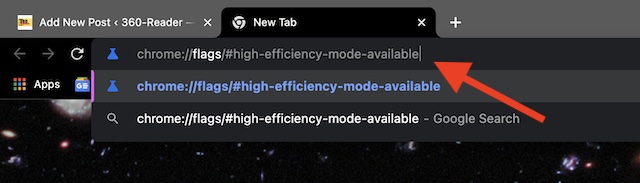
Step 1. To get started, open Chrome on your computer.
Step 2. Now, paste the following address in the address bar to bring up the Chrome Flags:
chrome://flags/#high-efficiency-mode-available
Step 3. Click on the drop-down menu next to Enable the High-Efficiency Mode feature in Settings and choose Enabled.
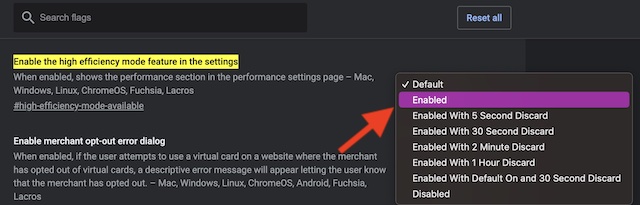
Step 4. Next, restart the Chrome browser.
Step 5. Next up, head over to the address bar in Chrome and navigate to the following location:
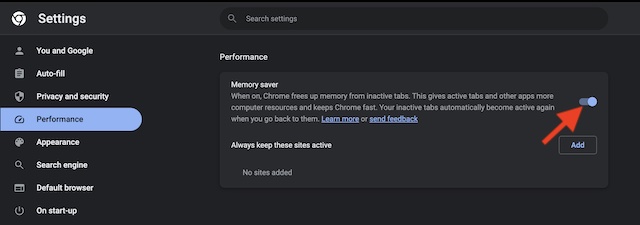
chrome://settings/performance
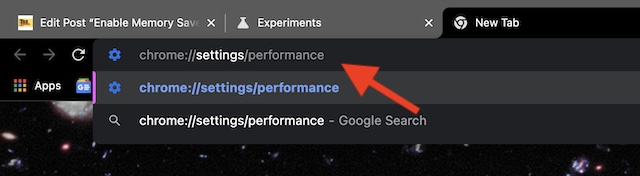
Step 6. Finally, turn on the toggle next to “Memory Saver” and then relaunch the browser to bring the change into effect.
That’s pretty much it! You have successfully activated the Memory Saver feature in Google Chrome on your macOS or Windows device. Now, go ahead and use the browser. You may soon notice the difference in Chrome resource usage, with relatively low memory usage and reduced CPU usage.
Frequently Asked Questions
Q 1. Which is better – Chrome or Safari?
If customization and having the luxury of a ton of top-notch extensions are your priorities, Chrome is the way to go. However, if you prefer to have a wide range of security tools and high efficiency, look no further than Safari.
Q 2. How do you import passwords and history from Chrome to Safari on Mac?
Open Safari on your Mac -> File menu at the top -> Import From and choose Google Chrome. After that, select the items you want to transfer and hit Import.
Read more: 3 Ways to Access System Report in macOS 13 Ventura on Mac