For an additional layer of safeguard against unauthorized access, many apps like WhatsApp allow you to use Face ID or Touch ID to prevent intrusion. While this is a great privacy feature, unfortunately, there are still a number of apps that do not support this functionality. Hence, you have to resort to different workarounds to block unauthorized access to any app on your iPhone. Thanks to a recent update, Apple has offered a neat way to let you lock specific iPhone apps behind Face ID/Touch ID or your passcode. That said, read on to set up and use this privacy-centric feature…
Lock Specific iPhone Apps Behind Face ID or Passcode
To begin with, let’s understand how this brand-new privacy feature works!
So, how do you use the Lock Screen action to Lock Apps on iPhone?
Wondering how this hack lets you protect specific apps with Face ID? Well, it first requires you to use the Shortcuts app to create a Lock Screen action. After that, you get an option to choose the app which you wish to protect. Since there is no restriction about the number of apps you can lock, you can get the most out of this handy shortcut to safeguard as many apps as you want.
Once you have ideally set up personal automation, the Lock Screen will be automatically triggered the moment anyone tries to open the specified apps. The app will then require authentication through Face ID before being opened. While this blockade won’t be a hassle for you thanks to the biometric authentication, it will work as a top-notch shield to keep intruders at bay.
Lock Specific Apps with Face ID on Your iPhone
- To get going, open the Apple Shortcuts app on your iPhone.
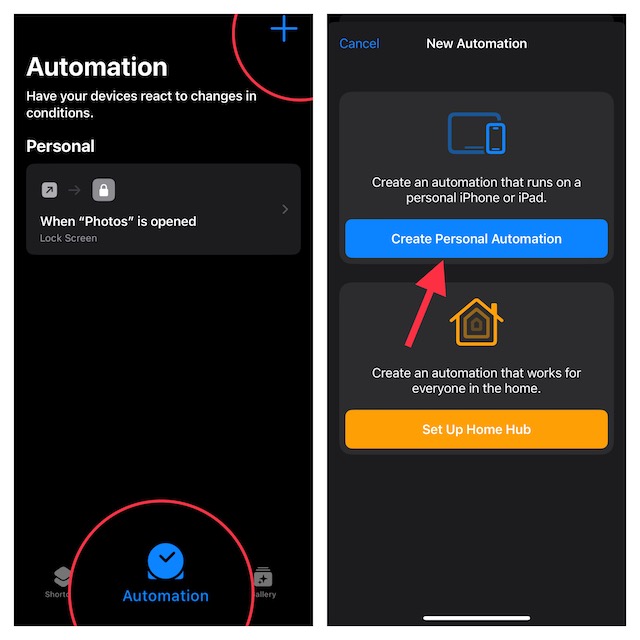
- After that, tap on the Automation tab at the bottom of the screen.
- Then, tap on the + button in the top-right corner and select Create Personal Automation.
Note:
- If you have not yet made any automation, the “+” button won’t appear at the top right corner of the screen. In this case, just tap on Create Personal Automation to proceed.
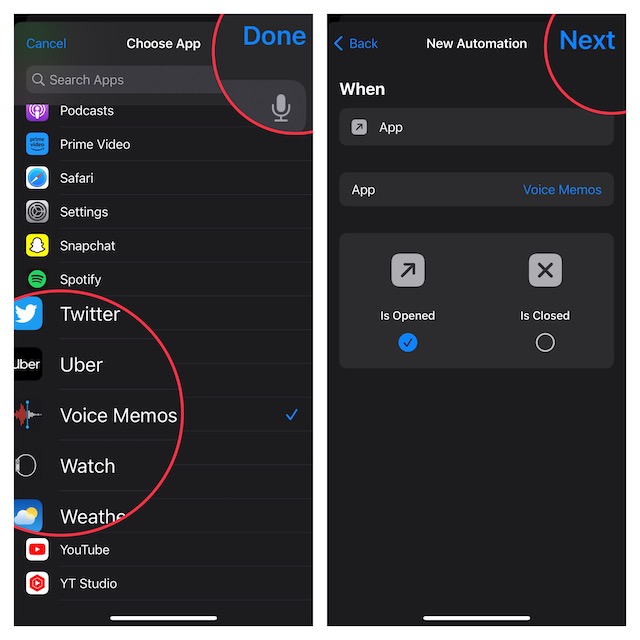
- Now, scroll down and tap on “App”.
- Then, ensure that the “Is Opened” is checked off.
- Next, tap on Choose.
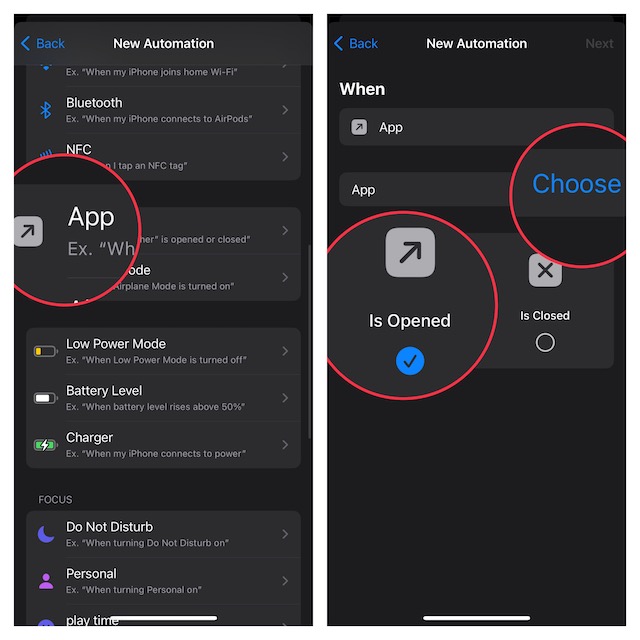
- Next up, scroll down the list of apps and then select the one you would like to lock with Face ID or passcode. Then after, tap on Done at the top-right corner of the screen.
- Tap on Next.
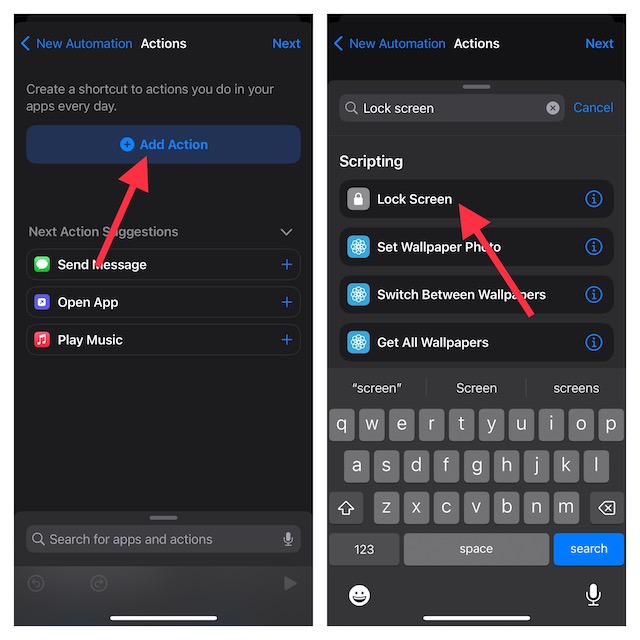
- Up next, tap on the Add Action button.
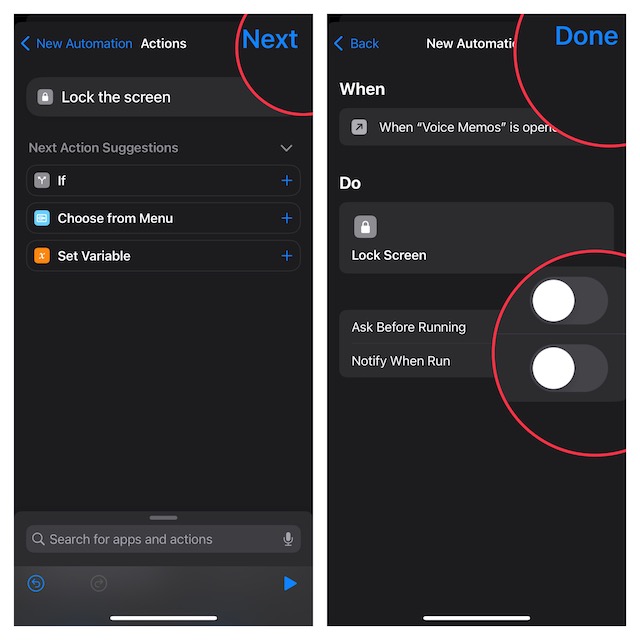
- Now, type “Lock Screen” into the text field and choose Lock Screen when it shows up. Then, hit Next.
- Turn off the toggle next to Ask Before Running and tap on Don’t Ask in the pop-up to confirm.
- In the end, make sure to tap on Done to finish and you are good to go!
That’s pretty much it! You have successfully created the Lock Screen action to lock the app with Face ID. Going forward, whenever you (or anyone else) tap on this app to open, the Lock Screen will be activated automatically in order to block access. One must authenticate with Face ID or passcode to open the app.
If you don’t want anyone to make changes to the shortcut, make sure to take advantage of the same Lock Screen action to protect the Shortcuts app as well.
Delete iPhone Lock Screen Action
Later, if you ever want to make changes or completely delete a particular Lock Screen action to remove the lock from any app, you can do so without any hassle.
- Head over to the Shortcuts app on your iPhone -> Automation tab -> swipe left on the automation and hit the Delete button to get rid of it.
- If you want to make changes to it, just tap on the automation and then make the necessary changes as per your needs.
Frequently Asked Questions
1. How many apps can I lock with Face ID using the Lock Screen action on my iPhone?
There is no restriction at all. Hence, you can lock an endless number of apps with Face ID on your iPhone.
2. What is the OS requirement for locking particular apps with Face ID on iPhone?
Keep in mind that your iPhone must be running iOS 16.4 or later to be able to lock specific apps using your passcode or Face ID.
3. Why is the Siri shortcut not working on my iPhone?
Make sure you have properly set up the Siri shortcut. If the issue still persists, delete the shortcut and set it up from scratch.


