There are multiple reasons why you may need to connect your iPhone to your computer via Finder or iTunes. For instance, for backing up your device locally on a computer, restoring the device or restoring the device in recovery mode, or even transferring photos, you will have to pair your iOS device with your macOS or Windows computer. Though in most cases, connecting the iPhone to the computer works as expected. There are times when it starts throwing tantrums and your iPhone does not show in the Finder. But bother not, we have found 32 viable tips to fix iPhone not showing in Finder on Mac.
Best Tips & Tricks to Fix iPhone Not Showing Up in Finder on Mac
Before moving ahead, let’s delve deep into what hinders the iPhone from showing in Finder or iTunes.
Why Doesn’t iPhone Appear in Finder or iTunes?
There are several reasons why the iPhone fails to show in Finder/iTunes. Notably, the issue could be both hardware and software related. Have a look at some of the biggest culprits:
- Uncertified cable
- Damaged port
- Outdated iTunes
- Wrong configuration
- Software bug
- Firewall
We have taken each one of the above villains into account and provided solutions that can fix the ill-functioning Finder and start showing the connected iPhone or iPad.
1. Make Sure You Are Using an MFi-Certified Cable
To begin with, ensure that you are using a fully certified USB cable. If your cable is not MFi (Made for iPhone and iPad) certified, it may not work reliably. As a result, the device may not appear in Finder.
2. Be Sure You Have Securely Connected Your Device to Your Computer
Another important thing that you should do without fail is to ensure that you have securely connected your mobile device to your computer. Check that the connector has made stable contact. If it hasn’t, remove the cable and plug it back in.
3. Ensure That the Cable Is Not Damaged
Well, it goes without saying, isn’t it? Therefore, make sure the cable is not damaged or frayed out. If you are dealing with an old cable that hadn’t been in use for a long time, it could be the culprit for the whole chaos.
4. Clean the Ports
Believe it or not, tiny particles of dust and debris are also equally responsible for the iPhone not appearing in Finder or iTunes issue. Thus, clear the ports to get rid of dust that may have sneaked inside and could be preventing the connector from making a secure connection.
5. Change the USB Cable
If the problem persists, I would recommend you change the USB cable as it might be creating the issue. If your device shows up in Finder on your Mac after you have changed the cable, it’s the cable (and not your iPhone) at fault.
If you need a strong and durable Lightning Cable, Check Out These Recommended Cables:
6. Quick Way to Confirm That Your iPhone/iPad has Connected to Your Computer
When you connect your iPhone to your computer, the charging icon pops up on the screen, thereby confirming that the device has been connected to the computer.
7. Make Sure Your iPhone/iPad is Unlocked and The Home Screen is Visible
Keep in mind that if your iPhone is not unlocked and the Home Screen is not visible, it won’t appear in Finder. Therefore, do check off this essential requirement without fail.
8. Set Finder Settings to Show Your Device in the Sidebar
Notably, Finder comes with a dedicated setting to let you show your device in the sidebar. Make sure you have set it to display your connected device.
- To do so, open Finder on your Mac.
- Now, click on the Finder menu at the upper left corner of the screen and choose Settings in the drop-down menu.
- After that, click on the Sidebar tab.
- Head over to the Locations section, and ensure that the CDs, DVDs, and iOS Devices box is checked off.
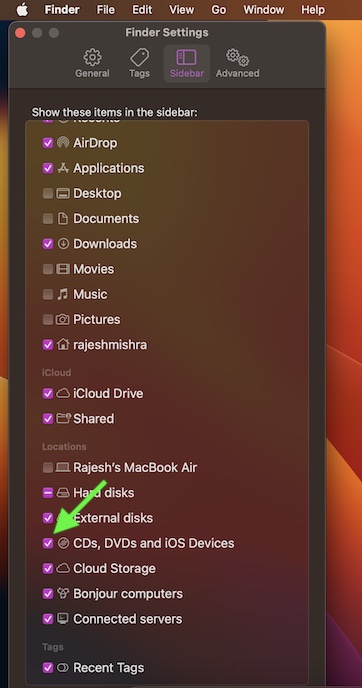
- Next, click on your device in the sidebar (Finder) or in the top left menu (iTunes) to view the syncing options.
9. Check to See If your iPhone Shows Up in the System’s Information
macOS provides a neat way to let you find out whether or not your iPhone appears in the System Information on your Mac.
- To do so, plug your iPhone or iPad into your Mac.
- After that, click the Apple menu at the upper left corner of the screen.
- Next, while holding down the Option/Alt key, click System Information.
- Next up, click USB in the sidebar.
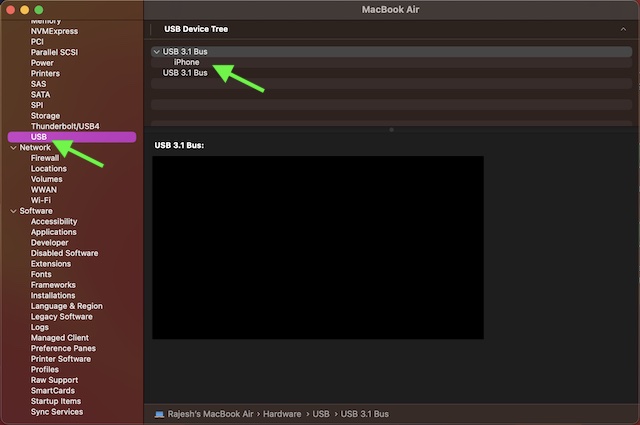
Note that if your iPhone shows up under the USB menu, which means your Mac is able to register the device as connected. In this case, you should blame a rare software bug for obstructing the device from showing in the Finder.
10. Force Kill Finder or iTunes
If Finder or iTunes is already open, quit the app and relaunch it. While this tip might sound quite simple, it has worked for me many a time. So, make sure to give it a try without fail.
On Mac
- Click on the Apple menu at the top left corner of the screen -> Force Quit in the menu.
- Now, select Finder in the menu and hit Relaunch.
On Windows PC
- Select iTunes and then press the Alt+ F4 keys to force quit iTunes. Then, launch iTunes again.
11. Force Quit All Other Apps
This tip might not appear to be a direct solution, but you shouldn’t overlook it. Force quitting all the open apps and launching just Finder/iTunes has done the trick for a handful of users. Hence, we will give it a chance as well.
On your Mac:
- Click on the Apple menu at the top left -> Force Quit -> Select all apps in the menu and hit Force Quit.

On Windows PC:
- Note that Taskbar shows all your active apps to let you easily quit apps with ease. Go to the Taskbar -> head over to the relevant taskbar icon and then hit the “Close’ button.
12. Disconnect Your iPhone/iPad from Computer and Reconnect
At times, all you need to do to fix the iPhone that is not showing up in Finder is just disconnect it from the computer and reconnect. So, be sure to give this nifty hack a try as well.
13. Try a Different Port
Ensure that the port is not damaged. Plug your iPhone into a different port -> fire up iTunes/Finder and then check if the device has started to appear.
14. Clean the Port
If the port of your Mac is infested with dust, gunk, or smudge, it will prevent the connector from having a stable connection. Thus, clean the port to remove the entire pileup.
15. Try a Different Computer
Connect your iPhone to a different computer and check if the device has begun to show in Finder. If it has, your computer is at fault.
16. Make Sure to Trust Your Computer
When you connect your iPhone to your computer, you will see a popup on your iPhone to trust the computer. Then, be sure to enter your iPhone’s passcode to trust the computer.
17. Connect Your Device Directly to Your Computer
Make sure you have connected your iPhone directly to your computer. Be sure not to connect to a USB hub, display, or other devices as it may cause obstruction.
18. Remove All Other Peripherals
Another important thing that you should do without fail is to remove all USB devices and accessories from your computer. After that, reconnect the iPhone to the computer.
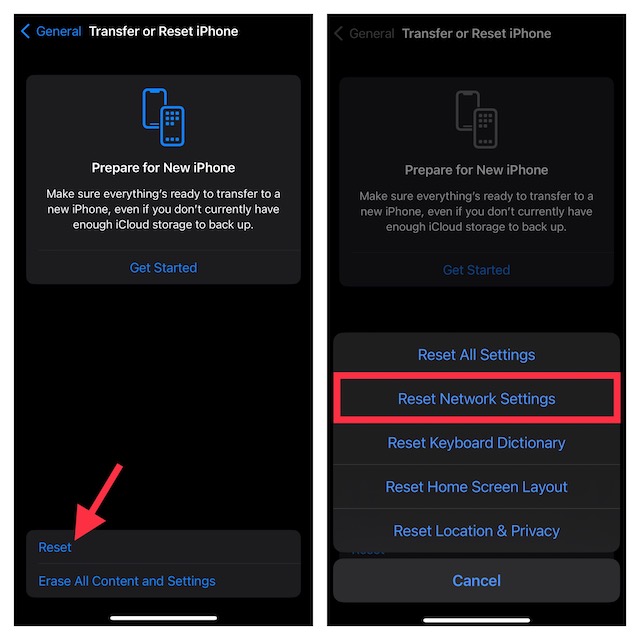
19. Reset Network Settings
If your iPhone is faced with a network-related issue, it might have a hard time connecting and working with other devices.
- On your iPhone or iPad, go to the Settings app -> General -> Transfer or Reset iPhone or iPad -> Reset -> Reset Network Settings and confirm.
20. Delete the Finder’s properties list file
A good many users who had run into the same problem have reported that deleting the Finder’s properties list file worked in fixing the issue. Without any doubt, we are going to give it a go as well.
- First off, copy this folder address ~/Library/Preferences/com.apple.finder.plist
- Head into Finder -> click on the Go menu at the top -> choose Go to Folder in the drop-down menu.
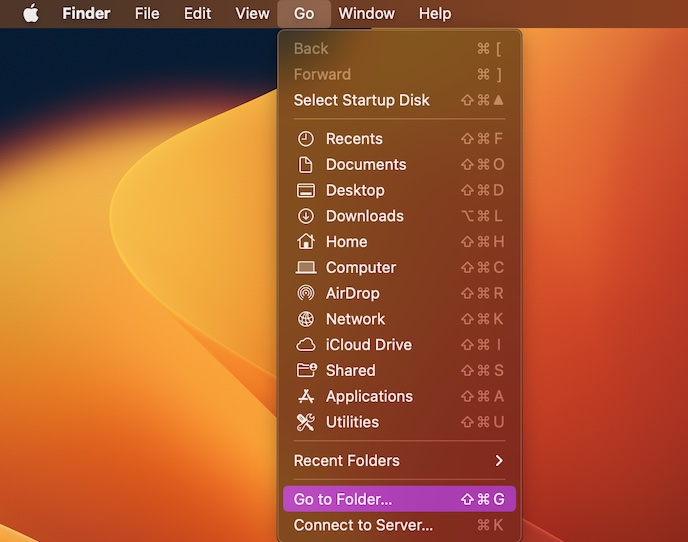
- Then, paste the folder address here and hit the enter key.

- After that, delete the selected com.apple.finder.plist file. For security, I would suggest you move it to another folder for backup and then delete it.
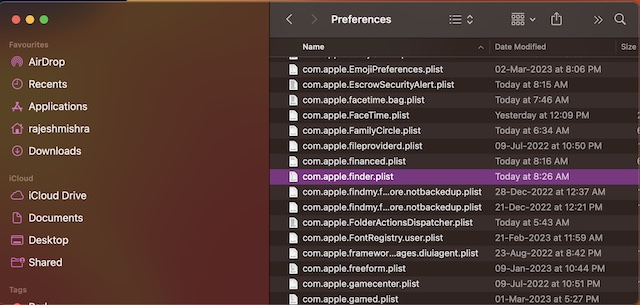
- Next, empty the trash.
- Finally, restart your Mac.
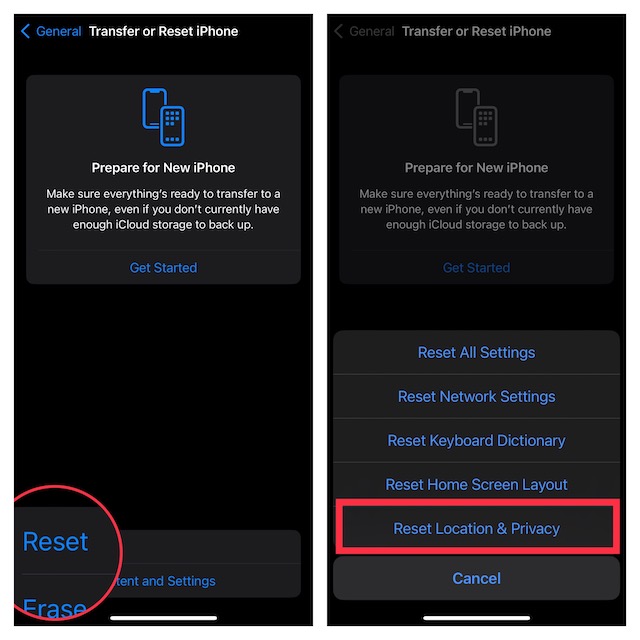
21. Reset your iPhone’s Remembered List of Trusted Computers
iOS provides a way reset the remembered list of trusted computers. Give this reliable solution a try, if your device is unable to appear in Finder even after you have taken care of all the basics.
- First off, open the Settings app on your iPhone or iPad –> General.
- Now, Transfer or Reset iPhone/iPad -> Reset.
- Next, tap on Reset Location & Privacy.
22. Reboot Your iPhone/iPad and Computer
More often than not, you can get rid of a frustrating issue like this one by just rebooting your device. Considering how simple and effective this tip is, you should never miss out on it.
23. Hard Reset Your iPhone or iPad
When it comes to resolving a common issue, force reset aka hard reset has a decent track record.
- On iPhone 8 or later (including iPhone X) and iPad without the Home button: Press and quickly release the volume up button. Then, press and quickly release the volume down button. Next, hold down the power button until the Apple logo appears on the screen.
- On iPhone 7/7 Plus: Hold down the Volume down button and the Side button at once until the Apple logo shows up on the screen.
- iPhone 6s or earlier or iPad with the Home button: Hold down the Home button and the power button simultaneously until you see the Apple logo on the screen.
24. Update iTunes
If it’s been a while since you updated iTunes on your computer, there is a good chance that the outdated version of the software is causing the issue. Therefore, be sure to update the software.
On your Mac (in macOS Mojave or earlier):
- Launch the App Store app on your Mac -> click on the Updates tab at the top of the App Store window.
- If there is any update available, hit Install to get it.
On your Windows PC:
- Open the iTunes app -> click on the Help menu and hit Check for Updates.
25. Delete and Reinstall iTunes
Is your iPhone still not showing up in iTunes on your computer? No worries! It’s time to delete and reinstall it.
On your Mac (in macOS Mojave or earlier)
- Head over to the Applications folder -> drag the iTunes app and drop it into the trash bin. If asked, confirm by entering your administrator password.
On your Windows:
- Click on the Start menu -> Settings -> Apps -> Apps & features.
- Now, select the app you want to delete and then hit Uninstall.
26. Update Your Mac, Windows PC, iPhone/iPad
Should the problem persist, update both your computer and iPhone as there is a high chance that a software bug could be behind the issue.
- On your iPhone or iPad: Go to the Settings app -> General -> Software Update. Allow your device to check for updates. Once that’s done, download and install the latest iteration of iOS/iPadOS.
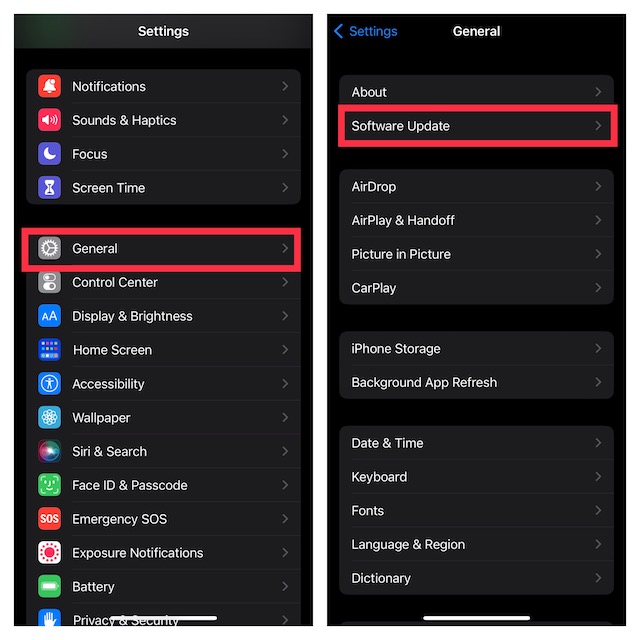
- On your Mac: Head over to the System Settings app -> General -> Software Update -> download and install the latest version of macOS.
- On Windows: Click on the Start menu -> Settings -> Update & Security -> Windows Update and then do the needful.
27. Disable VPN
In order to offer an enhanced layer of safeguard, virtual private networks tend to block communications. If you have set up a VPN, disable it.
28. Disable Firewall
Firewall is designed to safeguard your Mac against malicious attacks. When enabled, it blocks all incoming connections to a computer for enhanced protection. Make sure this security feature is turned off.
- On your Mac, launch the System Settings app -> Network -> Firewall and then turn it off.
29. Turn Microsoft Defender Firewall on or off
In terms of functionality, Microsoft Defender is pretty much like Apple’s Firewall. Hence, we would recommend you disable it as well.
- First off, click on the Start menu -> Settings. Under Privacy & Security, choose Windows Security -> Firewall & network protection and disable it.
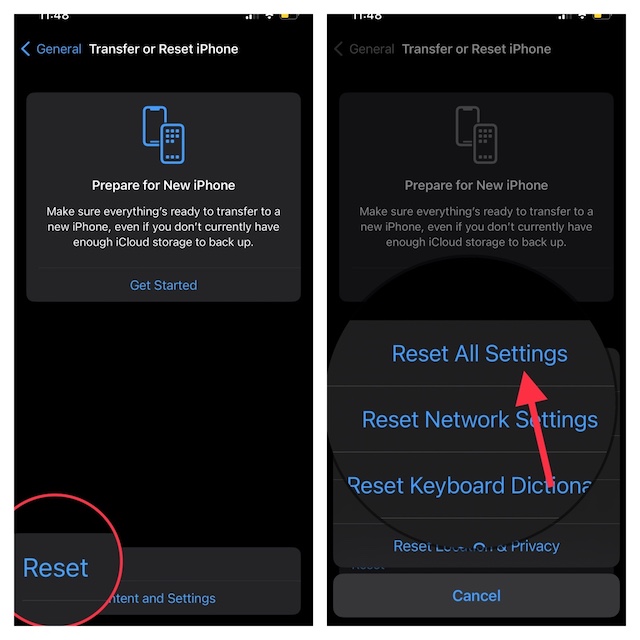
30. Factory Reset Your iPhone or iPad
Factory reset has long been a highly effective solution for fixing a frustrating issue like this one, So, we are going to give it a chance as well.
- Go to the Settings app on your iPhone or iPad -> General -> Transfer or Reset iPhone/iPad.
- Now, click on Reset -> Reset All Settings and confirm.
31. Restore Your iPhone or iPad As New Using iCloud
Restoring the iPhone as new is often recommended when faced with a complex problem or something that doesn’t get sorted out by basic tips. No prizes for guessing! We are going to count on it to resolve iPhone not showing in the Finder issue as well.
If you have sufficient iCloud storage, you can restore your iPhone or iPad without using iTunes/Finder.
- Head over to the Settings app on your iPhone or iPad -> Apple ID banner -> iCloud -> iCloud Backup. Then, back up your device to iCloud.
- After you have successfully backed up your device, navigate to the Settings app on your device -> General -> Transfer or Reset iPhone/iPad -> Reset -> Erase All Content and Settings and confirm.
- Then, follow the setup assistant to set up your device from scratch. When prompted to restore the backup, choose the latest iCloud backup.
- Once you have restored your iPhone/iPad, connect it to your computer using a cable -> open Finder/iTunes, and then check if the device appears in the sidebar or the menu.
32. Erase Your Mac and Set It Up from Scratch
When everything else has failed in resolving the problem, erase your Mac. Bear in mind that it has to be your last resort. Therefore, pick it up only when nothing has rescued you. Fully back up your Mac before going for this nuclear solution.
- On your Mac, head into the System Settings app > General > Time Machine and then back up your Mac.
- Transfer or Reset –> Erase All Content and Settings and confirm.
- Next, set up your Mac from scratch and also restore it from the latest backup.

Disclaimer: Having thoroughly taken a close look at products, we review and recommend them without any bias or strings attached. When you buy any item through our affiliate or sponsored links, we earn a small amount of commission, which helps manage the ever-growing team and the site. Read more…
Fixed iPhone Not Showing Up in Finder on Mac..!
There you go! So, these are the best tip and tricks to fix iPhone not showing in Finder or iTunes. I guess you have finally gotten the better of this frustrating issue. As always, it would be great to have your feedback in the comments. And, if you know any workable tip that can get rid of this problem, feel free to share it as well. Oh yes, do not forget to like and share the poem which I have added just to make this exhausting guide a bit interesting.
“Remembering your gifted pain, I forgot to hook my pen. Now, wondering how to pen down the memories in the hailstorm of tearful rain! While the old flame is gone for good, the flickering memories still make me go insane..!” Rajesh Mishra
Read more: 16 Ways to Fix Notification Center Not Working on iPhone in iOS 16