Probably the most notable Accessibility feature that has arrived in iOS 18 is “Eye-Tracking”. What makes it so impressive is the ability to let you control your iPhone or iPad using just your eyes. While it’s designed for differently-abled people, anyone can make the best use of this awesome feature. If you wish to use this new Accessibility feature, let me help you get started!
Set Up & Use Eye-Tracking in iOS 18 on iPhone & iPad
It’s worth pointing out that iOS 18 is currently in beta and will go through a lot of churning before being officially released this fall. So, you shouldn’t expect the Eye Tracking to work as expected – for now.
- To get going, open the Settings app on your iPhone -> Accessibility -> Now, choose the “Eye Tracking” option.
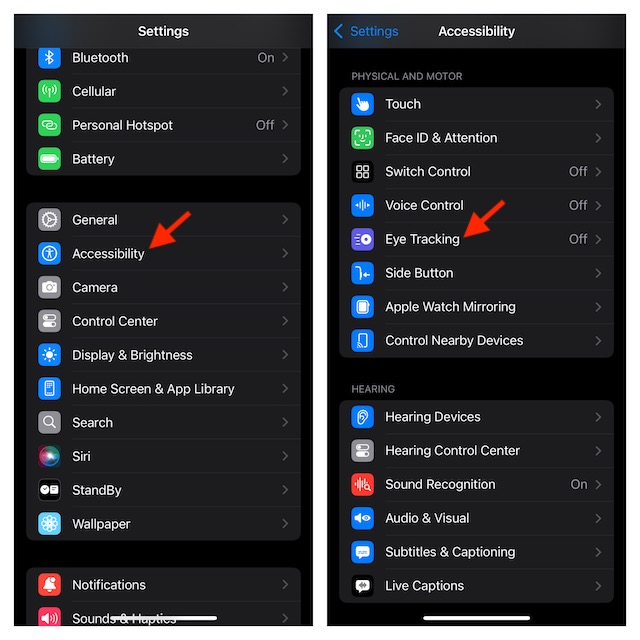
- After that, turn on the toggle for Eye-Tracking and you are all set! Now, follow the “Dot” with your eyes on the screen to control your device.
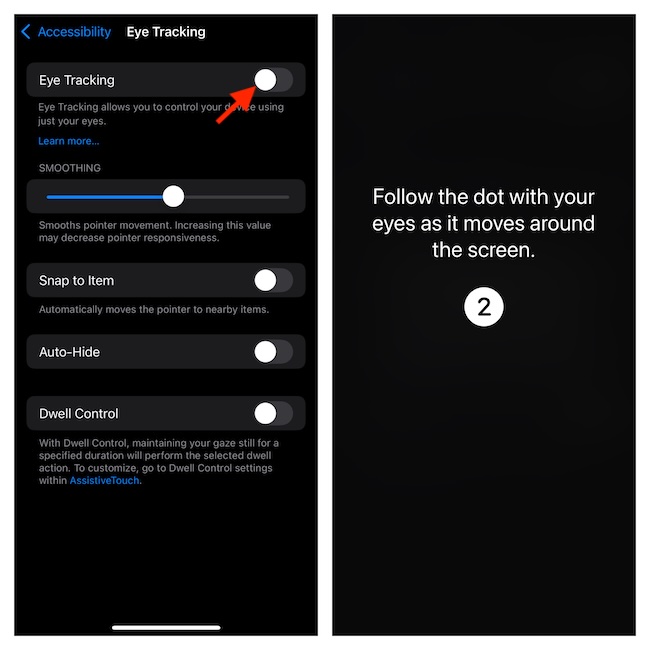
- Now, follow the instructions to control your iPhone using your eyes. For a more personalized experience, I would recommend you adjust “Smoothness” by using the slider. It will let you smoothen pointer movement. Note that increasing this value may decrease pointer responsiveness.
- Another feature that you should pay attention is the “Snap to Item” that can let you automatically move the pointer to nearby items.
- Moreover, you can also “Auto-Hide” the pointer. To do so, turn on the toggle for Auto-Hide and adjust the time using buttons or slider.
- Finally, there is also a super handy “Dwell Control” feature that will let you maintain your gaze still for a specified duration in order to perform the selected dwell action.
Perfectly Customize Dwell Control for Enhanced Eye-Tracking Experience
For a more improved eye-tracking experience, I would recommend you perfectly customize the Dwell Control.
- To do so, go to the Settings app on your iPhone.
- Now, scroll down and choose Accessibility.
- Under the Physical and Motor section, choose “Touch”.
- Next, select the AssistiveTouch option.
- After that, activate Dwell Control and fine-tune it to your liking.
And that’s all there is to it! So, that’s how you can set up and use Eye-Tracking on your iPhone and iPad. Now that you have unlocked this handy Accessibility feature, get the most out of it.
Read more: How to Generate QR Codes for Saved Wi-Fi Passwords in iOS 18 (Video)

