Though iOS 18 is a significant update with a ton of exciting features, it’s still a work in progress. If issues like unexpected sluggishness, app crashing, random rebooting of the iPhone, and touchscreen unresponsiveness have plagued your excitement of exploring the all-new features, you are not alone. Without blaming the iOS 18 beta software for throwing all sorts of tantrums and causing you one nightmare after the other, you should know that beta software is generally buggy. So, if you have decided to go back to iOS 17 from iOS 18, I won’t blame you for the decision. Follow along to learn how to securely downgrade from iOS 18 beta to iOS 17 without losing any data.
Securely Downgrade From the iOS 18 Beta to iOS 17 Without Any Data Loss
Before moving ahead, let’s first clear the basics!
First and Foremost the Important Warning
Be warned that if you have installed watchOS 11 on your Apple Watch, you will no longer be able to use the smartwatch with your paired iPhone after you have downgraded to iOS 17. The reason why this annoyance exists is that there is no way you can manually downgrade your Apple Watch to a previous version of watchOS. If you want to get rid of watchOS 11, you will need to send your Apple Watch to Apple.
Make Sure You Have the Latest Backup of Your iPhone or iPad
Before downloading any software beta, we should always make sure to back up the entire device. With the latest backup, it becomes convenient to remove the software beta and return to the stable version of iOS without losing any data. Hopefully, you have got the backup at hand.
Remove iOS 18/iPadOS 18 from Your Device and Go Back to iOS 17/iPadOS 17
- To get started, launch Finder on your Mac or iTunes on your Windows PC.
- Using a USB cable, connect your iPhone or iPad to your computer.
- Then, put your device into recovery mode To get it done, press and quickly release the Volume Up button. After that, press and quickly release the Volume Down button. Next, hold down the power button until your device begins to restart. Be sure to hold down the power button until your device has entered the recovery mode.
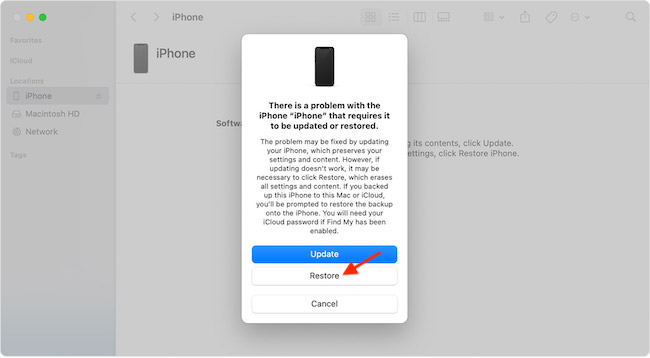
- Next up, a dialog will appear on the screen asking if you want to restore your device.
- Finally, click on Restore to completely erase your device and install the latest public release of iOS or iPadOS.
- Now, it’s time to grab a cup of tea and wait while the restore process completes.
- Once it’s completed, you can restore the latest backup of your device from iOS 17 or iPadOS 17 with the help of Mac or iCloud. And that’s pretty much it!
Wrap up…
Do not give up on iOS 18 as yet. The latest iteration of iOS will go through several refinements before being released publicly in September. So, do come back to give it a shot once the OS is rolled out publicly. If you can’t wait that long, I would recommend you give a try to public beta of iOS 18 as it will be a bit better in terms of stability.
Read more: 2 Ways to Permanently Delete Passwords in iOS 17 on iPhone and iPad