Apart from letting you share apps, games, music, and movies, Apple also allows you to share iCloud storage with your family members. That means if your cloud storage ever gets cluttered with too many photos, videos, and files, you can ask your loved ones to offer up the much-needed cloud space. From what I can tell, iCloud storage sharing feels ever so seamless across iDevices. However, there are times when it goes for a toss and starts throwing unexpected tantrums.
But fret not, this is where these handy tips will have a role to play. So, if you have found yourself on the wrong end of the problem, try out these 19 best tips to fix “Can’t share iCloud storage with family members” on iPhone, iPad, and Mac.
Best Tips to Fix iCloud+ Storage Sharing Not Working with Family Members
Before looking for ways to resolve the problem, let’s first briefly discuss the possible reasons that tend to come in the way of iCloud storage sharing.
So, What Prevents iCloud Storage Sharing from Working Properly?
When faced with the iCloud+ storage sharing not working problem, you should keep in mind a number of things. Unlike popular misconceptions, the issue is not always related to software bugs.
Take a look at some of the major culprits that tend to prevent iCloud storage sharing from functioning properly.
- Ill-fated setup
- Lack of sufficient iCloud storage
- iCloud server outage
- Incompatible device
- Miscellaneous software glitches
Keeping all the above-mentioned villains in mind, I have offered up solutions that are more likely to resolve the issue. For clear understanding, be sure to tick off all the basics. Once that’s done, we will try some workable tips to resolve “Can’t share iCloud storage” with family members.
1. Ensure That Your Device Meets the OS Requirements
First and foremost, make sure that your device is running the required version of the software. Note that –
- Your iPhone must be running iOS 11 or later.
- Your iPad must be running iOS 11 or later (iPadOS 13 or later)
- Your Mac must be running macOS 10.13 High Sierra or later.
In order to have the best cloud-sharing experience, ensure that the devices of your family members are also running the supported software versions.
2. Make Sure the Family Organizer has the Right iCloud Storage Plan
Another important thing that you should do without fail is to ensure that the family organizer has the appropriate iCloud storage plan in order to share the cloud space with family members.
If you are the family organizer, ensure that you have one of the following iCloud storage plans:
- 50GB/$0.99/month
- 200GB/$2.99/month
- 2TB/$9.99/month
3. The following Features are Part of iCloud+
There are three notable features that come bundled with the iCloud+ plan.
- iCloud Private Relay: It safeguards your privacy by making sure both your identity and what you browse in Safari remain concealed. For an extra layer of shield, Private Relay sends your requests through two separate and secure internet relays.
- Hide My Email: As the name itself suggests, Hide My Email is designed to let you hide your real email by generating unique and random email addresses that automatically forward to your personal inbox.
- HomeKit Secure Video support: It lets you add your home security cameras in the Home app so that you can record your footage and keep a track of it from anywhere.
4. Make Sure You Have Perfectly Set Up Family Sharing
Be sure you have perfectly set up Family Sharing on your iDevice. Again, this one might not seem to be a direct solution but it would be wise to take care of it in the very first place.
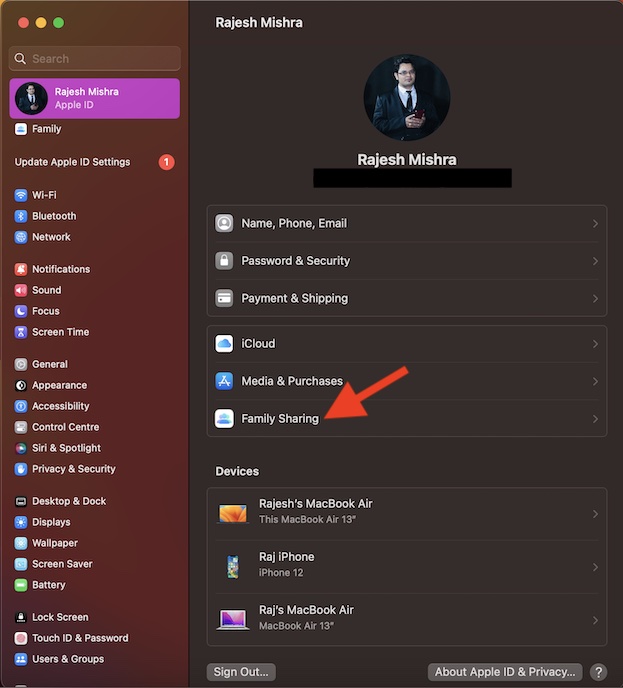
- On iPhone or iPad: Navigate to the Settings app -> your profile -> Family Sharing and then go through the instructions to complete the process.
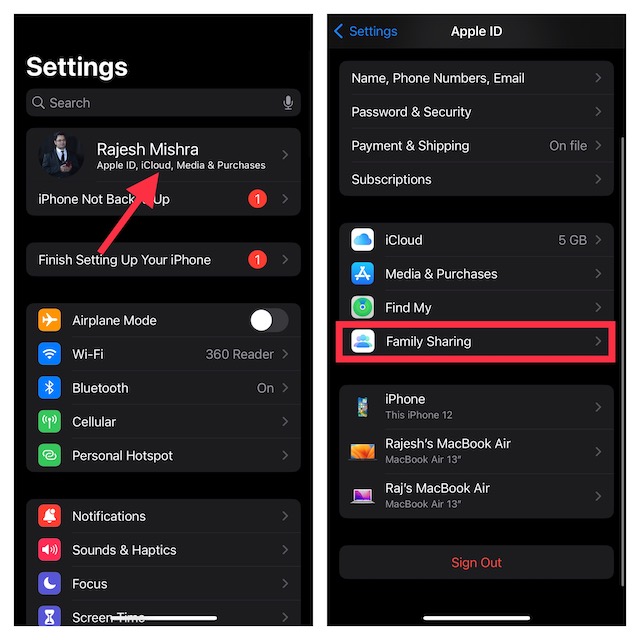
- On Mac: Open the System Settings app -> your profile -> Family Sharing and then follow the instructions to set it up properly.
5. Ensure That You Have Added a Valid Payment Method
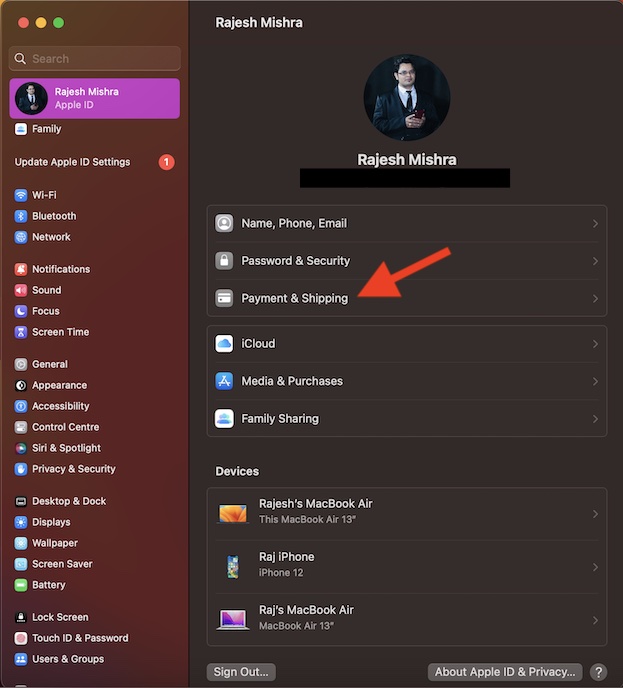
Ensure that you have set up a valid payment method on your iDevice. If the payment method is not valid or expired, fix it sooner than later.
- On iPhone or iPad: Go to the Settings app -> your profile -> Payment & Shipping -> Add Payment Method and then do the needful.
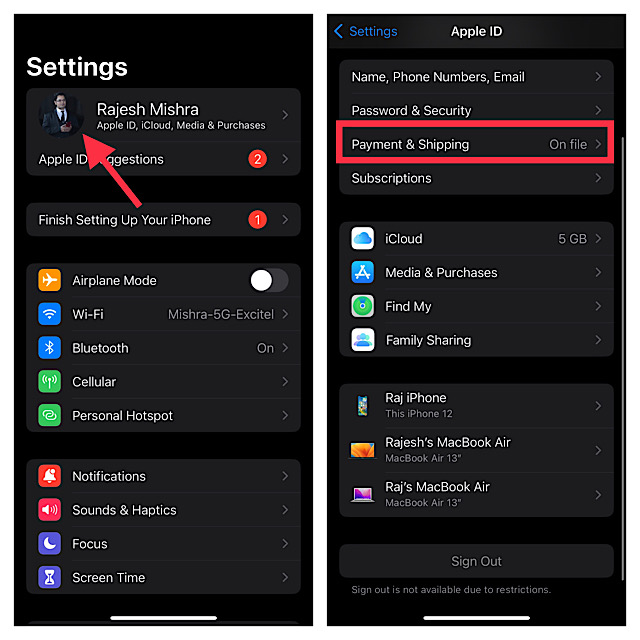
- On Mac: Head over to the System Settings app -> your profile -> Payment & Shipping -> Add Payment Method and follow the instructions to add it.
iOS, iPadOS and macOS offer pretty straightforward ways to share iCloud storage with family members. If you are not familiar with the process, have a look at it beforehand.
On your iPhone or iPad: Head over to the Settings app on your iPhone or iPad and tap on Family. After that, tap on Subscriptions and select iCloud+.
Then, follow the instructions to share your existing plan. It’s worth pointing out that you will need to use Messages to inform any family members with an existing iCloud+ plan that they can now switch to your shared plan.
Sticky Note:
- In iOS 15 or earlier, navigate to the Settings app -> your profile -> Family Sharing. After that, tap on iCloud+. Next, go through the instructions to share your existing plan.
On your Mac: Click on the Apple menu at the top left corner of the screen and choose System Settings in the drop-down menu. Next, click on Family and choose Subscriptions -> iCloud+ -> Share. Then, follow the onscreen instructions to complete the process.
Important note:
- In macOS Monterey or earlier, click on the Apple menu at the upper left corner of the screen and select System Preferences -> Family Sharing -> iCloud Storage -> Share.
7. Switch from Your Personal iCloud+ Plan to Your Family Plan
It’s important to note that when you share iCloud+ with family members, who are using the basic free 5GB plan, they are automatically added to your family plan. However, if a family member is already a subscriber to the iCloud+ plan, they have the option to switch to your plan or keep using their own. Regardless of whether or not they switch to your plan, they will remain part of the family-sharing group.
The good thing is when they (someone who is already using iCloud+) opt to use the shared family plan, Apple will offer them a refund for the remainder of their personal plan. It is because they can’t keep their current plan, while still using the shared family plan.
If you want to switch from your personal iCloud+ plan to the family plan, follow the steps below:
- On your iPhone or iPad running iOS 16 or iPadOS 16 later: Go to Settings -> Family -> Subscriptions -> iCloud+ -> Use Family Storage.
- On iPhone or iPad running iOS 15 or iPadOS 15 or earlier: Head into Settings -> your profile -> Family Sharing -> iCloud+ -> Use Family Storage.
- On your Mac in macOS 13 Ventura or later: Click on Apple menu -> System Settings -> Family -> Subscriptions -> iCloud+ -> Use Shared Plan.
- In macOS 12 Monterey or earlier: Click on the Apple menu -> System Preferences -> Family Sharing -> iCloud Storage -> Use Family Storage.
8. Find Out How Much Storage Each Family Member Uses
Remember that if your family is low on iCloud storage, Apple will notify all members about insufficient cloud space. After that, the family organizer or family member that purchased the plan will need to buy the plan up to 2TB in order to continue to share the cloud storage.
Luckily, keeping an eye on how much iCloud storage each family member uses is hassle-free.
- On your iPhone and iPad running iOS 16 or iPadOS 16 or later: Open the Settings app -> Family -> Subscriptions -> iCloud+
- In iOS 15 or iPadOS 15 or earlier: Launch the Settings app -> your profile -> Family Sharing -> iCloud+.
- On your Mac running macOS 13 Ventura or later: Click on the Apple menu at the top left corner of the screen -> System Settings -> Family -> Subscriptions -> iCloud+.
- In macOS 12 Monterey or earlier: Click on the Apple menu -> System Preferences -> Family Sharing -> iCloud Storage.
9. What Happens When Your Family Stops Sharing iCloud+ Plan or You Leave the Family Sharing Group?
Keep in mind when you leave a family that shares an iCloud+ plan and your file size exceeds 5GB, you can choose to buy your own plan. Note that if you don’t buy an iCloud+ plan even when your file size goes beyond the available storage, your files will no longer upload to iCloud Drive and your new photos/videos won’t upload to iCloud Photos either. That’s not all, your iDevices will also stop backing up.
10. Make Sure the Family Organizer Has Sufficient Cloud Storage
While it may sound funny to many, it’s always better to check off the basics beforehand. Therefore, I would recommend you ensure that the family organizer has enough free iCloud storage to let you use the desired amount of space.
Apple offers an easy way to upgrade iCloud+ storage.
- On iPhone and iPad: Go to the Settings app -> your profile -> iCloud -> Upgrade to iCloud+.
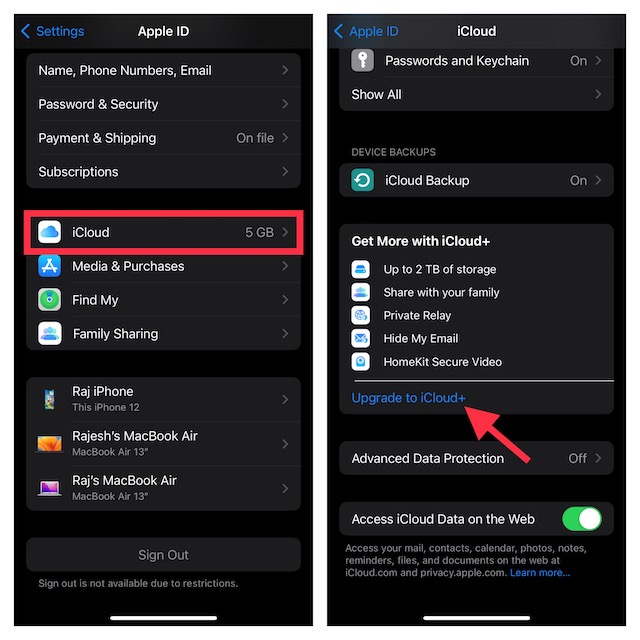
- On Mac: Head into the System Settings app -> your profile -> iCloud -> Upgrade to iCloud+ Plan.
11. Can’t Upgrade Your iCloud Storage Plan? Fix It
If you are unable to upgrade your iCloud storage plan, make sure your entered payment method is valid. Besides, ensure that iCloud Storage Upgrades functionality is not facing any outages. To do so, go to the Apple System Status page and then be sure that the circle next to iCloud Storage Upgrades is green.
12. Reboot Your Devices
Believe it or not, the soft reset has the knack for fixing unexpected issues or something that tends to occur out of nowhere. Therefore, do not forget to give it a go as and when you hit a roadblock. No prizes for guessing! We are going to bring it into play one more time.
13. Sign Out Of Apple ID and Sign Back In
Many a time, you can troubleshoot a persistent iCloud-related problem by signing out of Apple ID and signing back in. Given how effective it is, you should not miss out on this one either.
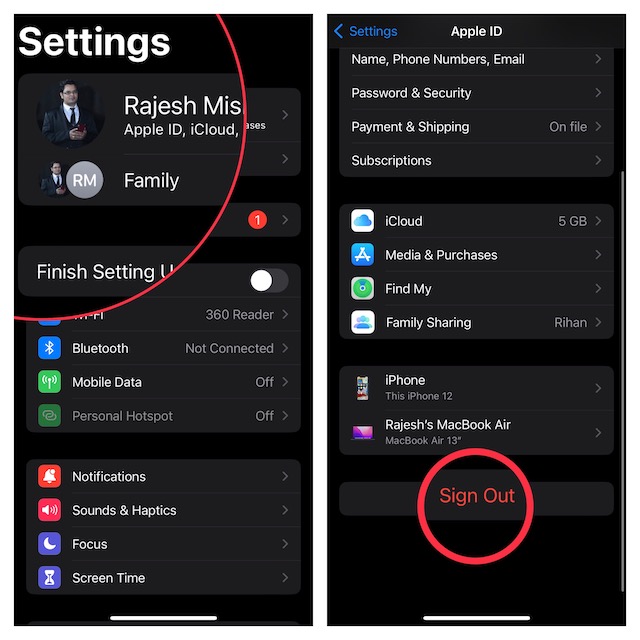
- On iPhone and iPad: Navigate to the Settings app -> your profile at the top -> Sign Out. When asked to keep a copy of all the important files, turn on the toggles for each file type. Wait for a few seconds and then sign in to your account.
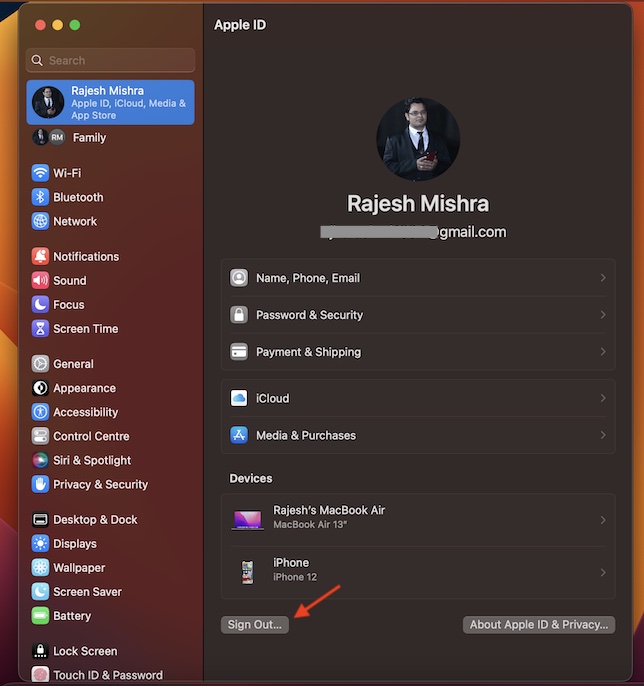
- On Mac: Open the System Settings app -> your profile -> Sign Out and confirm. Then, sign in to your account.
14. Update All Your iDevices
If iCloud+ storage continues to misbehave when sharing with family members, update all your iDevices. There is a good chance that the problem might be due to a software bug.
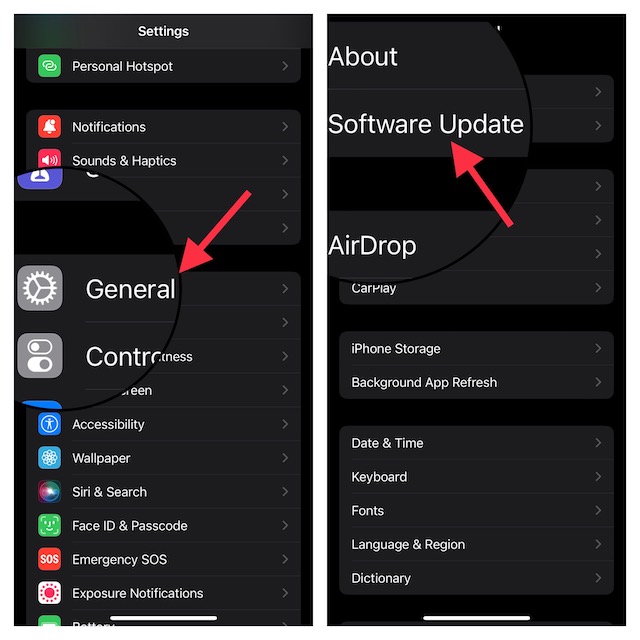
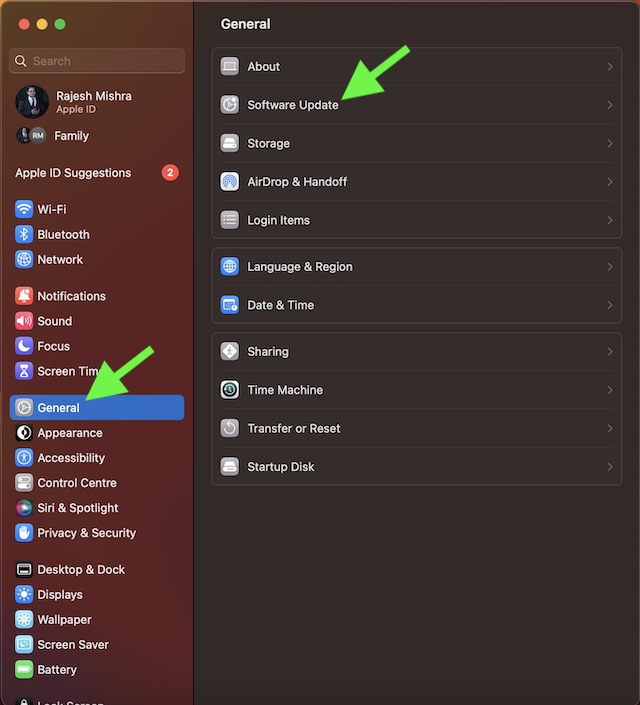
- On iPhone and iPad: open the Settings app -> General -> Software Update. After that, download and install the latest version of iOS/iPadOS.
- On Mac: launch the System Settings app -> General -> Software Update. Then, download and install the latest version of macOS.
15. Check iCloud Status
If “iCloud” is down or faced with some technical issues, iCloud+ will throw a ton of unexpected tantrums and malfunction.
- To find out the status of the iCloud, launch a browser on your device -> navigate to the Apple System Status web page, and ensure that iCloud is fit and firing as usual.
16. Factory Reset Your iPhone or iPad
Factory reset is the sort of solution that comes in handy when you are up against a problem that does not get sorted out through basic tips. Before going for this radical solution, you should know that it will wipe out all the custom settings and put them all in the default state. The good thing is none of your media and data are deleted in the process.
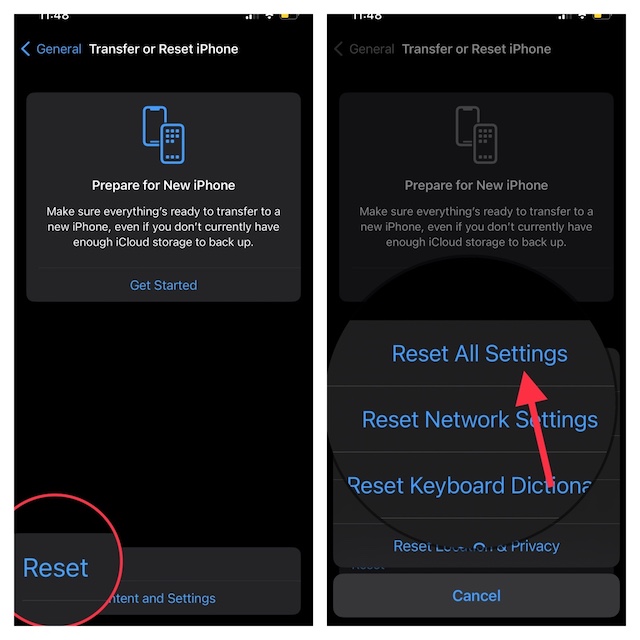
- Open the Settings app on your iPhone or iPad -> General -> Transfer or Reset iPhone/iPad -> Reset -> Reset All Settings.
17. Restore Your iPhone or iPad: Last Resort
When all the basic tips fail to troubleshoot a frustrating problem, restoring the device as new becomes the way to go. Therefore, we will take on this nuclear solution as well.
Bear in mind that it will erase your entire device including all the stored photos, videos, and files. Thus, do not forget to back up your device.
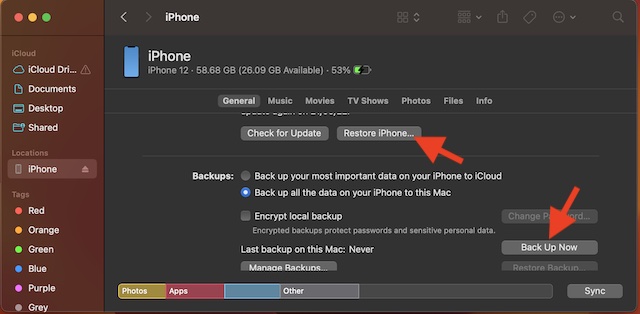
- Connect your iPhone or iPad to your computer and launch Finder (on Mac) or iTunes (Windows PC).
- After that, select your iPhone/iPad.
- Then, back up the device and restore it.
- After you have successfully restored your device, follow the setup assistant to set it up from scratch. In the middle of the setup process, you will get an option to restore the backup.
Note:
- If you have sufficient iCloud storage, you can back up and restore your device without using the computer.
- To do so, go to Settings app on your iPhone or iPad -> your profile -> iCloud -> iCloud Backup -> then back up your device.
- Next, head into the Settings app -> General -> Transfer or Reset iPhone/iPad -> Reset -> Erase All Content and Settings.
- Next up, set up your device and also restore the latest backup.
18. Erase Your Mac and Set It Up from Scratch: Last Resort
If you are still facing the “can’t share the iCloud+ storage plan with family members”, erase your Mac and set it up from scratch. Again, be warned that it will clean up your entire Mac, deleting all the apps and data in the process. Therefore, make sure to back up your computer before going for the kill.
- Open the System Settings app -> General -> Time Machine. Then, back up your Mac.
- After that, go to the System Settings app -> General -> Transfer or Reset -> Erase All Content and Settings.

- Then, set up your Mac once again and restore it from the latest backup.
19. Contact Apple Support
If luck has continued to shy away, why not contact Apple Support and explain the issues you are faced with? If the cloud service is embroiled in some issues, the tech giant will offer the right guidance and help you fix the problem.
Fixed iCloud Storage Sharing Not Working on iPhone, iPad, and Mac..!
There you go! Hopefully, iCloud+ storage sharing is back on track on your iDevice. But before you kickstart a watch party or intense gaming with your loved ones, let us know the trick that has helped you resolve the frustrating issue. Furthermore, if you find any workable hack missing from this troubleshooting guide, be sure to tip us about that as well.
Read more: 18 Ways to Fix AutoFill Passwords Not Working on iPhone and iPad (Video!)


How about one member already have 200g subscription.
Then the Father of the Family but 2T subscription .
Then the “one member” marked with “not using” ,
how to fix it without loosing the backup ?
j.r