When your iPhone gets stuck in the frustrating boot loop, it feels like the end of the device. You are in the midst of a task, and suddenly your iPhone crashes out and reboots. And by the time your anger could subside, another out-of-the-blue reboot triggers, hampering not just your ongoing task but also jeopardizing the security of your data. Rather annoying, isn’t it? Having encountered this terrible issue myself after updating to iOS 18, I thought it would be apt to share some workable tips to fix the iPhone keeps rebooting problem. Read on…
Tips to Fix iPhone Keeps Restarting After iOS 18 Software Update
To ensure you have a clear idea about this iOS problem and what sort of solutions can help you resolve it, let’s first briefly sort out some inherent questions!
Why does my iPhone restart again and again?
I’m sure you must be thinking why your iPhone is restarting repeatedly. Let me break it down, putting all the key aspects in mind.
It is normal for an iPhone/iPad to slightly overheat, drain the battery, and reboot once in a while after a software update.
It’s worth pointing out that it’s normal for an iPhone to reboot automatically a few times or slightly overheat or drain the battery after the software update for 2/3 days. Therefore, I would recommend you treat this behavior as a normal occurrence and not panic at all.
What if the random rebooting issue continues?
If your iPhone is plagued by repeated rebooting issue, you should look at it from an altogether different perspective. As for the reasons that could be behind this frustrating iOS problem, these are the usual suspects:
- Degraded battery
- Aging hardware
- Lack of proper control over power-hungry features
- Uncertified charger
- Clogged up storage
- Outdated apps
- Software bugs
How do you fix an iPhone that keeps rebooting?
As I stated above, the repeated restarting of an iPhone could be due to many factors including the lack of better controls over the features that are well-known for hogging plenty of resources, cluttered storage, and worn-out battery. To put it straight, this issue requires you to try multiple tips – both basic and radical ones.
While the basic tips and tricks are geared toward blocking all the gates that impact the battery and also gobble up plenty of resources, the radical ones recommend you clean up the clutter.
The best way to go about this whole process is, to begin with the handy tips and check if your device is back on track after every solution you have tried. If you get lucky with a tiny but pretty effective solution, you don’t need to try any other tips mentioned in this guide. Of course, you can have a look at the entire lineup of solutions for future reference, if the issue ever returns to haunt you.
1. Force Quit All Apps Running in the Background
To get started, force quit all the apps running in the background. If you don’t have the habit of force-killing apps when they are no longer in use, the devil of this problem could be buried in this very habit.
- On your iPhone or iPad without the Home Button: Swipe up from the Home Bar to show the app switcher, -> after that, swipe up all the apps to force quit them all.
- On iPhone or iPad with the Home Button: Double-press the Home Button -> swipe up the app cards to kill all the apps.

2. Hard Reset Your iPhone or iPad
Hard reset (also known as force reset) is my go-to solution for taking control of the boot loop issue on iPhone.
- To force reset your device, press the volume up button. After that, press the volume down button. Then, press and hold the power button until you see the familiar Apple logo on the screen.
- After your iOS device has rebooted, use it for some time to figure out if the random rebooting issue is gone.
3. Remove Power-Hungry Lock-Screen Widgets
If you have decked up your iPhone Lock Screen with power-hungry widgets like Weather and Maps, remove them all.
- Long-press on the Lock Screen -> tap on the Customize button -> tap on the “-” button to the left of a widget to get rid of it.
- Be sure to tap on Done at the upper-right corner of the screen to finish.
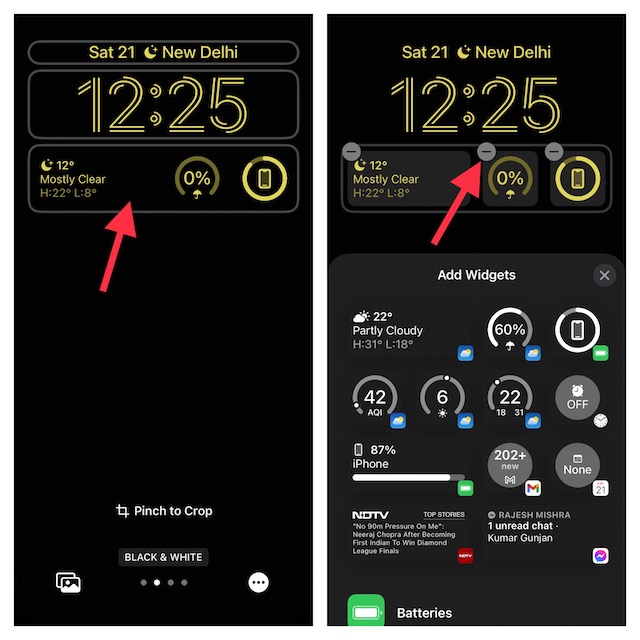
4. Remove All the Useless Home Screen Widgets
For times when your iPhone is rebooting repeatedly, it would be wise to keep the unnecessary widgets away. Especially the ones that need plenty of resources to run. Yeah, I’m pointing my fingers at widgets like Maps, Smart Stack, and Weather.
- Long-press on a Home Screen widget on your iPhone and hit Remove Widget in the menu.
5. Disable the Live Wallpaper
Without an iota of doubt, Live Wallpapers are elegant. What I love about them is the ability to come alive with a long press. As for the shortcoming, it can eat into a good chunk of battery which could lead to other issues like overheating and even unexpected rebooting.
- Go to the Settings app on your iPhone/iPad -> Wallpaper -> choose a still wallpaper and set it up.
6. Disable Auto-Download of Songs
Whenever you add any song to your library, it’s automatically downloaded so that you can stream it even when your device is offline. While it might not seem to be a big deal, turning it off can offer some respite to your device.
- On your iPhone or iPad, open the Settings app -> Music -> turn off the toggle next to Automatic Downloads.
7. Turn OFF Auto-Download of Podcasts
Apple Podcasts app lets you automatically download the latest episodes to ensure you can listen to your favorite ones at your own pace. And that too without worrying about the internet connection. Again this is a pretty handy feature but something you need to disable when faced with issues like battery drain or frequent restarting of the iPhone.
- Head into the Settings app on your iPhone or iPad -> Podcasts -> tap on Automatically Download and choose off.
8. Disable Unnecessary Notifications
If dozens of apps have been allowed to send notifications, your iPhone could hardly have much time to rest due to the never-ending bombardment of random alerts. Therefore, disable alerts from not-so-important alerts.
- To manage notifications, dive into the Settings app -> Notifications -> choose an app and turn off the toggle next to Allow Notifications.
- You can repeat these same steps to prevent other apps from sending notifications as well.
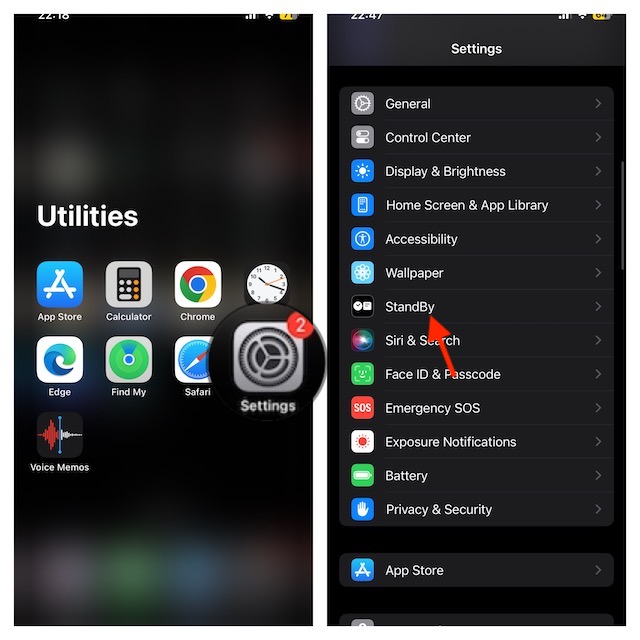
9. Disable the StandBy Mode
When your iPhone is docked, locked, placed in landscape mode, and plugged into an MFi-certified charger, the StandBy mode comes into play. The smart display is designed to let you track your favorite widgets and time with utmost ease.
- To turn off the smart display, navigate to the Settings app -> StandBy -> turn off the toggle next to StandBy.
10. Turn OFF Location Services
It’s advisable to smartly manage location services and allow apps to use your location data only when you are using them. The non-stop location tracking not only eats into a lot of battery but also tends to cause other issues like overheating. For now, entirely turn off location tracking on your device.
- To disable location tracking, open the Settings app -> Privacy & Security -> Location Services and then turn it off.
11. Disable Background App Refresh
Background app refresh falls in the same category as the location services. So, never let this massive power gobbler run without any restriction. Again, I would suggest you put an end to the background refreshing of apps.
- To turn off this feature, open the Settings app -> General -> Background App Refresh -> Background App Refresh -> and then choose Off.
12. Turn OFF iOS 18 Software Beta and Switch to Official Version
If your iPhone is running iOS 18 beta, it could very well be the wrecker-in-chief. Hence, there is a good chance that turning it off and switching to the official version could help you overcome the hurdle. To learn how to quit beta testing and securely downgrade to the stable version, head over to this detailed guide.
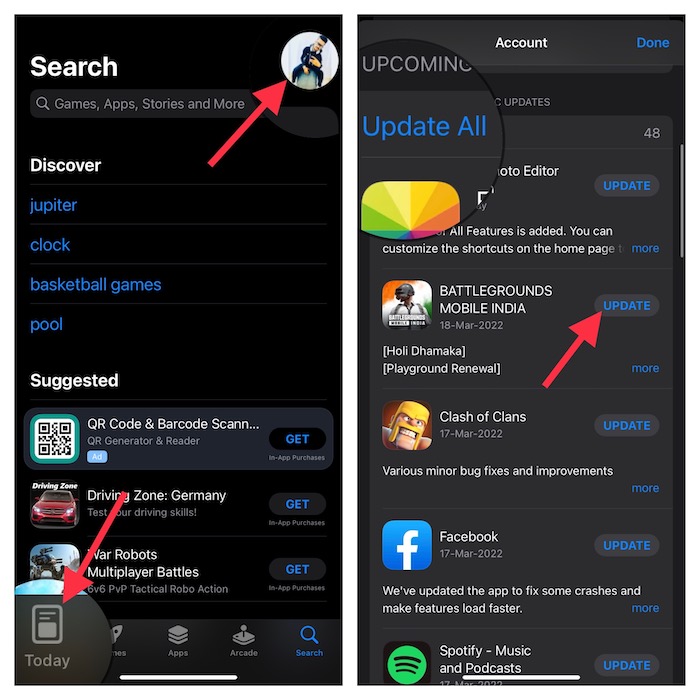
13. Update All Apps
Outdated apps not only eat into more battery, gobble up more resources but also cause the device to crash out. Not to mention, outdated apps are also deemed to be more vulnerable to hacking. Therefore, it would be wise to update all the apps.
- On your iPhone or iPad, open the App Store -> your profile -> scroll down to see the list of all the apps that need to be updated.
- After that, you will have the option to Update All apps at once or update one app at a time.
14. Disable Automatic Software Update
If you prefer to dig into all new features, the automatic software update is for you. However, the downside of the auto-software update is that it might open the floodgate for numerous issues including random rebooting. That’s the reason why it’s better to check the review before downloading the software.
- On your device, navigate to the Settings app -> General -> Software Update -> Automatic Updates -> turn off the toggles next to iOS/iPadOS Updates.
15. Disable Auto-Download/Updates of Apps
Auto-app updates and downloads are designed to enhance your experience but in a situation like this one, you should turn off this feature.
- Get into the Settings app -> App Store -> turn off the toggles for App Downloads and App Updates.
- Also, turn off the switch next to In-app Content to stop apps from running in the background automatically to download content before you launch them.
16. Turn OFF Automatic iCloud Backup
With the automatic iCloud backup, your precious data gets automatically backed to iCloud every day, thereby saving you not just from hassle but also ensuring your data has an extra layer of shield. Nevertheless, when you are up against issues like the repeated restarting of the iPhone, it’s apt to disable the auto backup.
- To disable the auto iCloud backup, go to the Settings app -> Apple ID banner -> iCloud -> iCloud Backup -> turn off the switch next to Back Up This iPhone/iPad.
17. Charge Your Device Using an MFi Charger
It goes without saying, doesn’t it? If you charge your iPhone using a fake or an uncertified charger, it will invoke issues like overheating, rebooting, and even sluggishness. Thus, keep fake chargers away in order to keep such problems at bay.
18. Do Not Use Your Device When It’s Charging
Though it might not seem to be a direct solution to the issue we are discussing, you should keep it in mind. When your iPhone is being charged, leave it alone. Streaming videos, listening to music, or browsing the web extensively while your device is being juiced up can badly hurt the battery’s health. With poor battery health, your iPhone will fall prey to several issues.
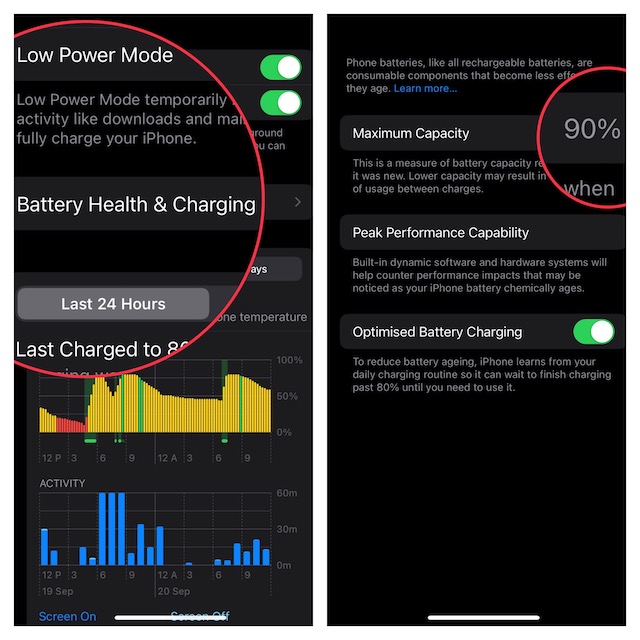
19. Enable Low Power Mode
There are multiple reasons why you should enable the Low Power Mode. For one, it automatically pauses the background activities and mail fetch to boost the battery life.
To me, this is like a one-stop solution for taking control of several major features including Location Services, Background App Refresh, video auto-play in the App Store, and more. Aside from extending the battery life, it also reduces the pressure on the battery.
- To enable this power-saving mode, visit the Settings app -> Battery -> Low Power Mode.
20. Check Your Battery Health
If your iPhone’s battery has gone past the prime or has drastically degraded to a point where it’s huffing and puffing, it could be struggling to cope with the demand for the latest and greatest features. Unable to deliver peak performance, the battery would be feeling the heat, causing your iPhone to restart over and over again.
- To view the battery health, go to the Settings app -> Battery -> Battery Health & Charging -> have a look at the maximum capacity of your device.
- If your iPhone’s battery capacity has gone below 80%, it’s time to replace the battery for enhanced performance.
21. Find Out If An App is Causing the Issue
iOS comes with a built-in tool to diagnose apps and highlight the problematic ones. In other words, this is exactly what you need to nab the culprits red-handed (no pun intended).
- Navigate to the Settings app on your iPhone or iPad -> Privacy & Security -> Analytics & Improvements -> Analytics Data.
- Now, scroll through the entire list to find the apps that have appeared multiple times. Once you have spotted the problematic apps, delete them all.
- Now, take your iPhone for a spin to check if the rebooting issue is gone. If it has, you’ve overcome the hurdle. Rejoice!
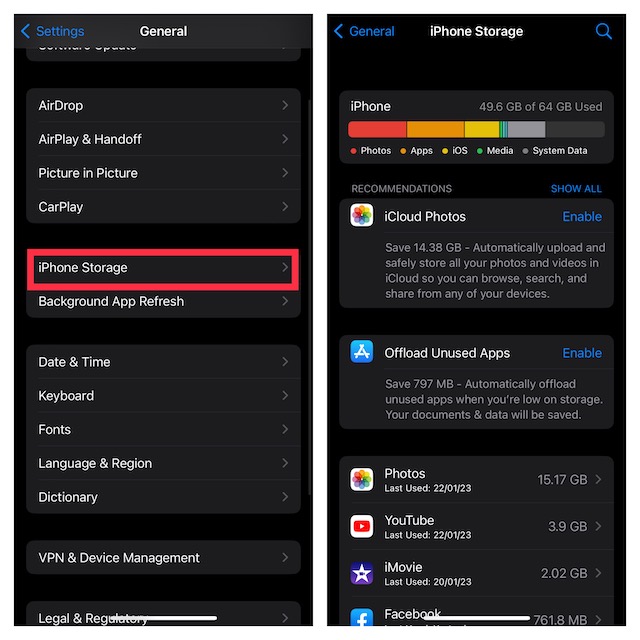
22. Delete All the Useless Files, Photos, Videos, and Songs
Has it been a long time since you took your iPhone for a cleanup drive? If you are nodding in the affirmative, there is a good chance the clogged-up space with too many redundant files is making life difficult for your iOS device.
- To find out which apps need to be cleaned up, head over to the Settings app on your iPhone/iPad -> General -> iPhone/iPad Storage -> Find out how much space has been used and how much is available.
- Scroll down to view the list of all the installed apps and the total amount of space each one has consumed.
- Once the inspection is done, wipe out all the useless items to recover plenty of precious space.
- After you have deleted all the redundant files, restart your iPhone and use the device for some time to find out if the problem is gone.
23. Delete All the Useless Apps
It’s time to embrace the radical measure and wipe out the entire clutter. Remember the saying, “When the going gets tough, the tough get going.” Well, with it, I mean eliminating all the redundant apps to free up plenty of storage. With only a few important apps to handle, your iPhone will find it a bit more convenient to run.
- Just touch and hold onto an app icon that you no longer want to keep -> Remove App -> Delete App and confirm the deletion of the app.
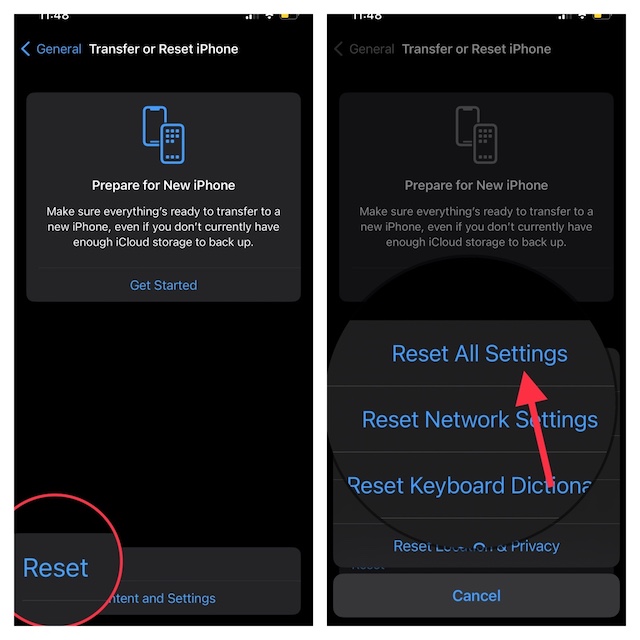
24. Factory Reset Your Device
For a handful of users, factory reset has worked in fixing the iPhone that keeps restarting repeatedly. Thus, we are going to bank on it to deliver the goods as well.
- To factory reset your device, head over to the Settings app -> General -> Transfer or Reset iPhone/iPad -> Reset -> Reset All Settings and confirm the action.
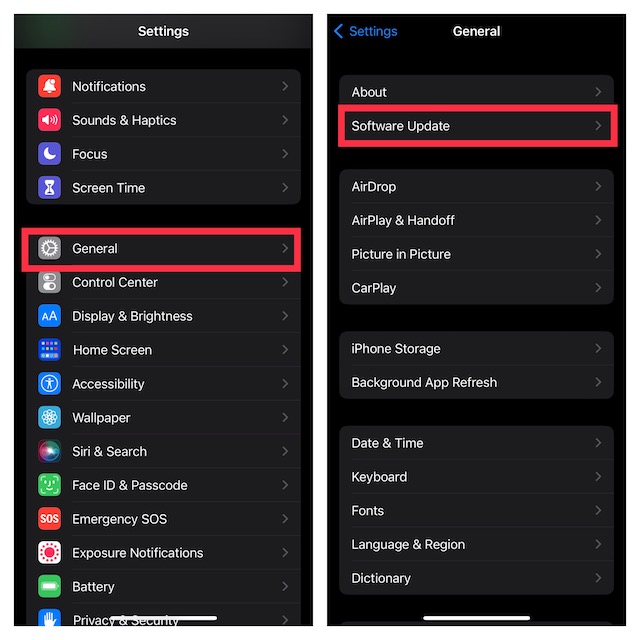
25. Update the Software Update
Software bugs could also be very much behind the random rebooting of your iOS device. Hopefully, updating the software update will be able to fix the issue.
- Go to the Settings app on your iPhone or iPad -> General -> Software Update.
- Once your device has checked for the available software update, you will get the option to download and install the software.
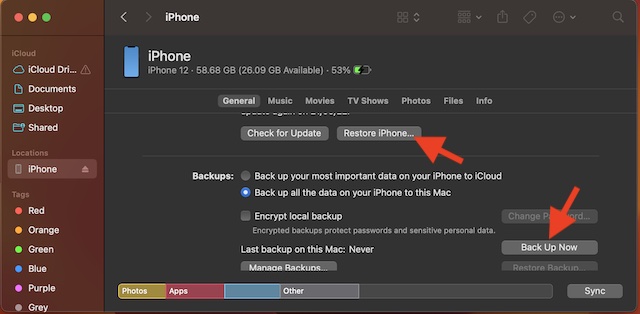
26. Last Resort – Restore Your iPhone As New
This one is the sort of solution that we take on only as the last resort. Therefore, consider giving it a try only when nothing has worked in fixing the iPhone keeps restarting issue. Be warned that it will completely wipe out your device including all your precious data and memorable photos. Therefore, the first thing that you should do beforehand is to fully back up the device.
- To get going, connect your iOS/iPadOS device to your Mac or Windows PC using a certified USB cable -> select your device in the sidebar/top menu -> Hit Back Up Now, and let your device back up without any interference.
- Once your device is backed up, hit the Restore iPhone/iPad and wait until you have successfully restored the device.
- After that, you can follow the prompts to set your device as new.
27. Contact Apple Support
Haven’t been able to troubleshoot the frequent rebooting of your iPhone, contact Apple Support without any delay. I’m afraid, your iPhone might have run into some hardware-related issue that is forcing it to reboot. In this case, contacting the authorized service center is the better way to go.
Wrapping up…
Been there, done that, I must say that taking control of the resource-hogging features and updating the software troubleshoot the iPad/iPad that is rebooting time and time again – more often than not. If that doesn’t yield the desired result, replacing the worn-out battery gets the job done. Enough talk, let me the tips that have come to your rescue.
Read more: 16 Tips to Fix Rapid Battery Drain on Apple Watch in watchOS 11

What’s the point in using iPhone after disabling so many features!!!??
We can switch to android rather..