Even if you are a professional photographer, you would be the first one to admit that it’s not always easy to capture a stunning shot. Especially when you are dealing with a dimly lit environment. On the flip side, at times, over-brightness also destroys an otherwise good-looking image. Hence, it’s better to have the desired control over the brightness so that your photos can look pleasing to the eyes. Read on to learn how to adjust the brightness of photos on iPhone and iPad with enhanced control.
Adjust the Brightness of Photos in iOS 17 on iPhone and iPad
You can tweak the brightness not just while snapping shots but also while editing images during post-production. In this hands-on guide, we’ve discussed both the methods:
Fine-Tune the Brightness While Capturing Photos on iPhone and iPad
- To get started, launch the Camera app on your iPhone or iPad
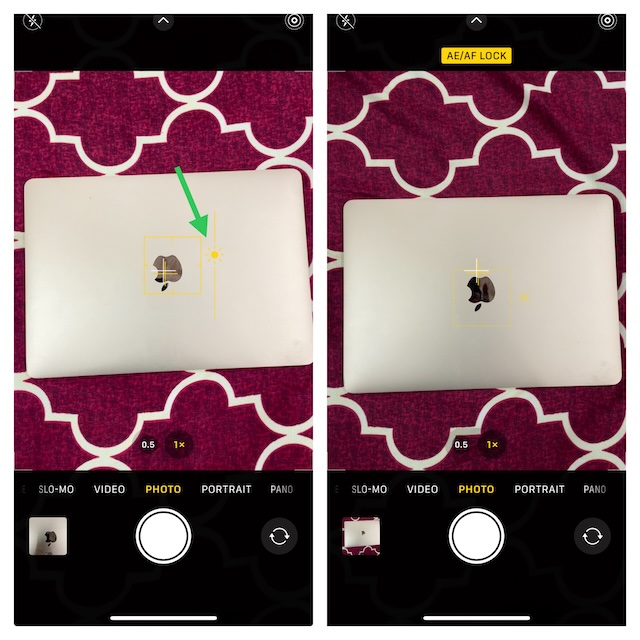
- Now, point the camera to the subject you would like to capture.
- Next, tap the screen at the spot where you wish to focus.
- Note that you can also lock the exposure for your future shots as well. To get it done, long-press the yellow box until the AE/AF Lock appears at the top of the screen.
- Next up, tap on the sun icon located to the right of the yellow box.
- Up next, a vertical slider will show up on the screen. After that, drag the sun icon up or down to perfectly adjust the brightness.
- When you are pleased with the brightness level, hit the shutter button to snap the image.
Fine-Tune the Brightness of Images in Photos App on iOS and iPadOS
If you find any image too bright or too dark, you can adjust it in the Photos app as well.
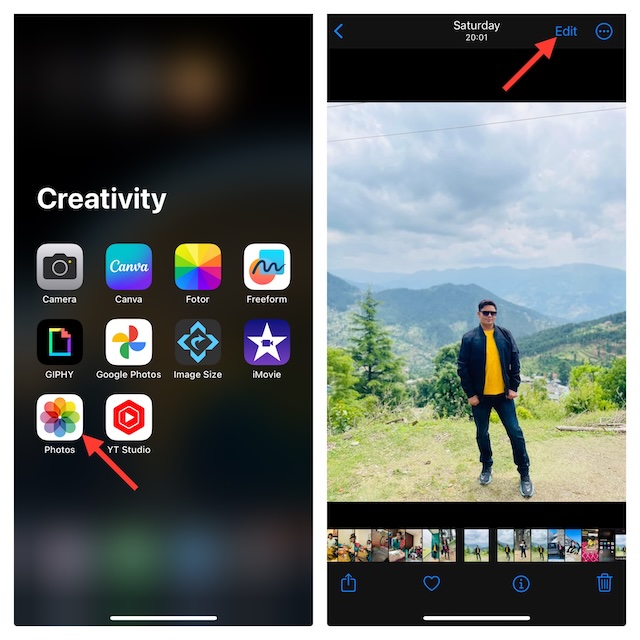
- First off, open the Photos app on your iPhone or iPad.
- Now, head over to the image in question.
- After that, tap on the Edit button at the top right corner of the screen.
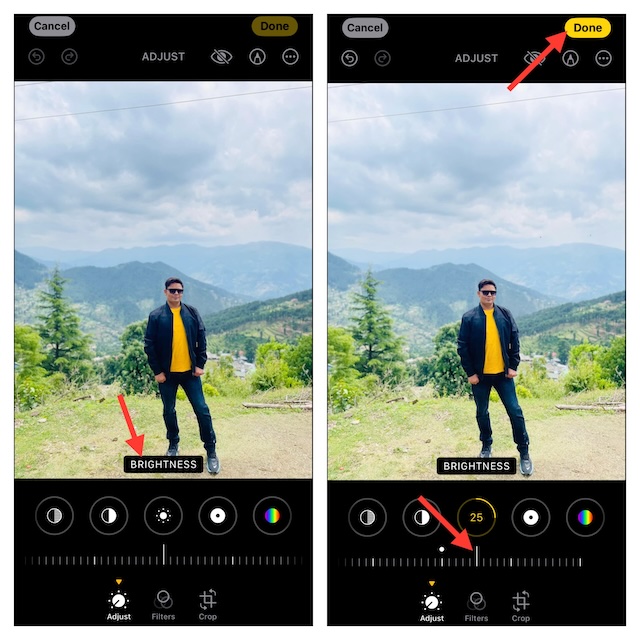
- Now, tap on the Adjust icon at the bottom of the screen.
- Next, swipe towards the left on the row of options to find the Brightness icon and tap on it.
- After that, drag the slider left or right to perfectly adjust the brightness of the image.
- When you are happy with the brightness of your image, tap on Done at the top right corner of the screen and you are good to go!
- That’s pretty much it! So, that’s how you can perfectly fine-tune the brightness level of any image on your iPhone.
- Later, if you ever want to revert the change due to any reason, open the Image -> tap on the Edit button -> then, tap on the red Revert button and confirm the action.
Wrapping up…
There you go! So, that’s how you tweak the brightness of images on your iOS device. I hope your photos will no longer look dull or completely washed out.
Read more: iPhone Slow After iOS 17 Update? 26 Tips to Speed Up iOS 17