If you need a top-notch video editor with all the basic tools and without having to sell out any bucks, iMovie is for you. One of my favorite features in this noted video editing app is the green-screen effect (also known as the blue-screen effect). You can get the most out of this tool to record a video in front of a green or blue backdrop and place it over another video, thereby creating an eye-catching effect. For instance, you can record your friend singing in front of a blue backdrop and then superimpose that video over a clip showing clouds so that your friend will appear to be singing in the clouds. Sounds interesting? Let me show you how to use green screen effect in iMovie on Mac.
How to Create Green Screen Effect in iMovie on Mac
Before getting started, you should know that if the subject of your video is green or is sporting green, make sure to record it in front of a blue background. And if the subject of your video has a blue backdrop, be sure to record it in front of a green background.
It’s also important to point out upfront that the audio from the original clip and the audio from the green-screen or blue-screen clip play at once. iMovie lets you reduce the volume of either clip to ensure everything is in accordance with your preference.
Step 1. First off, open the iMovie app on your Mac.
Step 2. Now, choose a clip or range in the timeline that you have recorded against a green or blue backdrop. Then, drag it above a clip in your project.
Step 3. When the green Add icon “+” button appears, release the mouse button.
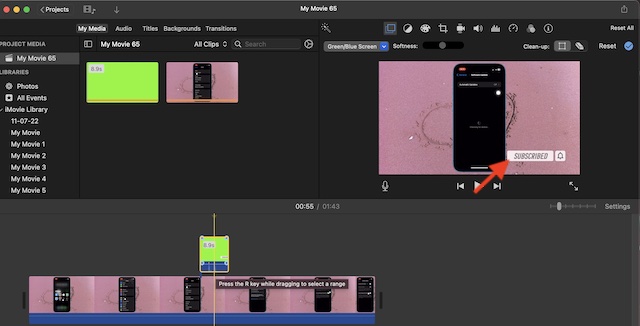
Step 4. Just in case the video overlay controls don’t appear, click on the Video Overlay settings icon.
Step 5. Next, click on the pop-up menu on the left and select Green/Blue Screen.

Now, iMovie will instantly remove the green/blue backdrop of the clip and the video below will show through the areas that were green or blue, thereby making a nice composite image.
Keep in mind that if the frame below the playhead isn’t in sync with the rest of the clip, you might have to reposition the playhead and reapply the effect. In order to reposition the green-screen or blue-screen clip, just drag it to a different spot within the clip or to another clip. Besides, you can shorten or lengthen it by dragging the ends.
Step 6. If you are ready to apply the changes, click the Apply button in the Green/Blue Screen controls.
Adjust Green-Screen or Blue Screen Effect in iMovie on Mac
What’s more, you can also customize the green-screen effect so that it looks perfectly in line with your taste.
Step 1. In the iMovie app, choose a green-screen or blue-screen clip in the timeline.
Step 2. After that, click on the Video Overlay Settings icon.

To adjust the softness of the edges of the superimposed clip
- Just drag the Softness slider.
To isolate areas of the green-screen or blue-screen clip
- Click the Crop button. After that, drag the corners of the frame to isolate the subject in the foreground clip.
To clean up areas of the green-screen or blue-screen clip
- Click the Clean-up button. Then, you need to drag across stray parts of the green-screen/blue-screen clip.
- Note that whenever you drag, iMovie uses the new selection to figure out what should be cleaned up.
Pro Tip:
- I would recommend you set Softness before clicking the Clean-up button. It is because if you adjust Softness after using the Clean-up button, it will reset the background clean-up selection.
Step 3. When you are happy with your video, click the Apply button in the Green/Blue Screen controls.
To check out this effect in action, watch the video below:
Signing off…
There you go! So, that’s how you can enable and customize the green screen effect in iMovie on your Mac. Hopefully, you can now use it with the desired precision. If you have any doubts or questions, make sure to let us know via the comments section below.