Before iOS 14, an app could access and use your local network (also known as the home network) without restrictions whatsoever. While some apps needed to use your local network to deliver a more personalized experience, others, especially the data-hungry apps would access it without any obvious reason. Keeping privacy in mind, Apple has introduced a neat way to manage local network on iPhone and iPad. Not sure how it’s done? Read on as I show you how to allow or disallow apps from having access to your home network on iOS and iPadOS.
How to Manage Local Network on iPhone and iPad
Before moving ahead, let’s sort out some important questions.
What is Local Network?
A local network is a data communications network within a home or office. It’s also known as a local area network or LAN. TCP/IP, Ethernet, and Wi-Fi are the local network standards.
Why do Apps Want to Access Your Local Network on iPhone or iPad?
Apps that have got access to your local network can collect information about nearby devices to find out which networks you join and when. Using this information, they create a profile of you in order to deliver a more personalized experience. For instance, a streaming app might want to access your local network in order to determine a connected display or a game may need to find and connect to other players on the same network to amp up the gaming experience.
How Do iOS and iPadOS Allow You to Manage Local Networks?
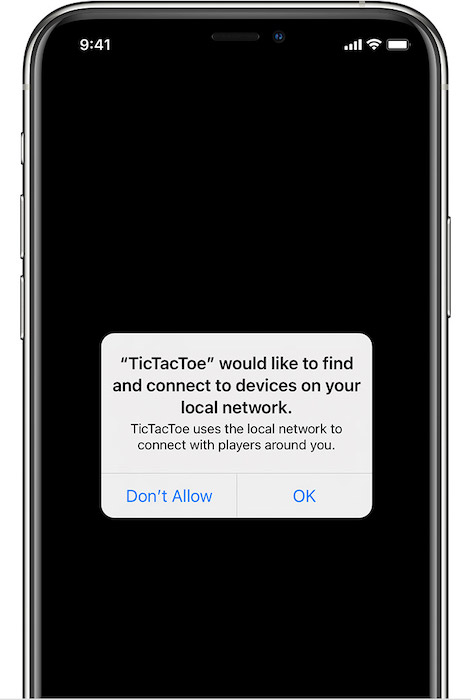
Any app that wants to interact with devices on your network needs to ask for your permission the first time it tries to access your local network. Through a popup alert, the app must explain why it would like to browse your network. Then, you can choose to allow or disallow the app to use your network. Keep in mind that the app can still use the internet or even interact with the local network with the help of a system service such as AirDrop, AirPlay, HomeKit, AirPrint, etc.
To ensure you have the desired control over apps, iOS also offers a dedicated setting where you can keep a track of all apps that are using the network and choose to revoke access as per your needs.
Manage Local Network on iOS and iPad
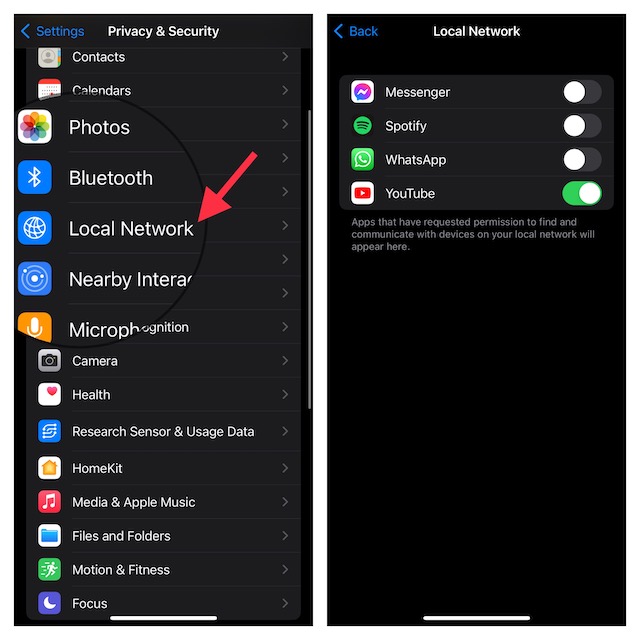
- Head over to the Settings app on your iPhone or iPad.
- Now, scroll down and choose Privacy & Security (in iOS 15 and iOS 14, select Privacy).

- Next, select Local Network.
- On this screen, you should see the list of all apps that are using your network.
- If you want to stop a specific app from using your network, just turn off the toggle next to it.
- And if you wish to completely turn off the local network on your iPhone or iPad, turn off the toggles for each app.
And that’s about it!
Wrap up…
So, that concludes this article about managing local network on iOS. Hopefully, you have now got a clear understanding of how this privacy feature works. However, if you still have any doubts, let me know via the comments below.
Read more: Pro Digging: 50 Best iOS 16 Hidden Features You Need to Know!