Whether you want to snap a screen or wish to record the screen to create a hands-on tutorial or share it with your loved ones, “Snipping Tool” comes in handy. By and large, it works as expected. However, a number of users have recently complained about the Windows 11 snipping tool not working problem. If you have also found yourself on the wrong end of this Windows issue, this guide has got you covered with reliable tips and tricks. Read on…
How to Fix Windows 11 Snipping Tool Not Working
What could be preventing the Snipping Tool from functioning properly on your PC? If you are new to Windows, I suspect the lack of clarity about how it works might be hurting your experience. Beyond this basic thing, I won’t rule out the possibility of software glitches either.
1. Find Out How the Snipping Tool Works on Windows.
Before moving ahead, I would like to put some light on how the Snipping Tool works on Windows. Note that when you capture screenshots on your PC, they are automatically saved in a folder called “Screenshots”. So, you will need to go there to access your screengrabs.
- When attempting to record your Windows screen, you will need to keep a couple of key things in mind. Once you have invoked the Snipping Tool (Shift+Ctrl+S), make sure to select the tiny video icon.
- After that, you need to first select the portion of the screen that you would like to record and then hit the screen recording icon.
- Once you have successfully recorded the screen, click on the stop button -> hit the tiny “save” icon at the top right -> select the desired location and save the recording.
2. Force Quit the Snipping Tool
On quite a few occasions, I have managed to fix the ill-functioning Snipping Tool by just force-quitting it. Therefore, I would like to give this nifty solution a chance as well.
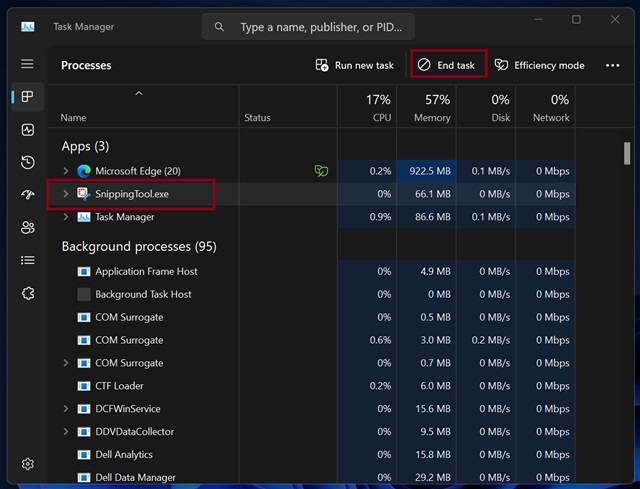
- Press the Ctrl+Shift+Esc keys to access the Task Manager -> Select the Snipping tool in the left sidebar and hit End Task at the top.
- Now, launch the Snipping Tool app and try to take a screenshot to figure out if the problem is gone.
3. Restart Your Computer
For a handful of Windows users, rebooting the computer has done the trick and brought the Snipping Tool back into action. Considering the fact that rebooting is dead simple and easy to perform, we should go for it as well.
- On your Windows computer, click on the power icon -> Restart.
- After your computer has restarted, check out if the Snipping Tool has begun to function as expected. If it has, you have gotten the better of the problem.
4. Check Your Storage
While this solution might seem to be a bit weird, you shouldn’t fail to check it off. If your PC is cluttered with space or hardly has enough storage to accommodate new files, it could very well be spoiling your party.
- Launch the Settings app on your computer -> System -> Storage -> Clean up the clutter to recover as much storage as possible.
5. Update Your Computer
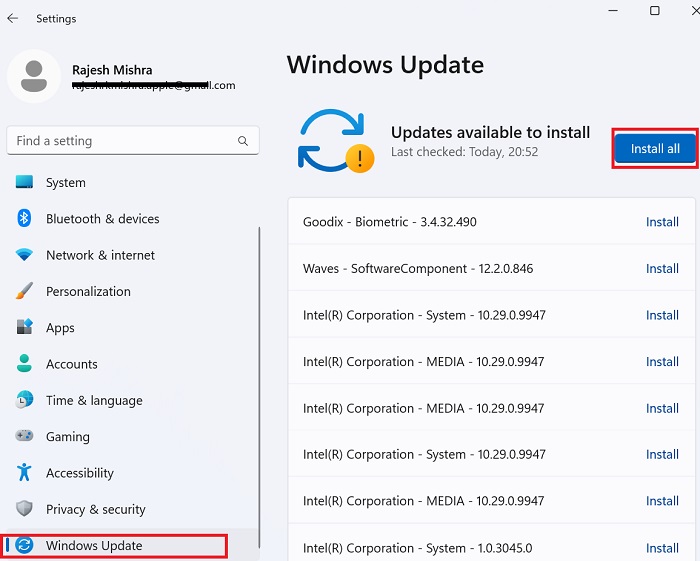
If your computer is stuck with an outdated version of the software, there is a decent chance that the outdated version is making life difficult for the Snipping Tool. Bother not! If it is related to a bug, updating Windows will likely resolve the problem.
- Open the Settings app on your PC -> Windows Update -> Check the updates and download and install the latest version of Windows.
6. Update Your Graphics Driver
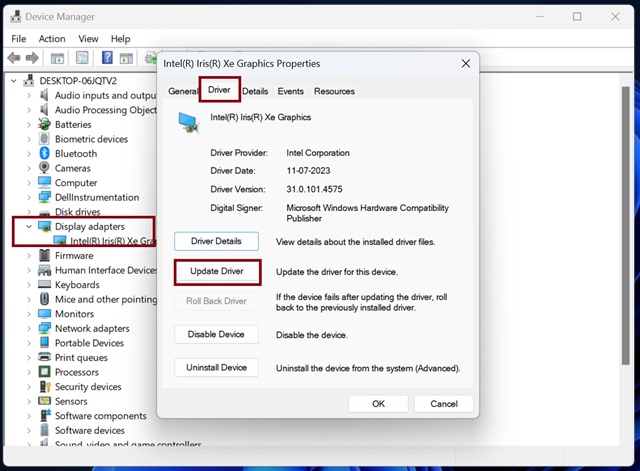
An outdated graphics driver has a long history of ill-functioning and even causing miscellaneous issues.
- Use the Win+X keyboard shortcut to access the Quick Links menu -> Select Device Manager in the menu.
- Now, click on the arrow that appears to the left of Display Adapters -> Choose your graphics driver.
- Select the Driver tab at the top -> Now, hit the Update Drive button.
7. Run DISM Scan
DISM (Deployment Image Servicing and Management) scans have often proved pretty handy in fixing persistent Windows issues. Hence, you can bank on this noted troubleshooter to deliver the goods and resolve the Snipping Tool issues on your PC.
- To get going, type in CMD in the search bar on your PC > select “Run as administrator” -> click on Yes in the prompt to continue.
- Then, you need to enter the following commands one by one and press enter.
DISM /Online /Cleanup-Image /CheckHealth
DISM /Online /Cleanup-Image /ScanHealth
DISM /Online /Cleanup-Image /RestoreHealth
8. Reset the Graphics Driver
If the “Snipping Tool” has continued to malfunction on your Windows device, try resetting the graphics driver.
- To get started, press the Win+X keys to launch the Quick Links menu -> Select Device Manager in the menu.
- Hit the arrow that shows to the left of Display Adapters -> Select your driver -> Select the Driver tab at the top -> Uninstall Driver.
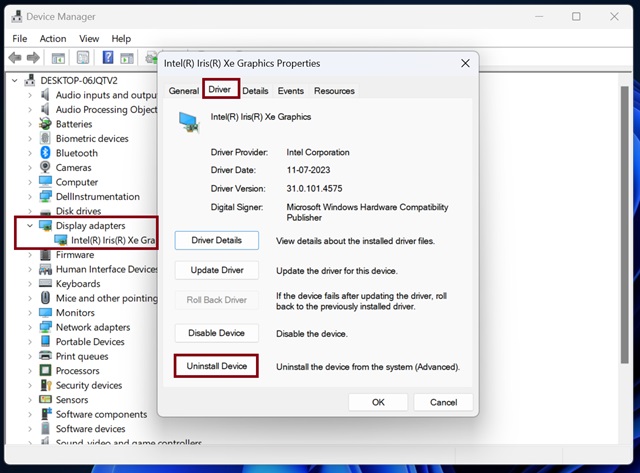
- Now, restart your computer. As Windows will automatically reinstall the updated version of graphics driver during reboot, you don’t need to worry about it at all.
Now, bring up the Snipping Tool to check if it has begun to work as expected. Hopefully, it would let you snap your screen without any hassle at all. Do let me know your feedback and the tips that have shot out this Windows problem.
Read more: 21 Tips to Use Windows 11 Recall on Copilot+PC Like a Pro