First introduced in iOS 11, Screen Recording has long been a notable feature. What makes it so handy is the ability to let you record anything that shows on your screen and share the recording with anyone. Whether you want to help a friend fix any issue or show a pretty neat hack on Instagram, it will come into play. That’s cool! But what if you have decided to shield this feature and no longer want to let anyone use it, whether for privacy or any personal reason? Fret not! There are 2 quick ways to disable screen recording on iPhone and iPad.
Quick Ways to Disable Screen Recording on iPhone and iPad
It’s worth pointing out that in this guide we have discussed both the temporary and permanent ways to restrict the screen recorder on iPhone. Hence, you can choose the desired method depending on your needs.
How Do You Restrict Screen Recording on iPhone and iPad?
Using Screen Time, the built-in parental control feature, you can easily block screen recording on your iOS or iPadOS device. Should you need to restrict it permanently, Screen Time has got you fully covered. However, if you just need to disable the screen recorder temporarily, there is a neat way as well.
Remove Screen Recorder from Control Center on iPhone and iPad
If you want to disable screen recording temporarily, remove it from the Control Center.
- Go to the Settings app on your iPhone or iPad -> Control Center -> find Screen Recording and then tap on the red minus button to the left of it -> hit Remove.

Use Screen Time to Permanently Disable on iPhone and iPad
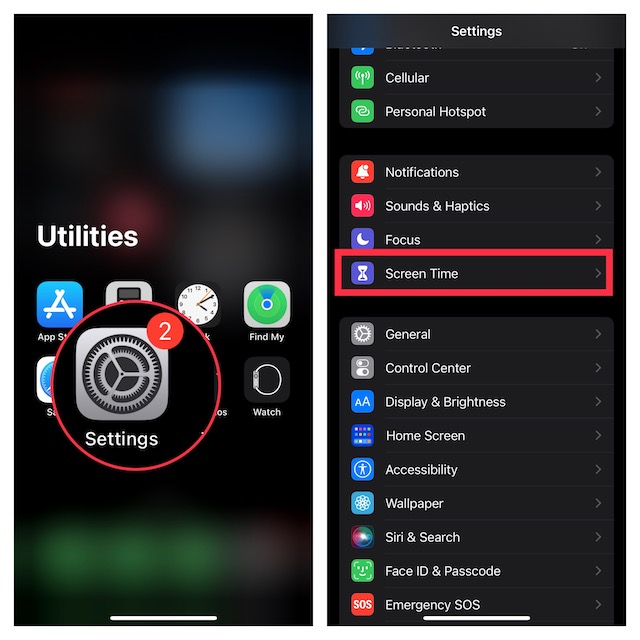
- Navigate to the Settings app on your iPhone or iPad -> Screen Time.
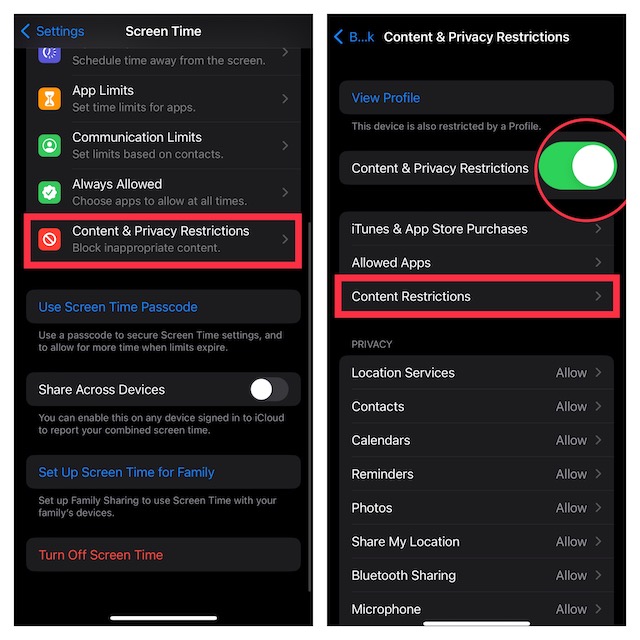
- After that, tap on Content & Privacy Restrictions -> Now, turn on the toggle for Content & Privacy Restrictions -> Content Restrictions.
- Then, head over to the Game Center section and hit Screen Recording and then choose Don’t Allow.
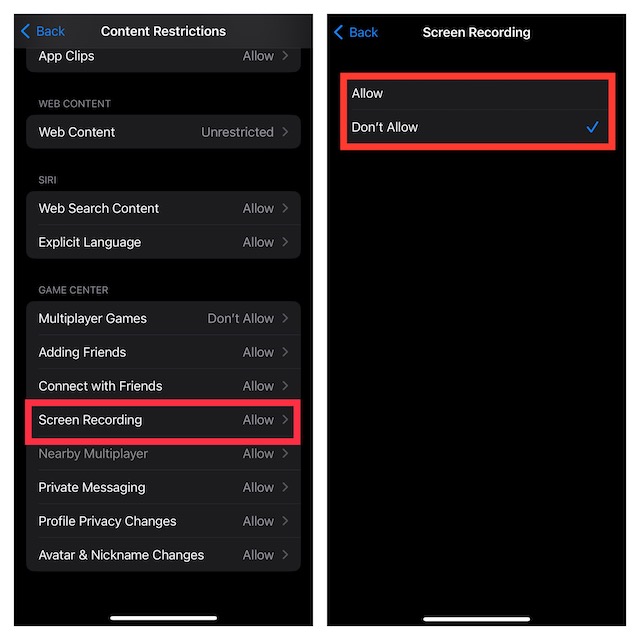
There you go! The change will come into effect immediately and will block the Screen Recorder on your device.
Frequently Asked Questions
Q 1. How do you add the screen recorder to Control Center on iPhone?
Navigate to the Settings app on your iPhone -> Control Center. Under the More Controls section, find Screen Recording and then tap on the “+” button to the left of it.
Q 2. How do you turn on the microphone for screen recording on iPhone?
Bring up the Control Center by swiping down from the top right corner of the screen or swiping up from the bottom edge of the screen. After that, touch and hold the screen recording icon and then hit the microphone icon to turn it on.
Wrap up…
There you go! So, these are the 2 quick ways to block screen recording on iPhone and iPad. I guess you are now fully aware of how these hacks work. Let me know your feedback via the comments section below.