One of the lesser-known yet pretty handy iOS features is the ability to transfer eSIM between iPhones faster and more conveniently. While iOS could let you transfer eSIM before, the process was not straightforward. What has made the difference in the latest iteration of iOS is the use of Bluetooth which makes the whole process a painless affair. Unfortunately, some users can’t transfer eSIM between iPhones. If you have also found yourself on the wrong end of the issue, these tried and tested tips will rescue you. So, let’s jump right in!
Tips to Fix eSIM Transfer Not Working Between iPhones in iOS 17
To get started, I would recommend you first double-check each essential requirement. Maybe you have failed to spot an important requirement and hence aren’t able to move the eSIM from your previous iPhone to the new one.
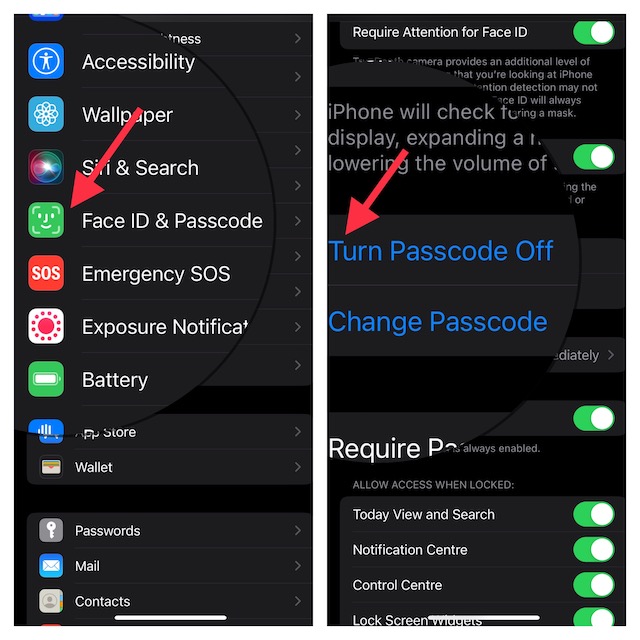
1. Make Sure Your iPhone is Passcode Protected
Yeah, you read that right! If you have not set a passcode on your iPhone, you won’t be able to move the eSIM to the new iPhone. Therefore, make sure to get it done without fail.
- Head into the Settings app -> Face ID/Touch ID & Passcode and set up a strong passcode.
2. Keep Your iPhone Unlocked
Your iPhone needs to be unlocked for being able to transfer eSIM.
- Navigate to the Settings app -> Display & brightness -> Auto-Lock and choose a bit longer time to prevent your iPhone from locking automatically.
3. Keep Your iPhone Near
Be sure to keep your iPhone near, knowing that Bluetooth is required for the transfer of the eSIM.
4. Ensure That Bluetooth and Wi-Fi are Enabled
Go to the Settings app on your iPhone and make sure that Bluetooth is active. Alternately, swipe down from the top right corner of the screen or swipe up from the bottom edge of the screen and tap on the Bluetooth icon to turn it on.
5. Disable/Enable Bluetooth
Since Bluetooth plays a vital role, soft reset it to fix any random glitch that may have cropped up.
- Open the Settings app on your iPhone > Bluetooth and then turn it off.
- Now, restart your iPhone.
- On iPhone with Face ID: Press and hold the volume up/down button and the power button at once. Then drag the power off slider to shut down your iPhone. After waiting for a few moments, press the side button to restart your iPhone.
- On iPhone with Touch ID: Press and hold the power button and the side button at once and then drag the power off slider to turn off your device. Then press the side button again to reboot your device.
Once your iPhone has rebooted, go to the Settings app > Bluetooth and then turn it on.
6. Disable/Enable Wi-Fi on Your iPhone
As Wi-Fi also plays a vital role in transferring eSIM, try turning it off/on.
- On your iPhone, head into the Settings app -> Wi-Fi and then turn off the toggle.
- Then, reboot your device.
- After your device has restarted, return to the Settings app and then turn on Wi-Fi.
Note:
- iPhone 14 models, which are equipped with eSIM, can activate without a Wi-Fi network.
7. Hard Reset Your iPhone
Hard reset aka force restart is slightly more effective than the soft restart. What makes it more effective is the ability to clean up the temporary files, which often works wonders in fixing common issues.
- To do it, press and quickly release the volume up button. Then, press and quickly release the volume down button.
- Then, hold down the side button until you see the Apple logo on the screen.
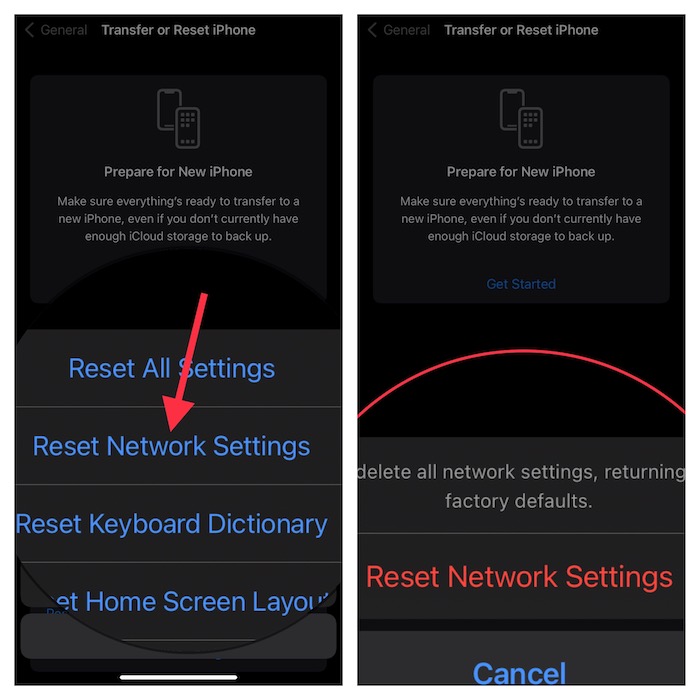
8. Reset Network Settings
If Bluetooth is not working properly on your iPhone, there is a good chance that it might be coming in the way. Luckily, you can resolve network-related issues by resetting the network settings.
- Head over to the Settings app on your iPhone -> General -> Transfer or Reset iPhone -> Reset -> Reset Network Settings and confirm the action.
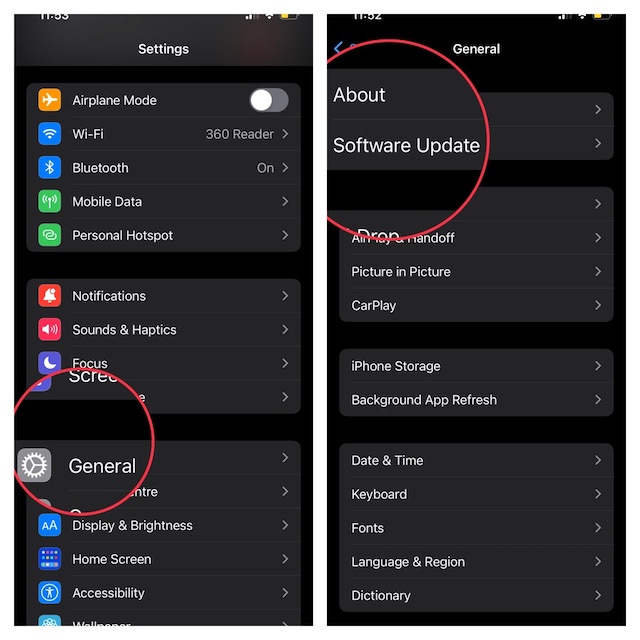
9. Update Software
If transferring eSIM between iPhones continues to be a hassle, go for the software update as there is a high chance that the issue could be due to a hidden software bug. Thus, updating the iPhone could help you get rid of the problem.
- Navigate to the Settings app on your iPhone -> General -> Software Update. Now, download and install the latest iteration of iOS as usual.
For more help, check out the video below:
Fixed the eSIM Transferring Issue on iOS
There you go! I hope you have finally resolved the eSIM Transferring problem. Would you like to let me know the tip that has worked for you? It would be great to know your feedback and the handy tip in the comments section below.
Read more: 10 Pro Tips to Fix Face ID Not Working in Landscape Mode