Times when you wish to work with the desired peace of mind, Do Not Disturb comes into play. What makes it so handy is the ability to silence notifications and calls so that you don’t get distracted by any random alerts. If you don’t want to miss out on important messages, you can allow notifications from your loved ones to bypass DND. Though this feature works as reliably as it can ever get, some users have complained that Do Not Disturb turning on automatically in iOS 17 on iPhone and iPad. If you have also found yourself on the wrong end of this frustrating issue, check out these 11 best tips to fix the Do Not Disturb mode getting activated automatically in iOS 17/iPadOS 17.
Fix Do Not Disturb Turning on Automatically in iOS 17 on iPhone and iPad
So, why is DND being activated without any rhyme or reason? To me, the biggest culprit of this issue appears to be the wrong configuration. Maybe you had set up DND on your Mac and chose to sync it across the connected devices. Perhaps, you had paired one of your favorite Lock Screens with DND or set it up to automatically activate at a specific location or time. Having gone into the root of the issue, we have suggested solutions that are more likely to get rid of it.
Note:
- It’s important to inform you that we’ve updated this in-depth guide in accordance with iOS 17. However, most of these tips also work with the older versions of iOS as well.
For a seamless experience, iCloud automatically syncs the Do Not Disturb status across connected devices such as iPad and Mac. Make sure to stop your device from sharing the DND status across devices.
On iPhone or iPad
- Go to the Settings app on your iPhone or iPad -> Focus.
- After that, turn off the toggle next to the “Share across devices”.
On Mac
- Head over to the System Settings app on your Mac -> Focus -> and then turn off the toggle next to Share Across Devices.
- Alternately, click on the Control Center icon in the upper right corner of the menu bar -> Focus -> Focus Settings -> and then turn off the toggle for Share across devices.
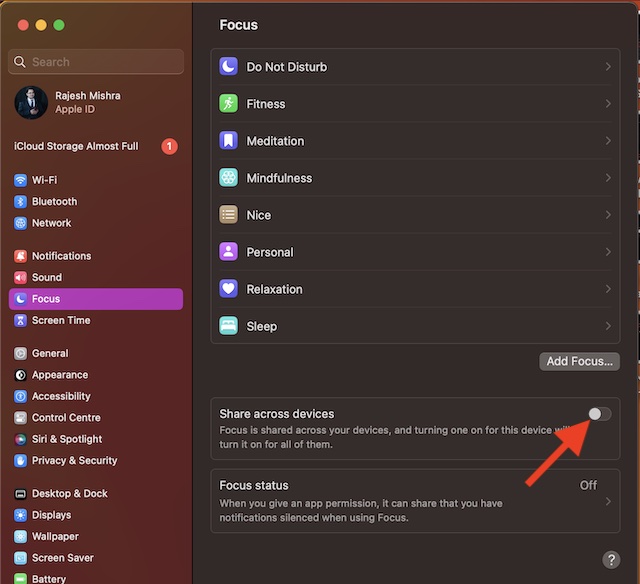
Going forward, iCloud won’t share your Focus status with other connected devices.
2. Turn Off the Do Not Disturb Schedule
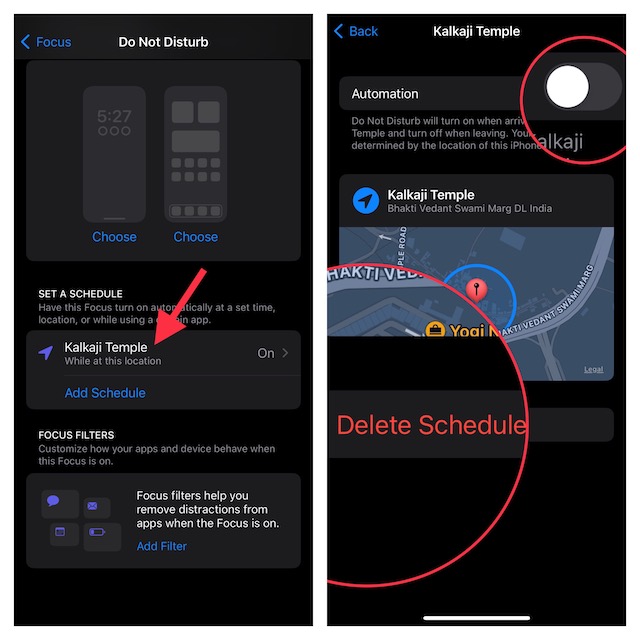
iOS allows you to activate Do Not Disturb automatically at a set time, location, or while using a specific app. If you have set the DND schedule, be sure to turn it off.
- To do so, open Settings on your iPhone -> select Focus -> Do Not Disturb.
- Now, select the schedule and turn it off. Just in case you don’t need the schedule anymore, delete it.
Hard Reset Your iPhone
Especially when facing a weird issue like the Do Not Disturb mode keeps activating automatically, I make it a point to try out the hard reset. Knowing the fact that it’s pretty safe and doesn’t harm any media or data, you shouldn’t miss out on this nifty but very effective solution.
- To begin with, press and release the volume up button.
- Press the volume down button. Now, immediately, press and hold the power button (or the top button on your iPad) until you see the Apple logo on the screen.
3. Unlink Focus from the Lock Screen
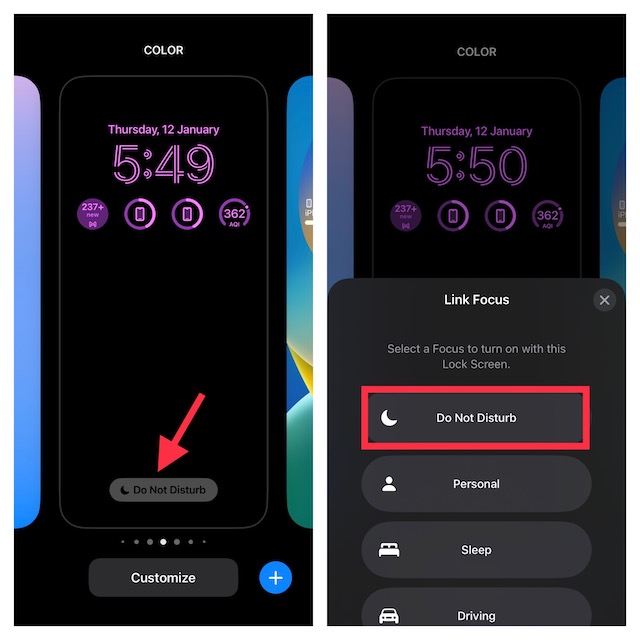
With iOS iOS 16 and iOS 17, you can link a Lock Screen with a Focus profile or Do Not Disturb. If you have paired your active Lock Screen with DND, this could very well be at the heart of the problem. Hence, try to unlink DND from the Lock Screen.
- Long-press on the lock screen to bring up the customization menu.
- Now, swipe to find the Lock Screen in question and then tap on the Do Not Disturb/Focus button at the bottom of the wallpaper.
- After that, hit the Do Not Disturb/Focus profile in the menu to deselect it.
- Then, tap on the “X” at the top right corner of the menu to finish.
4. Delete the Linked Lock Screen
If the Do Not Disturb mode still keeps turning on, I would recommend you delete the linked Lock Screen.
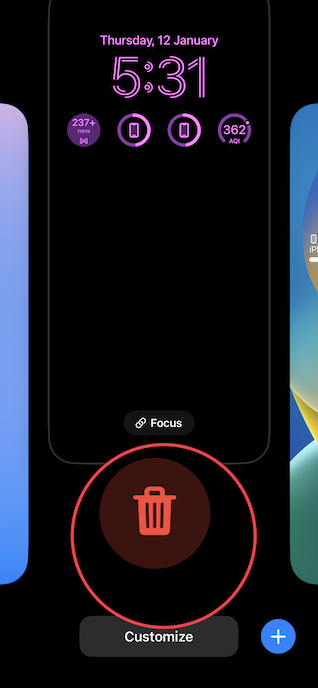
- Long-press on the lock screen to reveal the customization menu -> Swipe up on the Lock Screen and hit the delete icon to get rid of the Lock Screen.
5. Turn Off Do Not Disturb When Connected to CarPlay
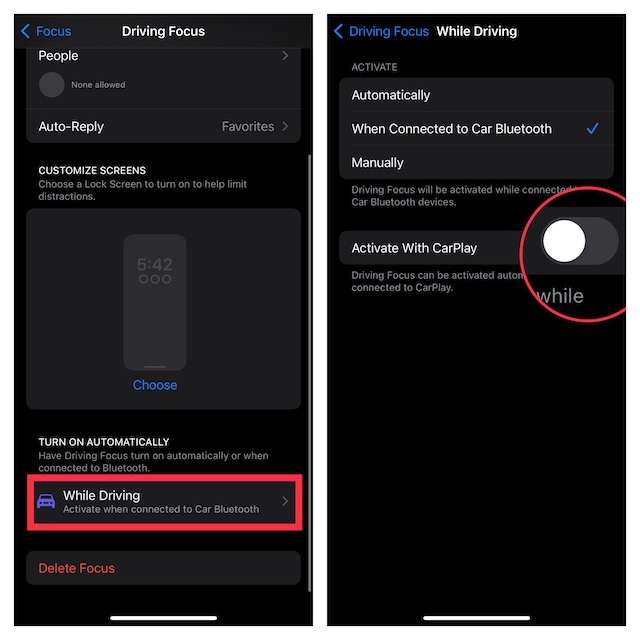
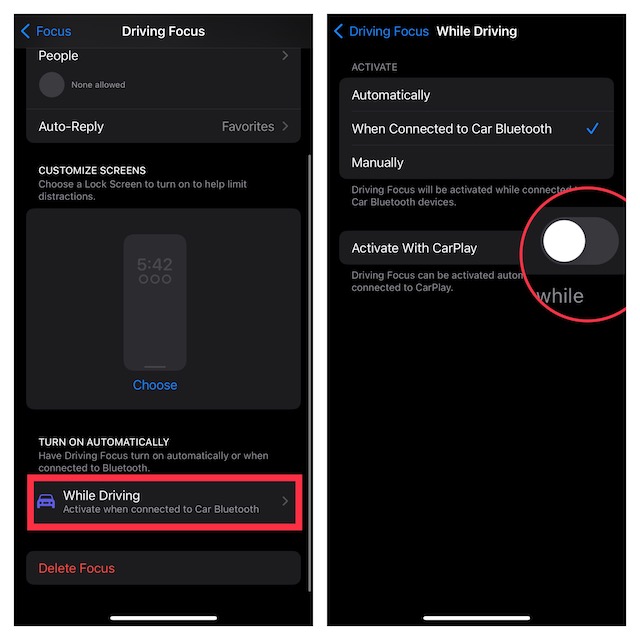
Driving Focus is designed to help you stay focused while driving by silencing notifications or customizing your screens and apps. If you have enabled Driving Focus (which also acts like Do Not Disturb), it might be causing the issue.
- Navigate to the Settings app on your iPhone -> Focus -> Driving -> While Driving.’
- Now, turn off the toggle for Activate With CarPlay.
6. Disable Do Not Disturb When Connected to Car Bluetooth
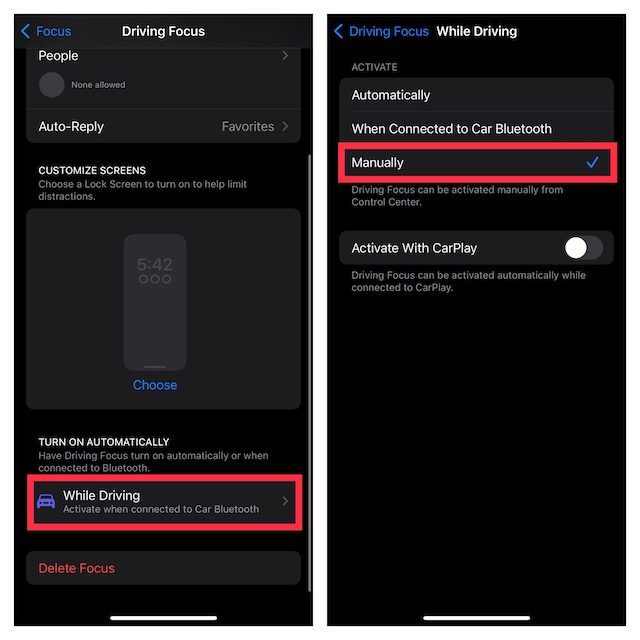
In order to keep distractions at bay while driving, iOS allows you to automatically activate Do Not Disturb when connected to your car Bluetooth. If you have enabled it, try turning it off as well.
- Head over to the Settings app on your iPhone -> Focus -> Driving.
- Now, tap on While Driving and choose Manually.
7. Delete Driving Focus
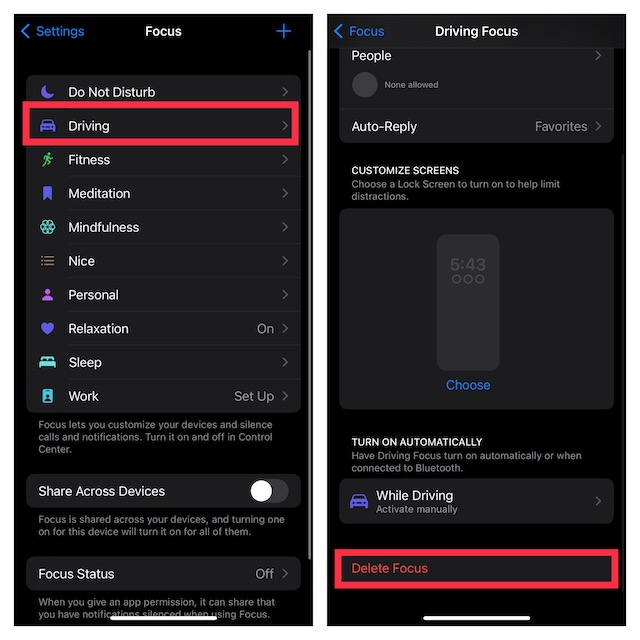
Should the problem persist, I would recommend you delete the driving focus.
- Open Settings on your iPhone -> Focus -> Driving.
- Now, tap on Delete Focus and confirm.
8. Update Software
If Do Not Disturb still gets activated on your iPhone, go for the software update. There is a high possibility that a software bug could be triggering the issue.
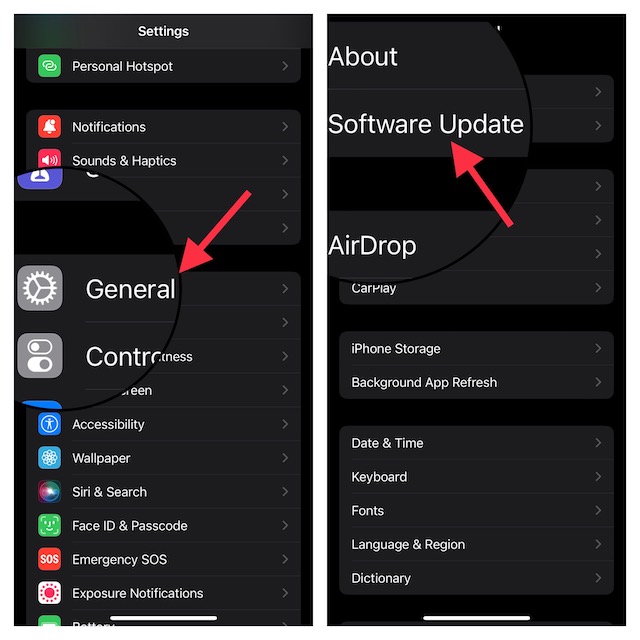
- Go to the Settings app on your iPhone or iPad -> General -> Software Update.
- After that, download and install the latest version of iOS or iPadOS.
10. Sign Out Of Apple ID and Sign Back In
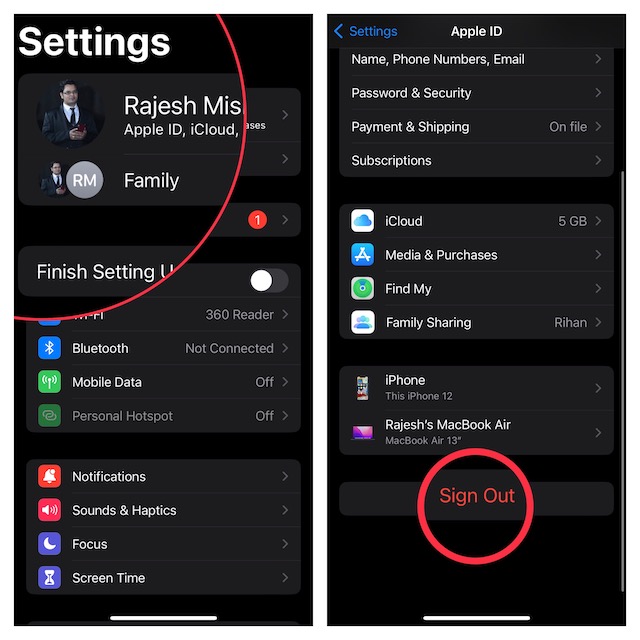
Should DND continue to trigger automatically, sign out of Apple ID and sign back in.
- On your iPhone or iPad, open the Settings app -> Apple ID -> Sign Out.
- Now, make sure to keep a copy of all the important data before signing out.
- After that, sign in with your Apple ID and password.
11. Factory Reset Your iPhone or iPad
For times when the Settings get messed up with accidental or unwanted configurations, it’s better to wipe out all the custom settings and go back to the default route.
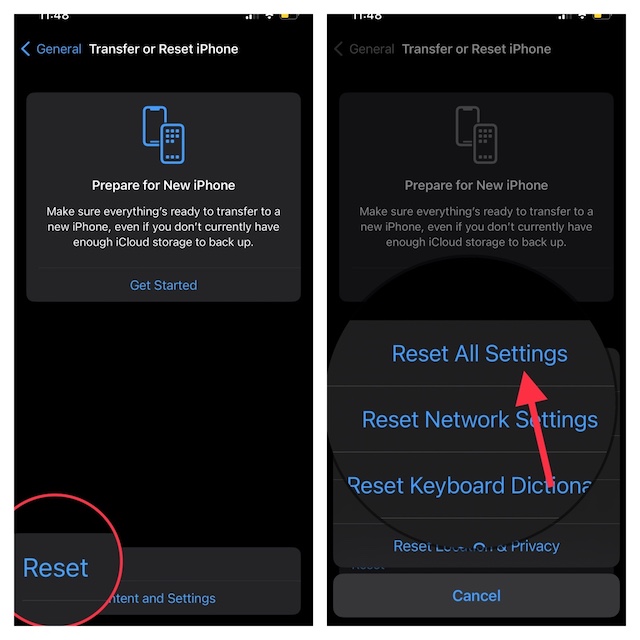
- On your iPhone or iPad, open the Settings app -> General -> Transfer or Reset iPhone/iPad -> Reset -> Reset All Settings.
Fixed the Do Not Disturb Keeps Turning ON Automatically in iOS 17
There you go! I hope you have taken control of the ill-functioning Do Not Disturb Mode. Now that you have resolved the issue, let me know the trick that has worked for you in troubleshooting DND on your iOS device.


You might want to check your wallpaper. I had added a photo I wanted to use as my wallpaper and finally noticed that every time I changed my wallpaper back to the photo I had added, it turned the DND on and when I would go manually turn it off, my wallpaper would go back to the preset one that came with the phone.
Thanks for posting this. Just got an iPhone 13 & the exact same thing is happening to me. Guess there’s no fix & we have to keep the factory set wallpaper.
Thanks for this. Tried all of this. Finally only thing that worked was deleting a particular Home Screen.
Most welcome! Glad that it worked for you! 🤩🔥
Do Not Disturb came on automatically on IOS 16 and there was no ‘off’ setting that I could find. After much reading and plenty of aggro, I set a schedule for a day on Focus, and then I was able to cancel/delete the schedule. That seems to finally work. Weird.
I tried all these except the latest update as I had none and none of the others worked…so I did the old IT guy fix…turned it off and then on again. Do Not Disturb is gone for now. Will wait to see if it returns. And yes I added a pic for my screen so it might be that but it also was refusing to leave WiFi versus stay on the network. That too is gone…but again, I will see. This is my second SE because I like the size but it also a second very glitchy SE.
Just say, “hey siri, turn off do not disturb “.
Fixed my my problem in an instant after messing with it for a couple of days.
That did it,,,,,, asked and she turned it off!